Plant Anatomy - 2013
APPENDICES
Reagents for Color Identification Reactions
Test substance |
Reagent |
Reaction product color |
Starch |
1% solution of I2 in KI (Lugol's solution) |
Blue |
Fats |
Sudan III solution in glycerin |
Orange |
Fiber or Cellulose |
10.0 ZnCl2, 10.0 KI, 2.0 I2 in 15 mL H2O |
Blue |
I2 solution |
Yellowish- brown |
|
Acid fuchsin |
Red |
|
Cutin |
Sudan III solution |
Pinkish- orange |
Chlor-zinc-iodine solution |
Yellow |
|
Suberin |
Sudan III solution |
Pinkish- orange |
Concentrated potassium hydroxide solution |
Yellowing and Swelling of |
|
1% phloroglucinol solution with concentrated HCl |
Crimson |
|
Chlor-zinc-iodine + H2SO4 |
Yellow |
|
Aniline sulfate |
Lemon-yellow |
|
0.5% alcoholic safranin solution |
Red |
|
Biuret test; CuSO4 solution in KOH |
Purple |
|
Lugol's solution |
Yellow |
|
Heating in the presence of nitric acid (xanthoproteic reaction) |
Bright yellow |
|
Mucilage |
Methylene blue solution |
Light blue or blue |
India ink solution |
Light spots on a dark Background |
|
Mineral substances |
Phenol solution |
Pink |
Note 1. When performing the lignin identification reaction, first apply the phloroglucinol solution, and add the acid 1-2 minutes later. Once reddened, blot the excess acid with a strip of filter paper and transfer the sample into Water. Glycerin is used instead of water for slide preservation.
Note 2. In permanent mounts, the phloem (bast) stains light blue with chlor-zinc-iodine, which is indicative of living tissue; the xylem (wood) stains crimson with phloroglucinol solution and concentrated HCl or H2SO4, which is indicative of lignified tissue.
Plant-derived materials and reagents required for
practical classes
Class No. |
Raw material |
|
1 |
2 |
3 |
1. |
Onion scale leaves, Elodea leaves, rose hips, Tradescantia leaves, potato pieces, wheat, corn, and rice grains; pea and castor bean seeds (if available); aloe leaves, horse sorrel and belladonna petioles, outer onion scales, wood sorrel stems |
methylene blue solution, distilled water, chloral hydrate solution, Lugol's solution, test papers for Alkaloids and Tannins, and litmus paper. |
2. |
Onion or wheat roots (germinated in water in advance), elder twigs, pumpkin stems |
chloral hydrate solution |
3. |
Elder, iris, geranium, and mint leaves; elder and wallflower stems; flax seeds; nettle leaves; oak bark |
chloral hydrate solution, Sudan III solution |
4. |
Oak bark, pumpkin or sunflower stems, motherwort stems, elder stems, iris roots, valerian roots, linden petioles |
|
5. |
Corn stems, pumpkin stems, lily of the valley rhizomes, male fern rhizomes |
chloral hydrate solution |
6. |
Iris roots, marshmallow roots, valerian roots |
chloral hydrate solution |
7. |
Corn and rye stems, lily of the valley rhizomes |
chloral hydrate solution |
8. |
Yarrow, clover, sunflower, and motherwort stems; bergenia and mint rhizomes; elder stems |
chloral hydrate solution |
9. |
Iris or asparagus leaves, bay leaves, pine needles, Chlorophytum leaves |
chloral hydrate solution |
10. |
Leaves, stems, roots, and rhizomes of unknown plants (practical test); Module 1 Plant Anatomy Assessment |
Guidelines for Coloring Botanical Drawings in Laboratory Workbooks
When sketching microscopic observations, it is advisable to use colored pencils to indicate individual Cells as well as cell contents and Tissues as a whole. Specific cell and tissue types are conventionally represented by distinct colors, in particular:
Name of tissue cells or cell contents |
Drawing color |
Living epidermis |
Black |
Lignified epidermis |
Red |
Cork |
Brown |
Collenchyma |
Blue |
Chlorenchyma |
Green |
METABOLISM/14.html">Chloroplasts |
Green |
Lignified endodermis |
Red |
Endodermis passage cells |
Blue |
Living endodermis |
Black |
Starch grains |
Blue |
Living exodermis |
Black |
Lignified exodermis |
Red |
Passage cells |
Black |
Living pericycle |
Black |
Lignified pericycle |
Red |
Phloem (sieve tubes and companion cells) |
Blue |
Xylem (vessels) |
Red |
Xylem - lignified parenchyma |
Red |
Xylem - slightly lignified |
Black |
Cambium |
Black |
Microscopy RULES AND GUIDELINES
The Microscope should be stored in a case or under a Glass bell jar to protect it from dust. Before starting work, take the microscope out of its case (holding it by the curved part of the limb and placing it carefully on the workbench near your left shoulder) and wipe the eyepiece and objectives with a soft cloth. Next, set up optimal illumination for the specimen. To do this, rotate the nosepiece until the low-power objective clicks into place under the body tube. It is important that the objective is properly aligned and centered beneath the tube, otherwise part of the field of view will be darkened. The microscope field of view is the bright circle visible to the naked eye. Direct light using the concave mirror toward a light source (window, electric lamp). Avoid excessively bright light, as it can dazzle THE EYE AND cause temporary loss of visual sensitivity.
Material examined under the microscope must be very thin. A thick specimen blocks light, allowing only its outlines to be visible under the microscope.
Look through the eyepiece with your left eye while keeping your right eye open to prevent eye strain. Once the lighting is adjusted, do not move the microscope for the duration of the work, as this disrupts the illumination conditions. Examine the specimen first under low magnification. Without looking into the eyepiece, use the coarse adjustment knob to lower the objective until it is about 0.5 cm away from the stage, then look into the eyepiece and raise the tube until a clear image appears. An object's image in the microscope can only be observed when it is at the correct distance from the objective lens. This distance is called the focal length. At low magnification, the focal length is approximately 1 cm.
After examining the general appearance of the specimen under low magnification, you can switch to high magnification. To do this, secure the specimen with stage clips so that the feature to be examined at high magnification is centered in the field of view. Rotate the nosepiece to switch from the 8× to the 40× objective until it clicks into place. Ensure image clarity by slowly turning the coarse adjustment knob counterclockwise. The focal length at high magnification is approximately 1 mm. Use the fine adjustment knob only at high magnification once the specimen has already been focused. Operating the fine adjustment knob shifts the focus slightly, allowing you to examine the entire cross-section of the specimen. Keep the objectives clean during work and prevent any liquid from getting onto the lenses. Draw the diagnostic Features of the specimen in your workbook, which should be placed to the right of the microscope. Upon completing the work, switch the microscope back to low magnification before removing the specimen from the stage.
MICROSCOPIC ANALYSIS OF PLANT Materials
Microscopic analysis is the primary method for authenticating crushed, cut, powdered, or cut-pressed herbal medicinal materials.
The technique for preparing microscopic slides varies depending on the morphological group of the studied object and the physical state of the raw material: whole, crushed, cut, or powdered.
When studying whole, uncrushed objects, various preparation Methods are used depending on the morphological group of the raw material. Delicate, easily cleared Organs such as leaves, flowers, non-lignified stems, etc., are usually examined in surface view. For roots, rhizomes, bark, seeds, and coarse, leathery leaves, transverse and longitudinal sections or scrapings and coarse powders are prepared; isolated tissue mounts obtained after maceration are also used.
All microscopic preparation techniques are designed to reveal distinct structures that are clearly visible under the microscope. This is facilitated by staining the slides and treating them with various liquids.
Mounting and clearing liquids. Both mounting (inert) and clearing (non-inert) liquids are used to prepare microscopic slides. Mounting liquids do not react with the test object and serve solely as a viewing medium. Water and glycerin are Examples of mounting liquids. Compared to other liquids, water alters the specimen the least: the shape and size of cells, as well as tissue Structure and coloration, remain unchanged; calcium oxalate crystals and starch grains are clearly visible, aleurone grains disintegrate, fatty oils coalesce into large droplets, and mucilage dissolves, while tissues remain dark and difficult to distinguish. Glycerin is typically used diluted with water in a 1:2 ratio, with The addition of a small piece of camphor or a crystal of carbolic acid. Undiluted glycerin tends to absorb water from tissues, causing them to shrink and deform. Tissues do not dry out for a long time in a glycerin solution. In addition, glycerin has weak clearing properties.
Non-inert liquids include solutions of potassium or sodium hydroxide, phenol, and hydrogen peroxide. Potassium or sodium hydroxides are used as 3-5%, or less frequently 10%, aqueous solutions. Solution concentration and exposure time depend on The properties of the object. Prolonged exposure causes starch grains to swell and gelatinize; fats are saponified, proteins dissolve, and darkly pigmented tissues become transparent. The disadvantage of alkalis is that they cause cells to swell excessively and rupture easily under pressure. Phenol rapidly penetrates tissues, displacing air from the object, causing starch grains to swell and dissolve; droplets of fatty and Essential Oils initially enlarge and then gradually dissolve; protein substances, chlorophyll, and other inclusions are destroyed; pigmented tissues become lighter; crystals remain unchanged though poorly visible. A 3% hydrogen peroxide solution is used as a clearing agent. Higher concentrations can also be used for slide maceration, i.e., isolating various elements (conducting and mechanical tissues, etc.).
Herbal medicinal materials must be softened using various methods prior to microscopic examination.
Cold softening. Coarse plant parts—bark, fruits, seeds, underground organs, coriaceous leaves—are immersed in a mixture of glycerol and 96° alcohol (1 : 1) and left until the tissues are fully penetrated by the liquid. This preparation method is quite slow (ranging from several days to several weeks, depending on the thickness of the object and its structural features), but it is highly effective as the tissues are completely freed from air and partially cleared.
Flowers and non-coriaceous leaves can be placed in a water-glycerol mixture (2:1), a mixture of water, glycerol, and 96° alcohol (1 : 1 : 1), or simply in water for 1–5 days. After soaking, the specimens are transferred to 96° alcohol with a small amount of glycerol to firm up the tissues.
Material can also be softened in a moist chamber. For example, water is poured into a desiccator, and the raw material is placed inside in such a way that it does not come into direct contact with the water, but is moistened and softened by the vapor in the chamber atmosphere. To prevent mold growth, a small amount of carbolic acid is added to the water.
Hot softening. Small pieces of raw material are boiled in water (bark for 3–5 min, underground organs for 20–30 min). Fruits and seeds are softened by steaming. To do this, the material is placed in gauze, tied, and suspended so that it is exposed to steam without being immersed in water. Steaming takes 15–30 min, depending on the hardness of the object.
To soften and clear flowers and herbs, pieces of the material are boiled in a 3–5% sodium or potassium hydroxide solution for 2–5 min, depending on the thickness and density of the object (over-softening must be avoided). After boiling, the material is rinsed thoroughly with water 2–3 times, discarding the water each time. The treated material is then transferred to a Petri dish or an evaporating dish, left in water, and used to prepare a microscope slide.
Maceration and tissue isolation techniques. The specimens are boiled in a 3–5% sodium hydroxide solution for 30 min, after which the tissues are separated using a dissecting needle.
To prepare a microscope slide, clean and dry glass slides and coverslips must be used. Using a dissecting needle, the prepared specimen is placed on the glass slide in a drop of reagent and covered with a coverslip. Careless placement of the coverslip may cause air bubbles to form, which appear as dark spots under the microscope. Therefore, the coverslip should be applied at an angle: first, Touch one edge of the coverslip to the drop of reagent, and then, holding it with a needle, gently lower it completely onto the slide. If air bubbles do form, they can be removed by gently tapping the coverslip with the blunt end of a needle or by warming the slide slightly over a spirit lamp flame (heating is permissible only if the specimen contains no heat-sensitive substances). If there is an excess of liquid used for slide preparation, it can be removed with a strip of filter paper applied to the edge of the coverslip. If the liquid does not completely fill the space between the slide and coverslip, additional drops can be added near the edge of the coverslip, underneath which it will quickly flow by capillary action.
GT1 • • •
Technique for preparing temporary microscope slides
1) From leaves, herbs, and flowers
When examining whole crude material, select pieces of the leaf blade including the margin and vein; for herbs, take a leaf, sometimes a piece of the stem, and a flower; for flowers, take the calyx and corolla. When examining cut crude material, take several different representative pieces.
Clear the raw material as follows: place several pieces into a flask or test tube and boil for 1–2 min in a 5% sodium hydroxide solution pre-diluted 1:1. Then, carefully pour the liquid into a Petri dish or evaporating dish. Using a scalpel (or spatula) and a dissecting needle, remove the pieces from the water and place them on a microscope slide in a drop of glycerol solution.
Divide the cleared piece of material into two parts using a scalpel or dissecting needle. Gently invert one of the parts so that the specimen can be studied from both top and bottom. Cover the specimen with a coverslip, warm it slightly until air bubbles are completely removed, and, after cooling, examine it under the microscope—first at low magnification, and then at high magnification. When preparing slides from thick leaves, pre-crush them slightly with a scalpel.
When examining a stem, boil pieces in a 5% sodium hydroxide solution, rinse thoroughly with water, remove the epidermis with a scalpel or dissecting needles to examine its surface; from other tissues, prepare a mount by crushing the object with a scalpel on a microscope slide in a glycerol solution.
To obtain cross-sections of leaves and stems, pre-soak the material in water, then place it in a water–glycerol–water mixture (1:1:1) for several days. Place the prepared material between two pieces of elderberry pith and cut cross-sections using a straight razor or a safety razor blade. Transfer the sections to a drop of glycerol solution on a microscope slide, cover with a coverslip, warm slightly to remove air bubbles, and, after cooling, examine under the microscope.
Main diagnostic features of leaves:
— epidermis characterized by specific cell shapes (with straight or sinuous lateral walls, thin or thickened cell walls, etc.);
— presence, nature, and thickness of the cuticle layer;
— shape of Stomata (Fig. 12), their distribution (on one or both sides of the leaf), and The Nature of the surrounding epidermal cells;
— presence of hydathodes;
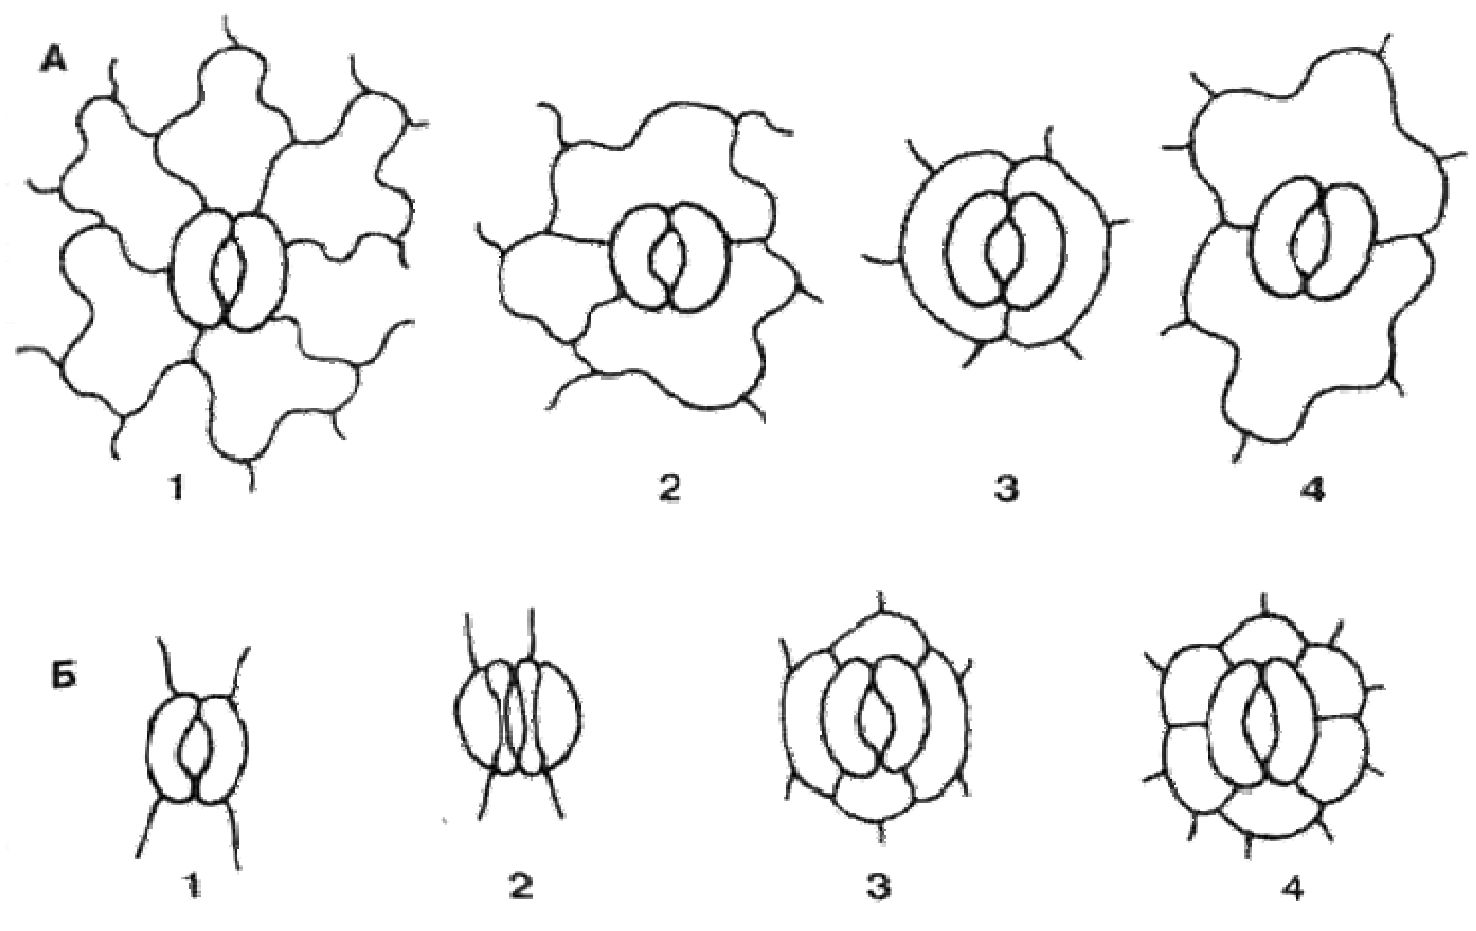
Fig. 12. MAIN TYPES OF stomatal complexes
A — Dicotyledons: 1 — anomocytic; 2 — anisocytic; 3 — paracytic; 4 — diacytic. B — Monocotyledons: 1 — aperinogenic; 2 — biperinogenic; 3 — tetraperinogenic; 4 — hexaperinogenic
- trichomes (Fig. 13) are a characteristic diagnostic element of leaves due to their diverse forms (unicellular, multicellular, capitate, tufted, branched, retort-shaped, etc.);
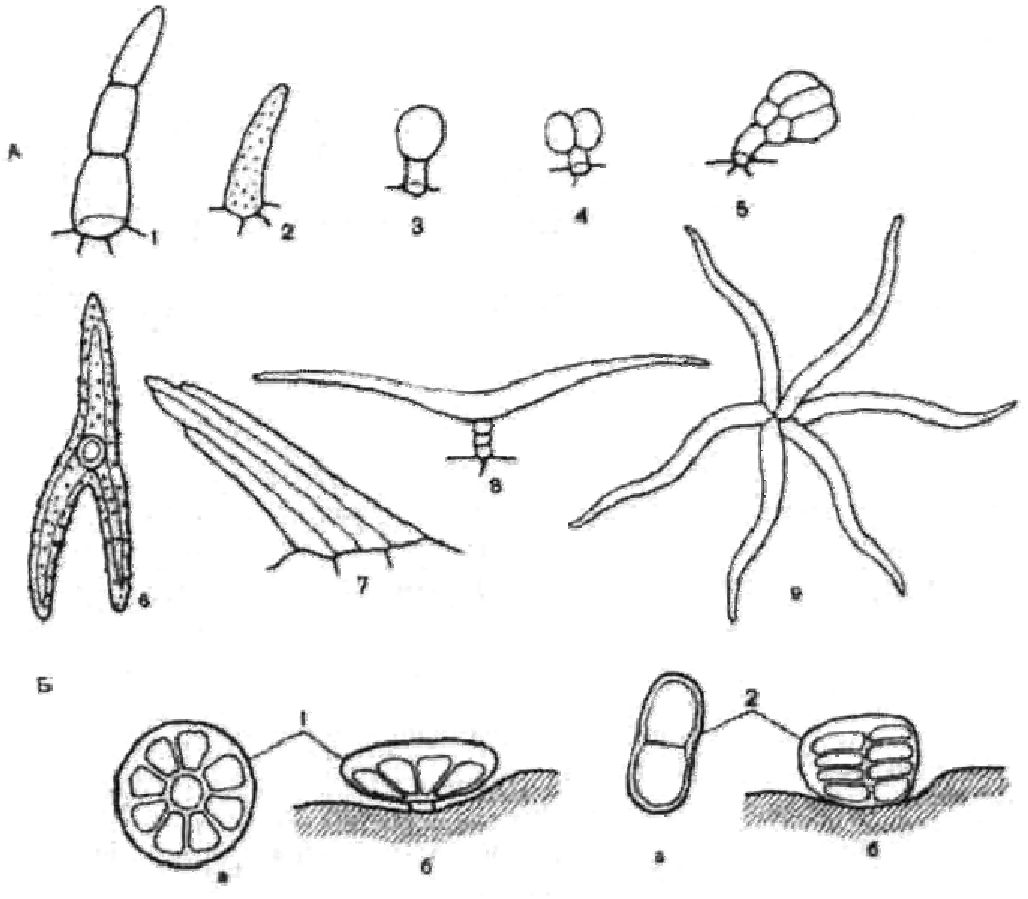
Fig. 13. Various types of trichomes
A — non-glandular hairs: 1 — simple multicellular; 2 — simple unicellular; 3 — capitate with a unicellular HEAD; 4 — capitate with a bicellular head; 5 — capitate with a multicellular head; 6 — unicellular multibranched (trifid); 7 — tufted; 8 — T-shaped; 9 — stellate.
B — essential oil glands: 1 — round with radially arranged secretory cells (Lamiaceae type); 2 — oval with tiered secretory cells (Asteraceae type); a — top view; b — side view
— essential oil glands, essential oil reservoirs, and laticifers are characteristic diagnostic features for each plant species and sometimes for an entire family (e.g., The structure of essential oil glands in Asteraceae and Lamiaceae families, Fig. 12);
— calcium oxalate or calcium carbonate crystals, druses, raphides, prismatic crystals, cystoliths, etc. (Fig. 14).
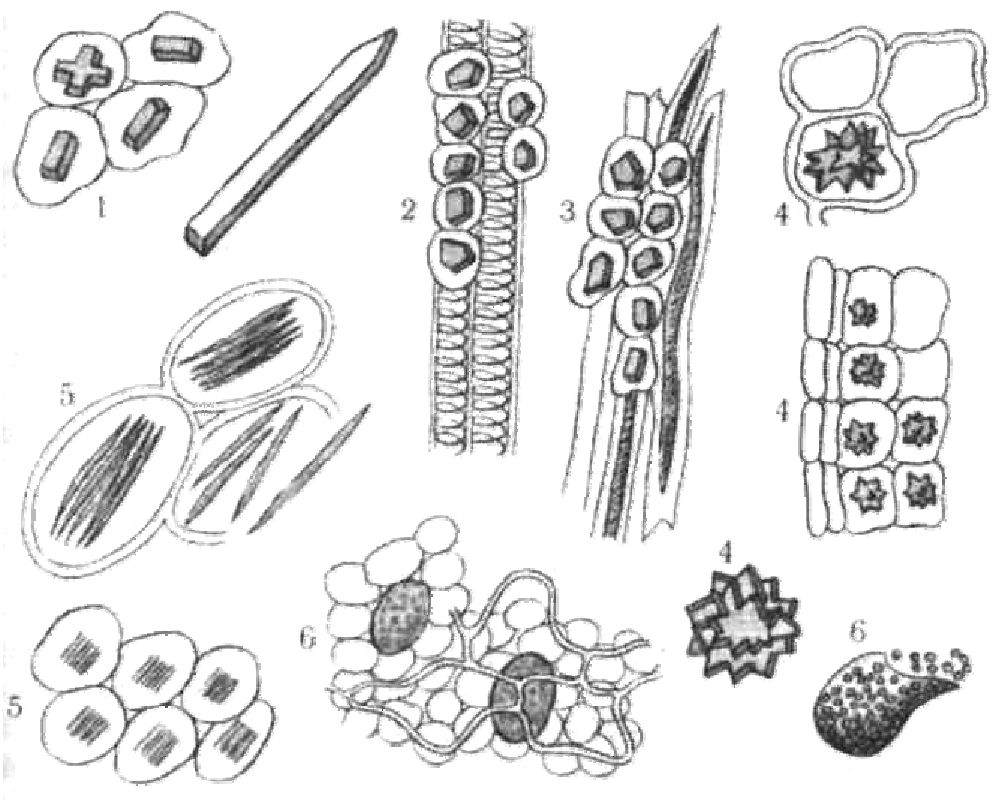
Fig. 14. Various Forms of calcium oxalate crystals
1 — solitary crystals; 2 — crystal-bearing vein sheath; 3 — crystal-bearing fiber sheath; 4 — druses; 5 — raphides; 6 — cells with crystalline sand
Key diagnostic features of flowers:
— STRUCTURE OF THE epidermis on the inner and outer surfaces of petals, corolla, and sepals;
— distribution pattern and structure of hairs, glands, and crystalline inclusions;
— shape and size of pollen grains.
Key diagnostic features of herbaceous stems:
— vascular bundles and their structure;
— structure of vessels;
— arrangement of mechanical tissues.
2) From fruits and seeds
When examining whole raw materials, surface preparations of the seed coat and pericarp or cross sections are prepared.
To prepare surface views of the seed coat and pericarp, 2-3 seeds or fruits are boiled in a test tube with a 5% sodium hydroxide solution for 2-3 minutes and thoroughly rinsed with water. The specimen is placed on a glass slide, and using dissecting needles, the seed coat or pericarp tissues are separated and examined in a glycerin solution.
To prepare cross sections, the raw material is pre-softened in a moisture chamber or by steaming. The structure of the fruit or seed is studied using sections made across the entire fruit. The sections must be very thin and taken from the apex or Base of the fruit, discarding the first sections. For examination, sections should be taken from the middle portion of the material, where all structural elements are most fully represented.
Very small fruits and seeds are usually embedded in a paraffin block measuring 1x1x1.5 cm. The paraffin is melted with the tip of a heated dissecting needle, and the specimen is quickly immersed into the resulting cavity. To obtain a cross section, the specimen must be placed vertically in the paraffin, and for longitudinal sections — horizontally. The surface of the specimen must be dry. Once the paraffin solidifies, sections are prepared. The specimen is sectioned along with the paraffin. The sections are then retrieved from the paraffin using a dissecting needle moistened with glycerin, and a slide is prepared in a glycerin solution. In addition to paraffin blocks, elderberry pith or cork can be used. The fruit is placed between two pieces of elderberry pith or cork, and sectioned.
Key diagnostic features of fruits and seeds:
— pericarp structure (mechanical tissue, essential oil canals, epidermal hairs);
— Chemical Nature of reserve substances (fatty oil, mucilage, etc.).
3) From bark
When studying whole raw materials, transverse or longitudinal sections are prepared. Bark pieces measuring 2-3 x 0.5-1 cm are softened using a cold or hot method. To make sections, the softened pieces are leveled with a scalpel so that they have a clear transverse or longitudinal profile. Thin sections are made and mounted in appropriate reagents to identify various structures or substances (lignified elements, starch, tannins, anthracene derivatives, etc.).
Main diagnostic features of the bark:
— thickness and Structural Features of the periderm (sometimes the color of the periderm has diagnostic value, e.g., in buckthorn bark);
— mechanical elements — bast fibers and sclereids, their structure, arrangement, and quantity;
— calcium oxalate crystals (they may occur in isolated cells or form a crystal sheath);
— presence of starch, essential oils, and other active substances determined by Microchemical Reactions.
Anatomy of Vegetative Organs
✵ Roots and ROOT crops
✵ Stems and rhizomes
Рисунок 15 - Корінь первинної будови (зона всмоктування)
Рисунок 16 - Корінь вторинної будови трав’янистої дводольної рослини непучкового типу (зона проведення)
Рисунок 17 - Корінь вторинної будови трав’янистої дводольної рослини пучкового типу (зона проведення)
Рисунок 18 - Корінь деревинної покритонасінної рослини непучкового типу -ясеня високого Fraxinus excelsior L.
Рисунок 19 - Коренеплоди
Рисунок 20 - Стебла однодольних рослин
Рисунок 21 - Стебло трав’янистої дводольної рослини пучкового типу -Cucurbita pepo L.
Рисунок 22 - Стебло трав’янистої дводольної рослини пучкового типу -Trifolium pretense L.
Рисунок 23 - Стебло трав’янистої дводольної рослини перехідного типу Helianthus annuus L.
Рисунок 24 - Кореневище дводольної рослини Convallaria majalis L.
Рисунок 25 - Кореневище дводольної рослини перехідного типу - Tussilago farfara L.
Рисунок 26 - Стебло голонасінної рослини - Pinus silvestris L.
Рисунок 27 - Стебла дерев’янистих покритонасінних рослин: А - Betula verrucosa Ehrn.; Б - Tilia cordata Mill.
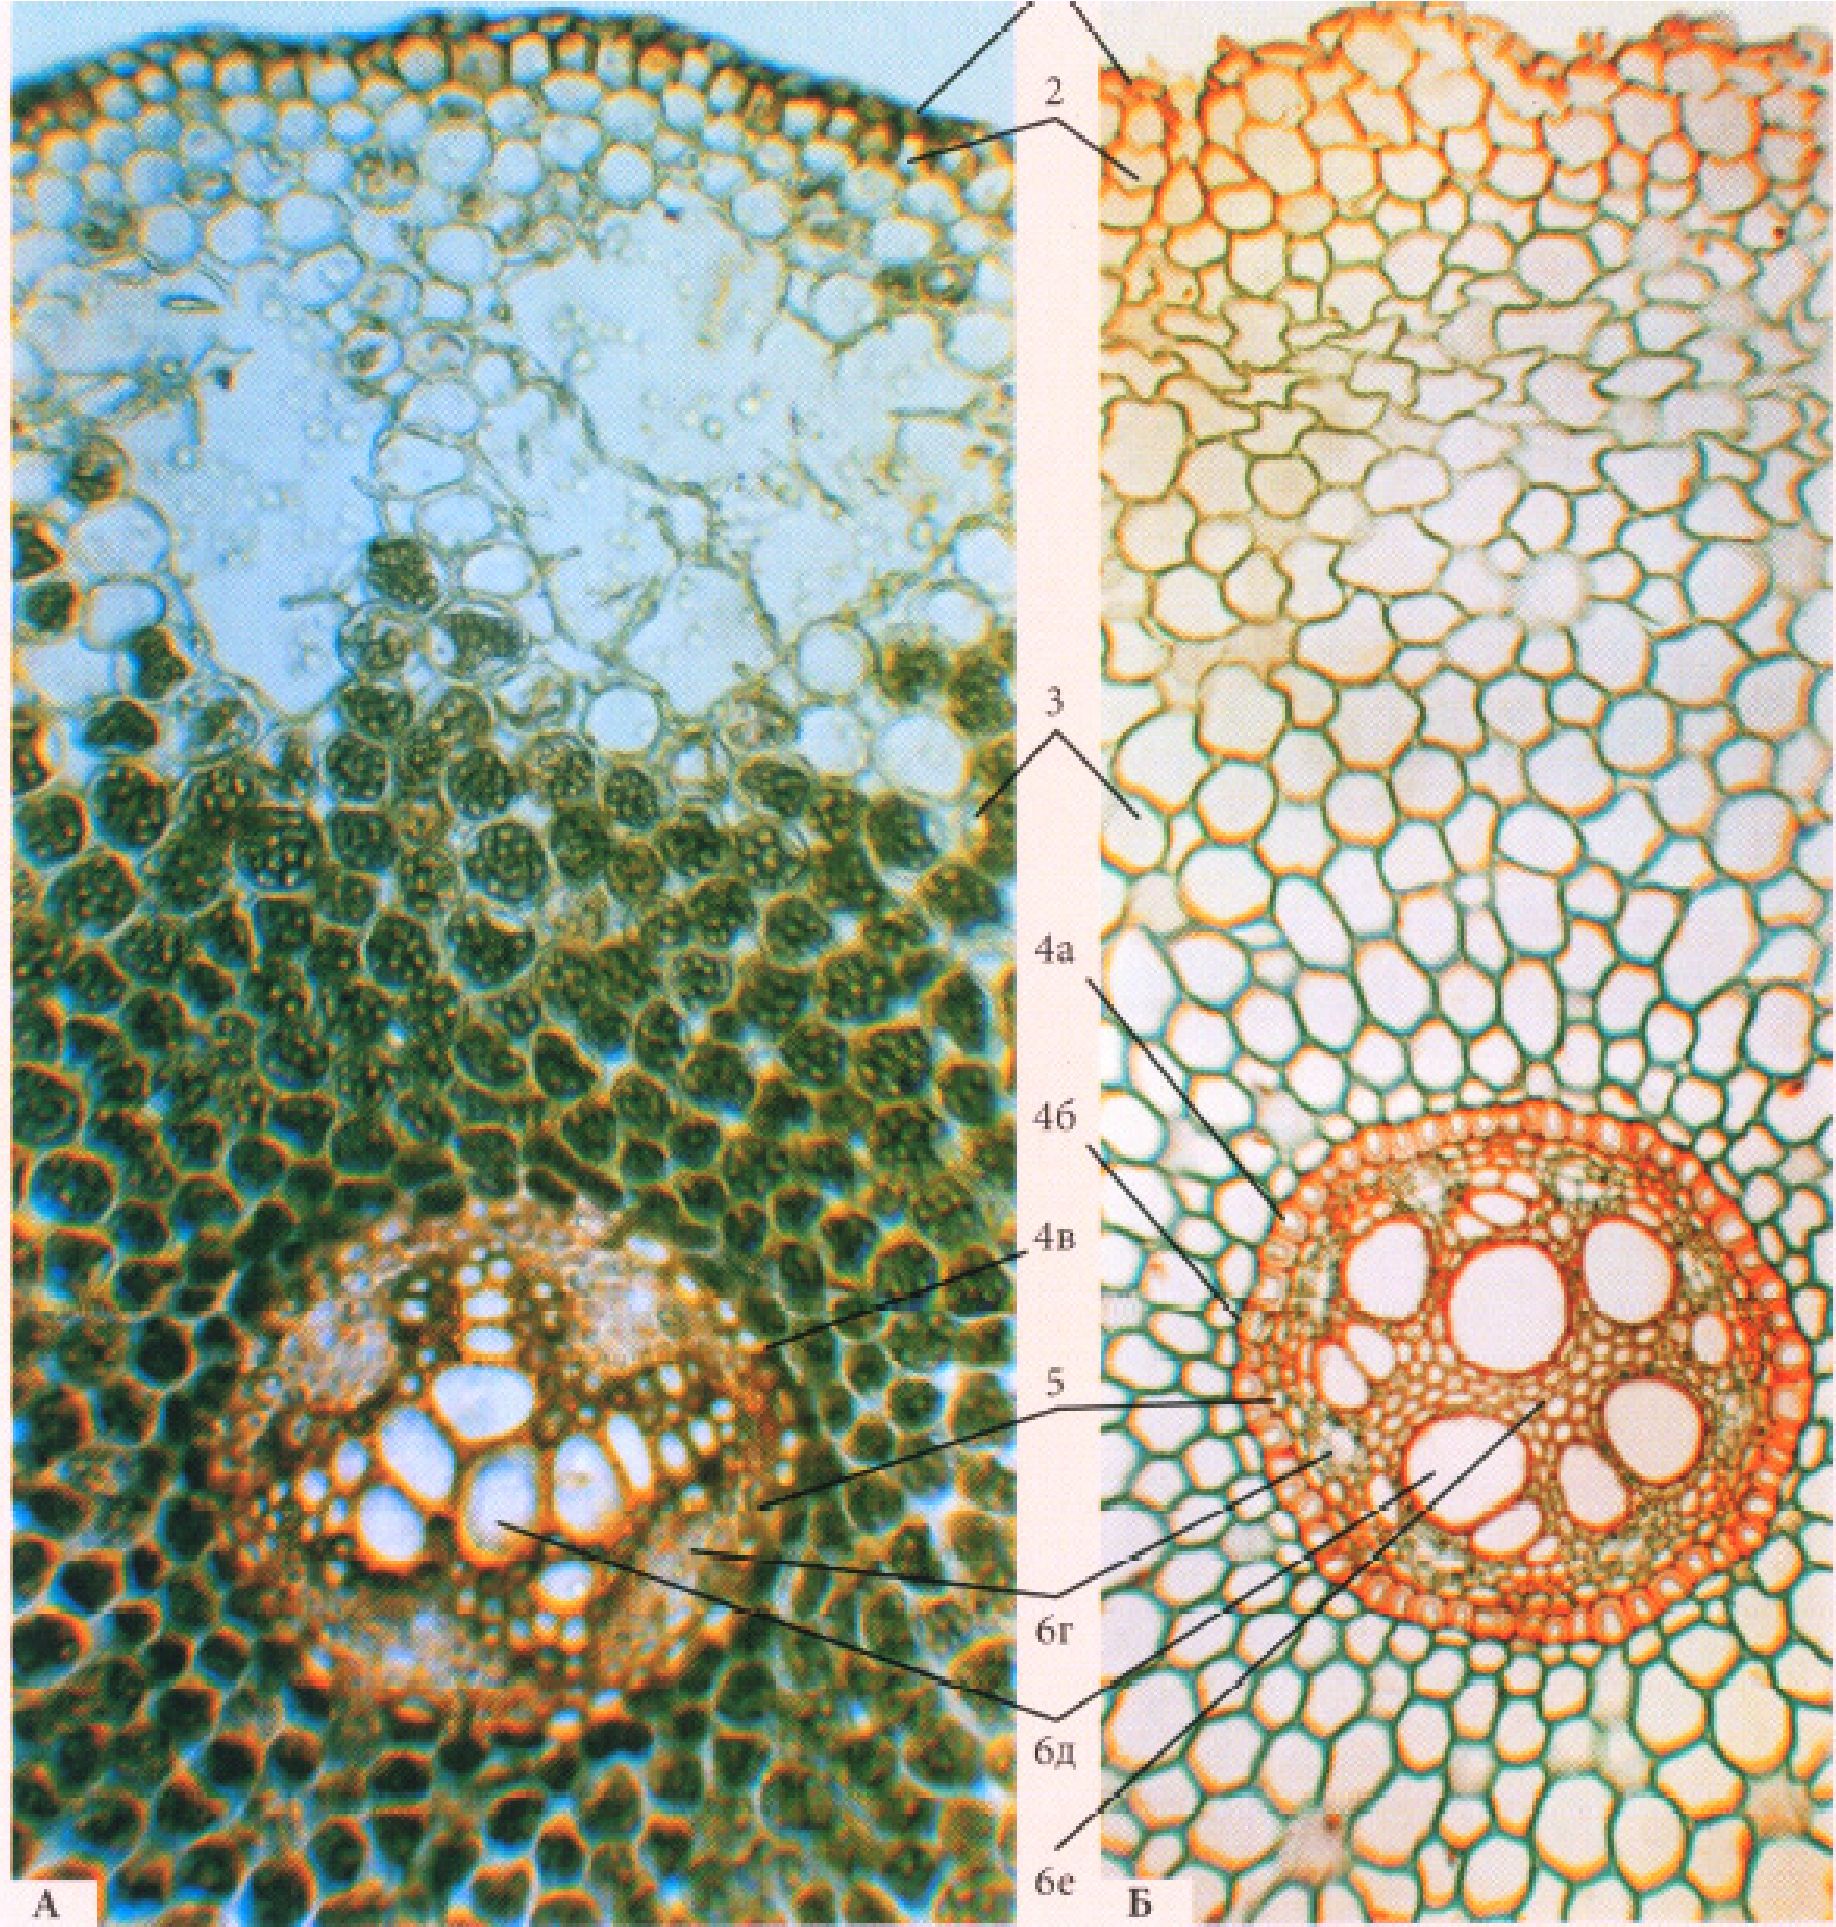
Fig. 15. Root with Primary Structure (absorption zone)
A. monocotyledonous plant Iris germanica L.
B. Dicotyledonous plant Ranunculus acris L.: 1 - epiblem, 2 - exodermis, 3 - mesodermis, 4 - endodermis (a - cells with U-thickened walls, b - passage cell, c - with Casparian strips), 5 - pericycle, 6 - radial bundle (d - phloem, e - xylem, f - sclerenchyma)
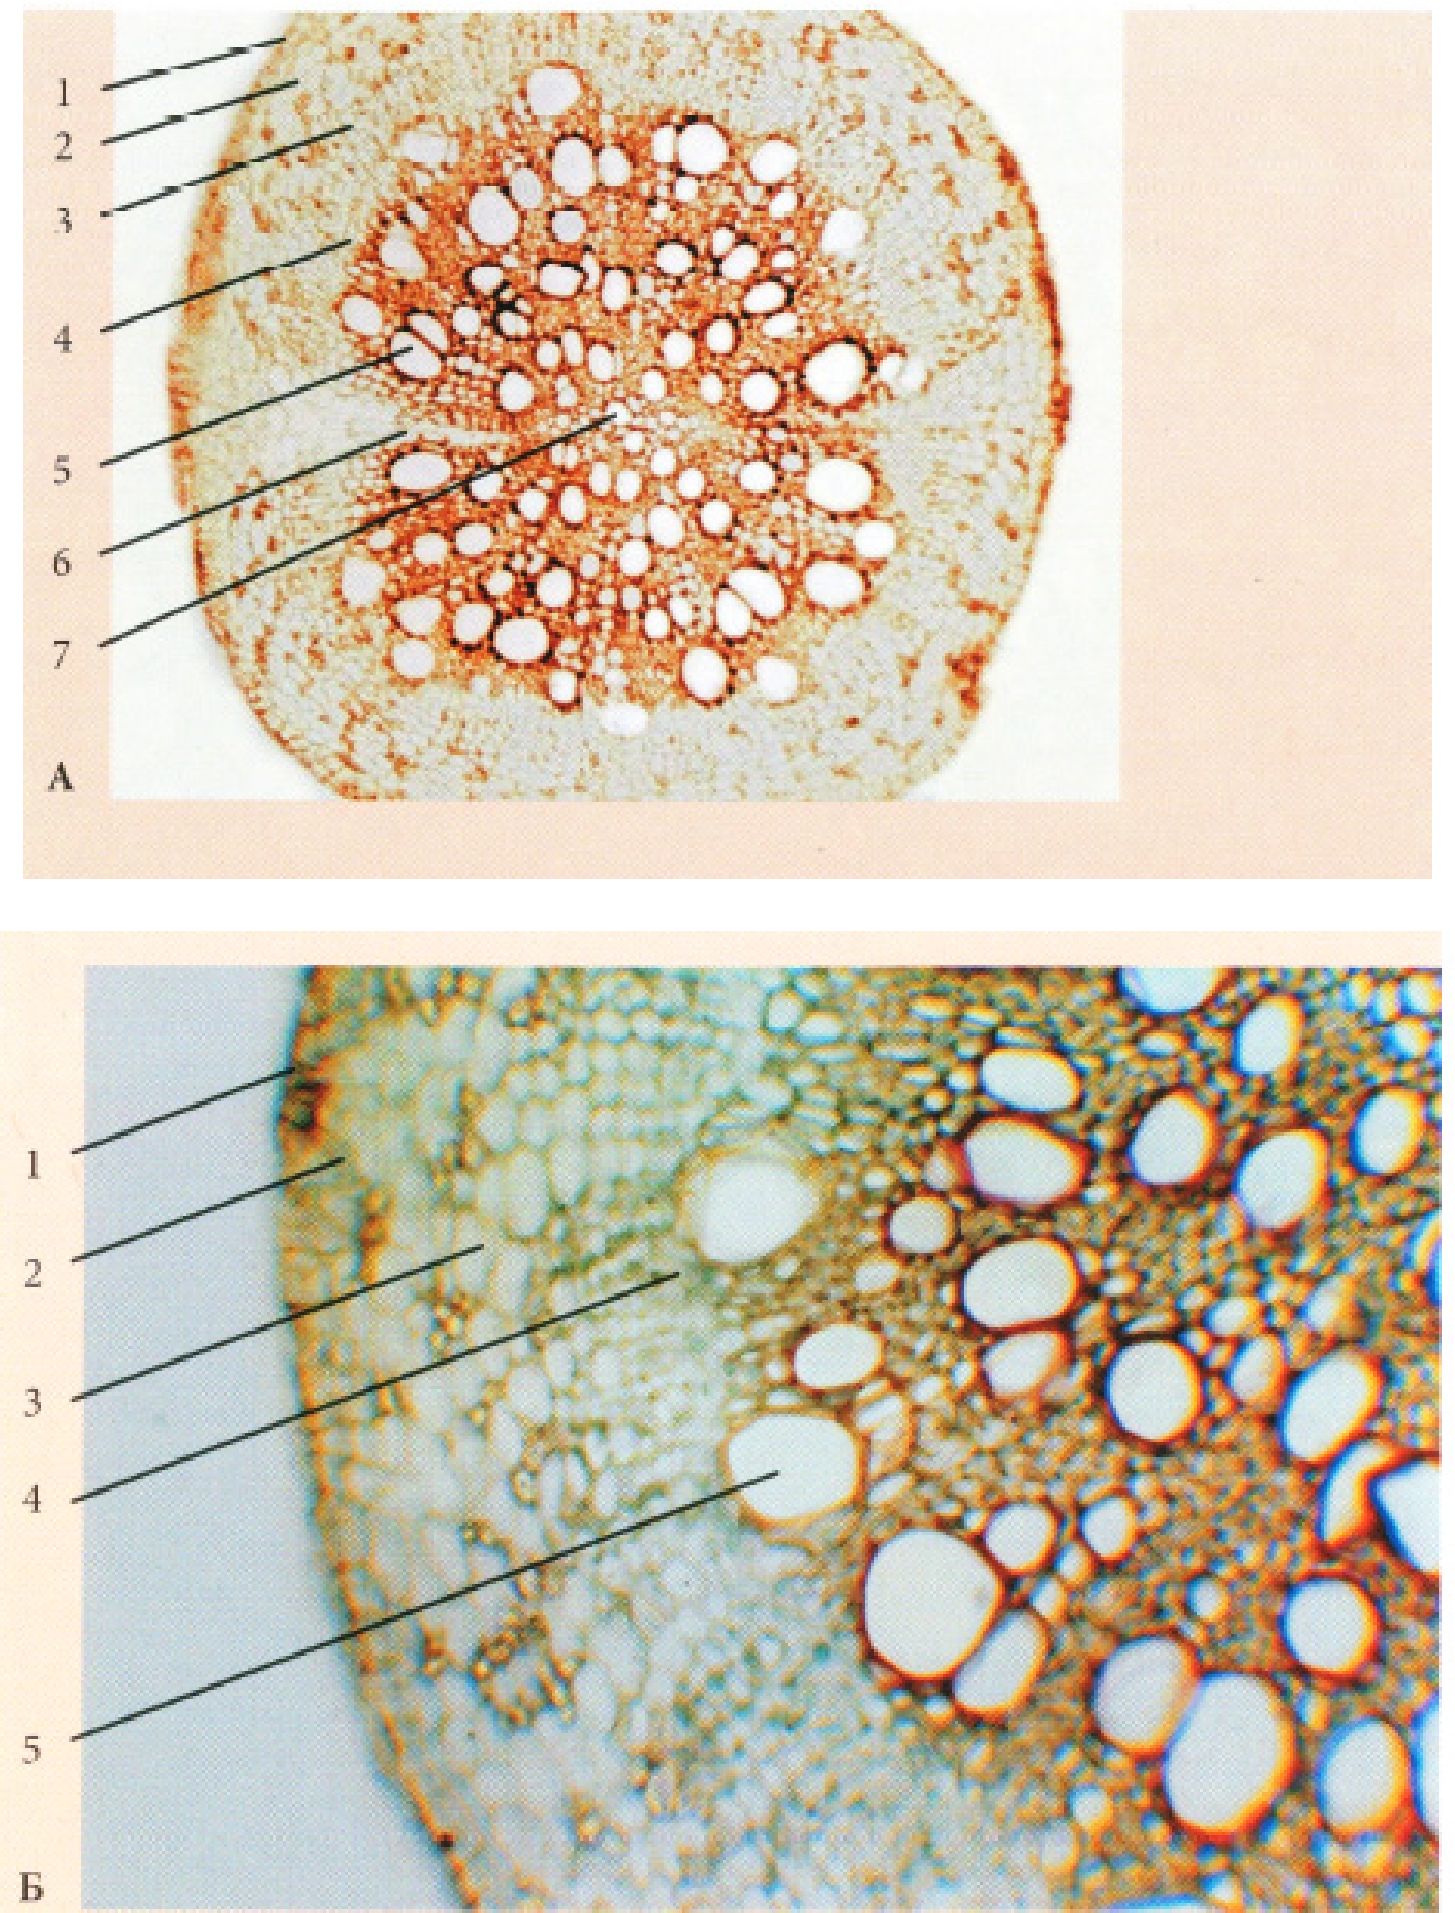
Fig. 16. Root of Introduction/11.html">Secondary structure of a herbaceous dicotyledonous plant of the non-bundle type (zone of maturation/conduction)
A. at low magnification, B. at high magnification: 1 - periderm, 2 - cortical parenchyma, 3 - secondary phloem, 4 - cambium, 5 - secondary xylem, 6 - medullary ray, 7 - primary xylem.
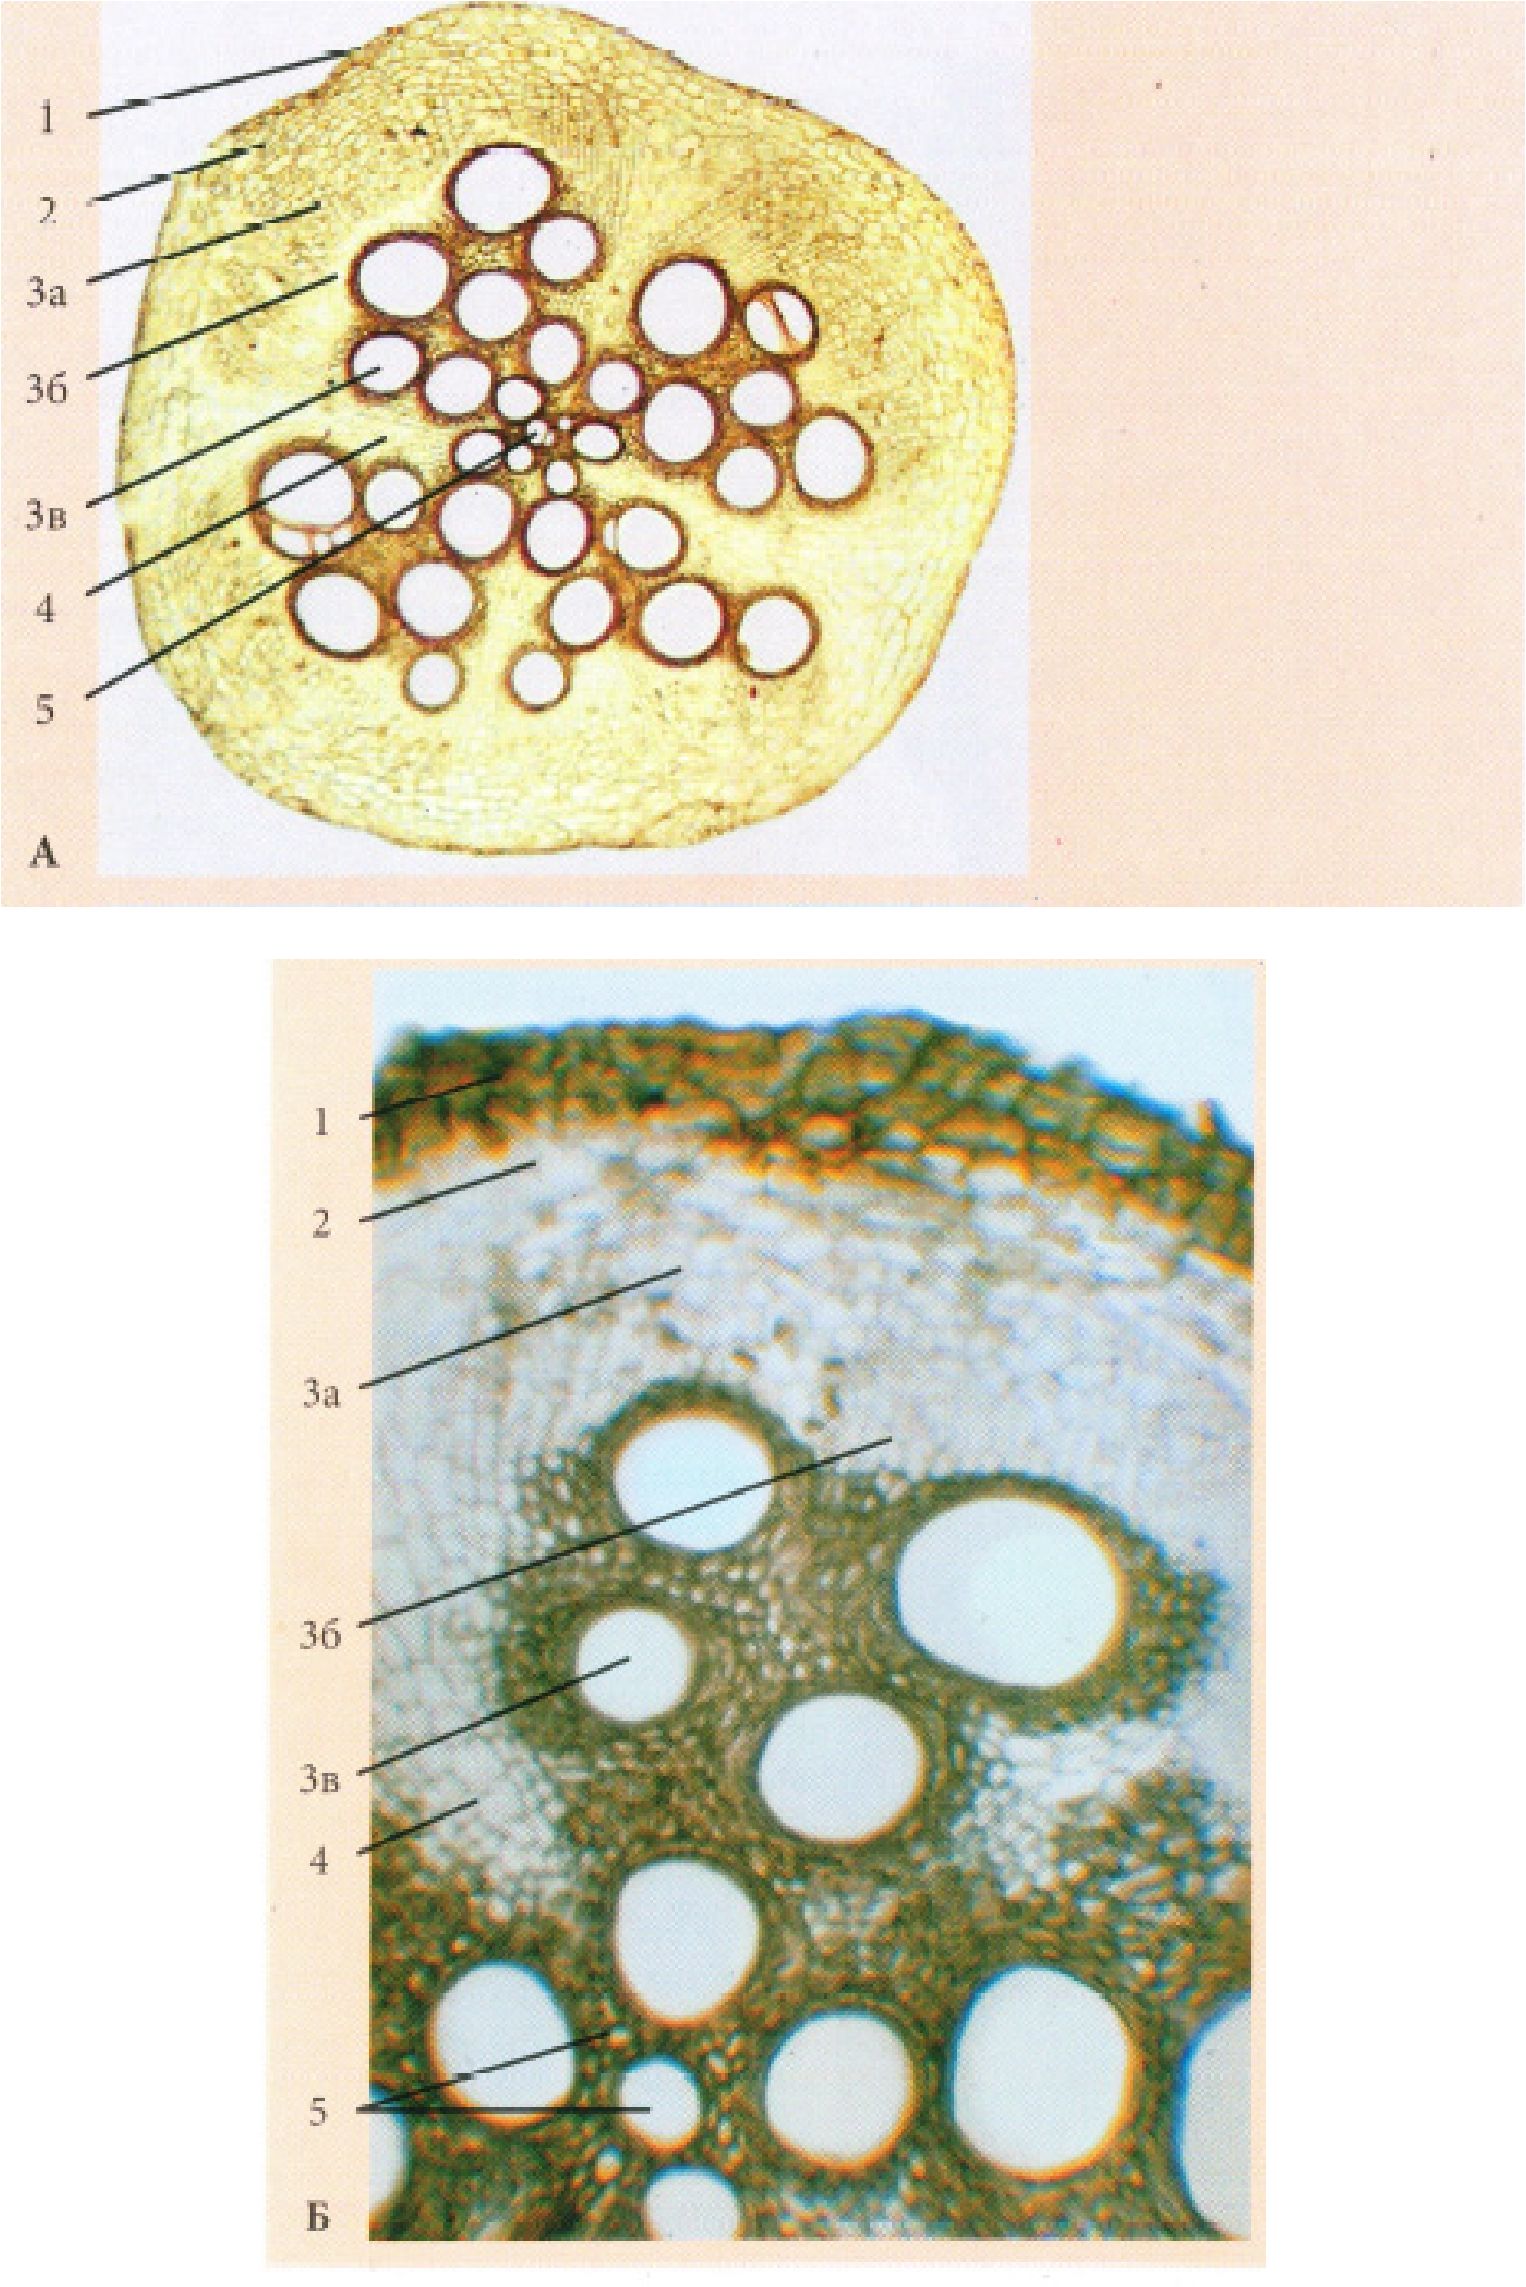
Fig. 17. Root of secondary structure of a herbaceous dicotyledonous plant of the bundle type (zone of conduction) - Cucurbita pepo L.
A. - at low magnification; B. - at high magnification: 1 - periderm, 2 - cortical parenchyma, 3 - open collateral bundle (a - secondary phloem, b - cambium, c - secondary xylem), 4 - medullary ray, 5 - primary xylem.
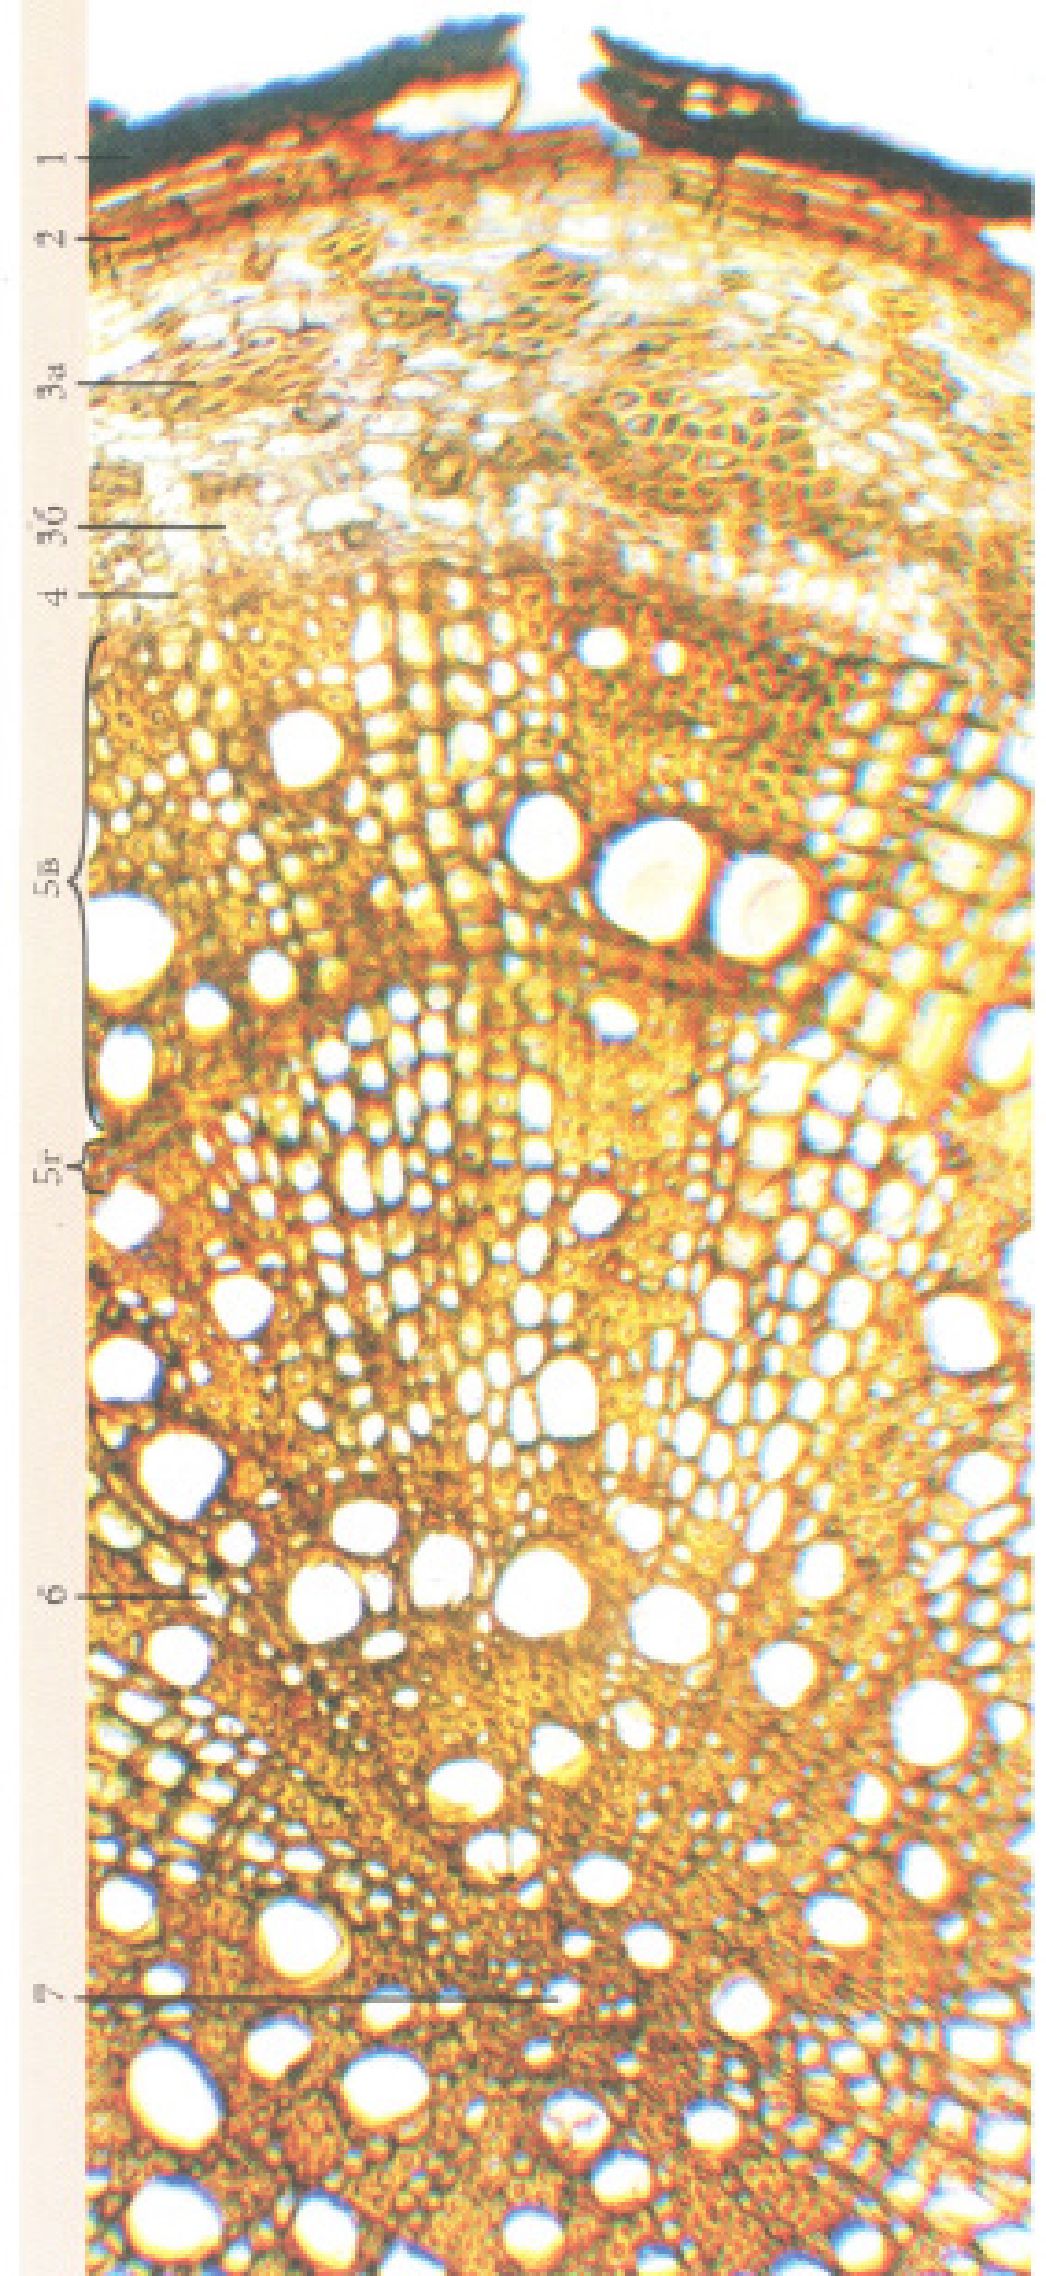
Fig. 18. Root of a woody angiosperm plant of the non-bundle type - European ash Fraxinus excelsior L.
1 - periderm, 2 - cortical parenchyma, 3 - secondary phloem (bast) (a - sclerenchymatous fibers (thick-walled bast), b - sieve tubes with companion cells, bast parenchyma (thin-walled bast)), 4 - cambium, 5 - secondary xylem (wood) (c - spring wood, d - autumn wood (c, d - annual ring)), 6 - medullary ray, 7 - primary xylem.
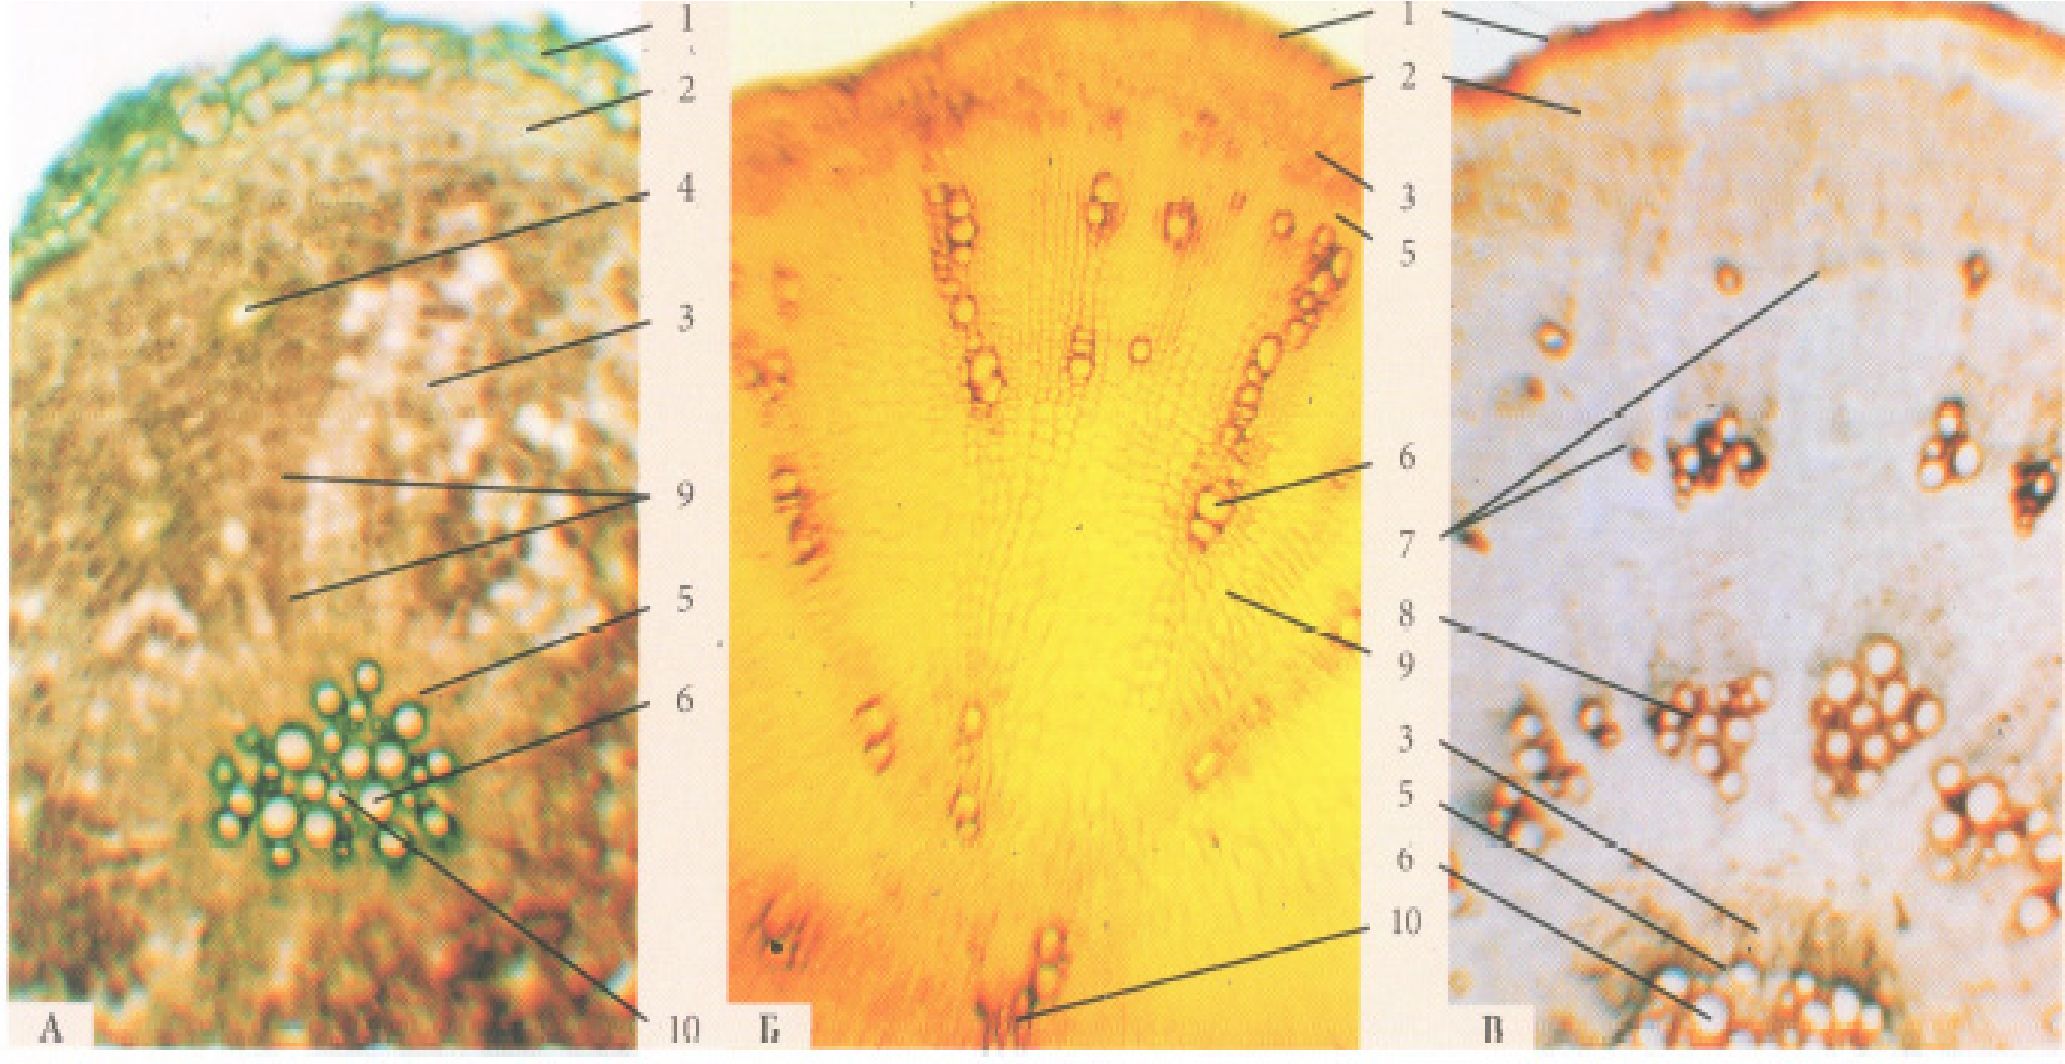
Fig. 19. Root crops
A - Petroselinum sativum Hoffm. (carrot type); B - Raphanus sativus L. (radish type); C - Beta vulgaris (beet type): 1 - periderm, 2 - storage cortical parenchyma, 3 - secondary phloem, 4 - schizogenous essential oil duct, 5 - cambium, 6 - secondary xylem, 7 - accessory cambial rings, 8 - open collateral bundles, 9 - storage parenchyma of the medullary ray, 10 - primary xylem.

Fig. 20. Stems of monocotyledonous plants:
A - Secale cereale L.: 1 - at low magnification, 2 - at high magnification (fragment); B - Zea mays; C - Polygonatum multiflorum L.: 1 - epidermis, 2 - chlorenchyma or cortical parenchyma, 3 - pericyclic sclerenchyma, 4 - closed collateral bundle (a - phloem, b - xylem, c - bundle sheath sclerenchyma), 5 - ground parenchyma of the vascular cylinder, 6 - pith cavity.
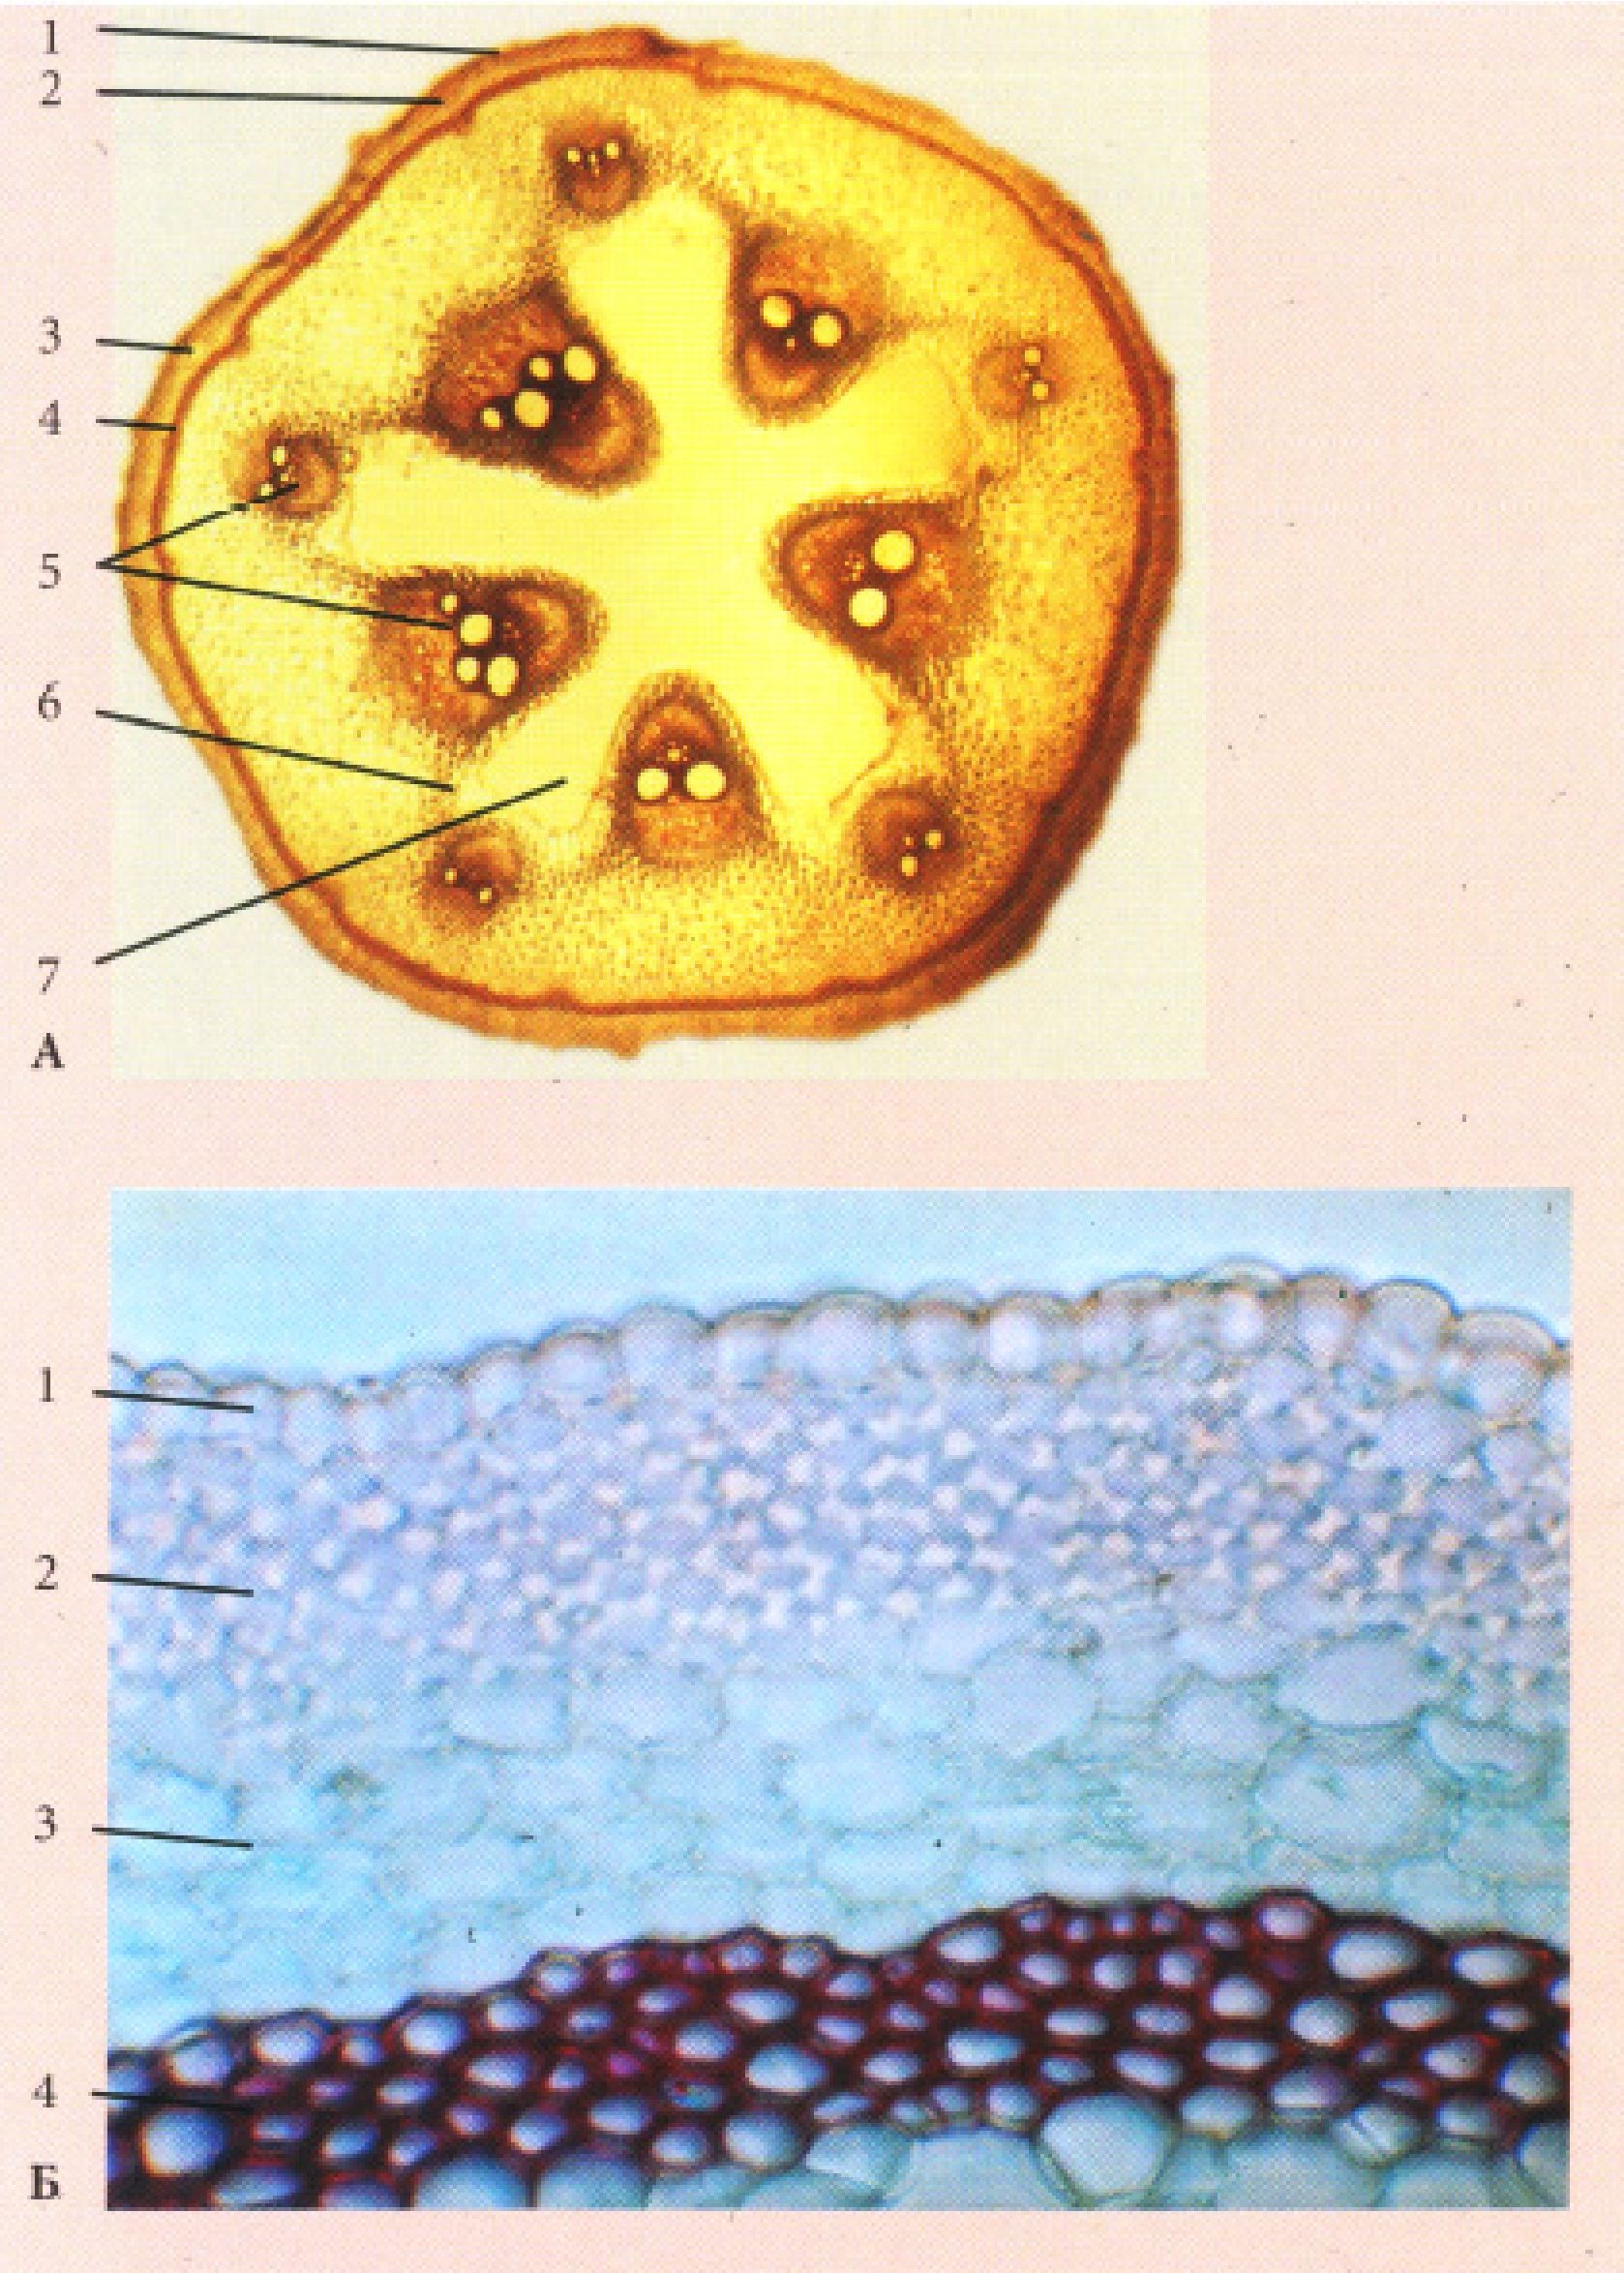
Fig. 21. Stem of a herbaceous dicotyledonous plant of the bundle type -
Cucurbita pepo L.:
A - at low magnification; B - at high magnification (fragment): 1 - epidermis, 2 - angular collenchyma, 3 - cortical (chlorenchymatous) parenchyma, 4 - pericyclic sclerenchyma, 5 - bicollateral bundle, 6 - medullary ray, 7 - pith with a cavity.
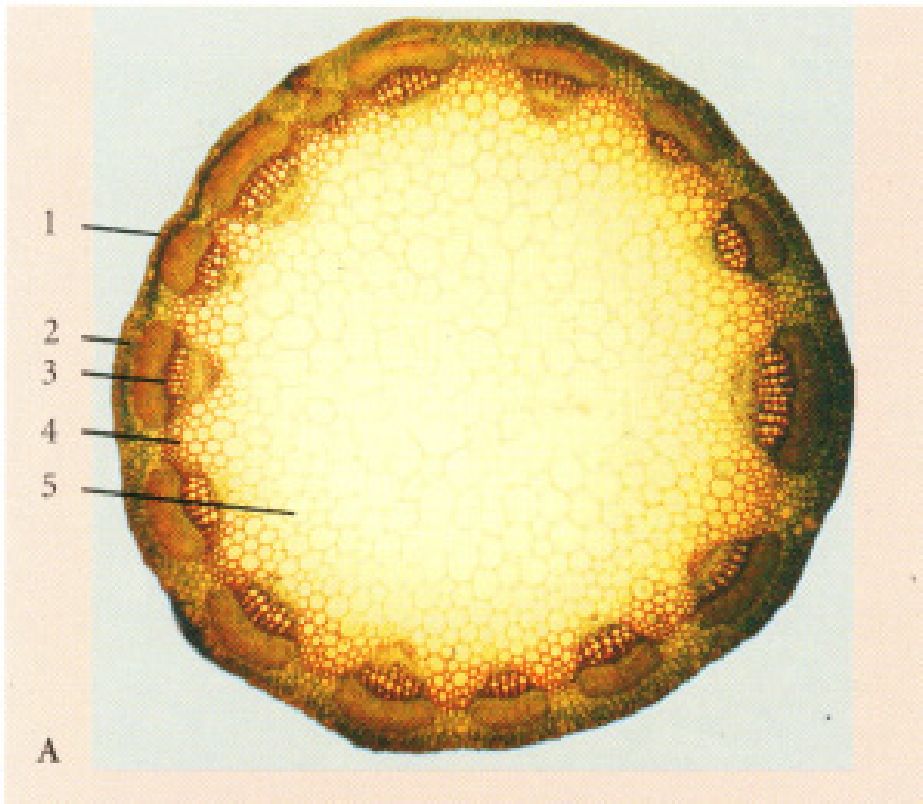
Fig. 22. Stem of a herbaceous dicotyledonous plant of the bundle type - Trifolium pratense L.
1 - epidermis, 2 - cortical parenchyma, 3 - open collateral bundle, 4 - medullary ray, 5 - pith.
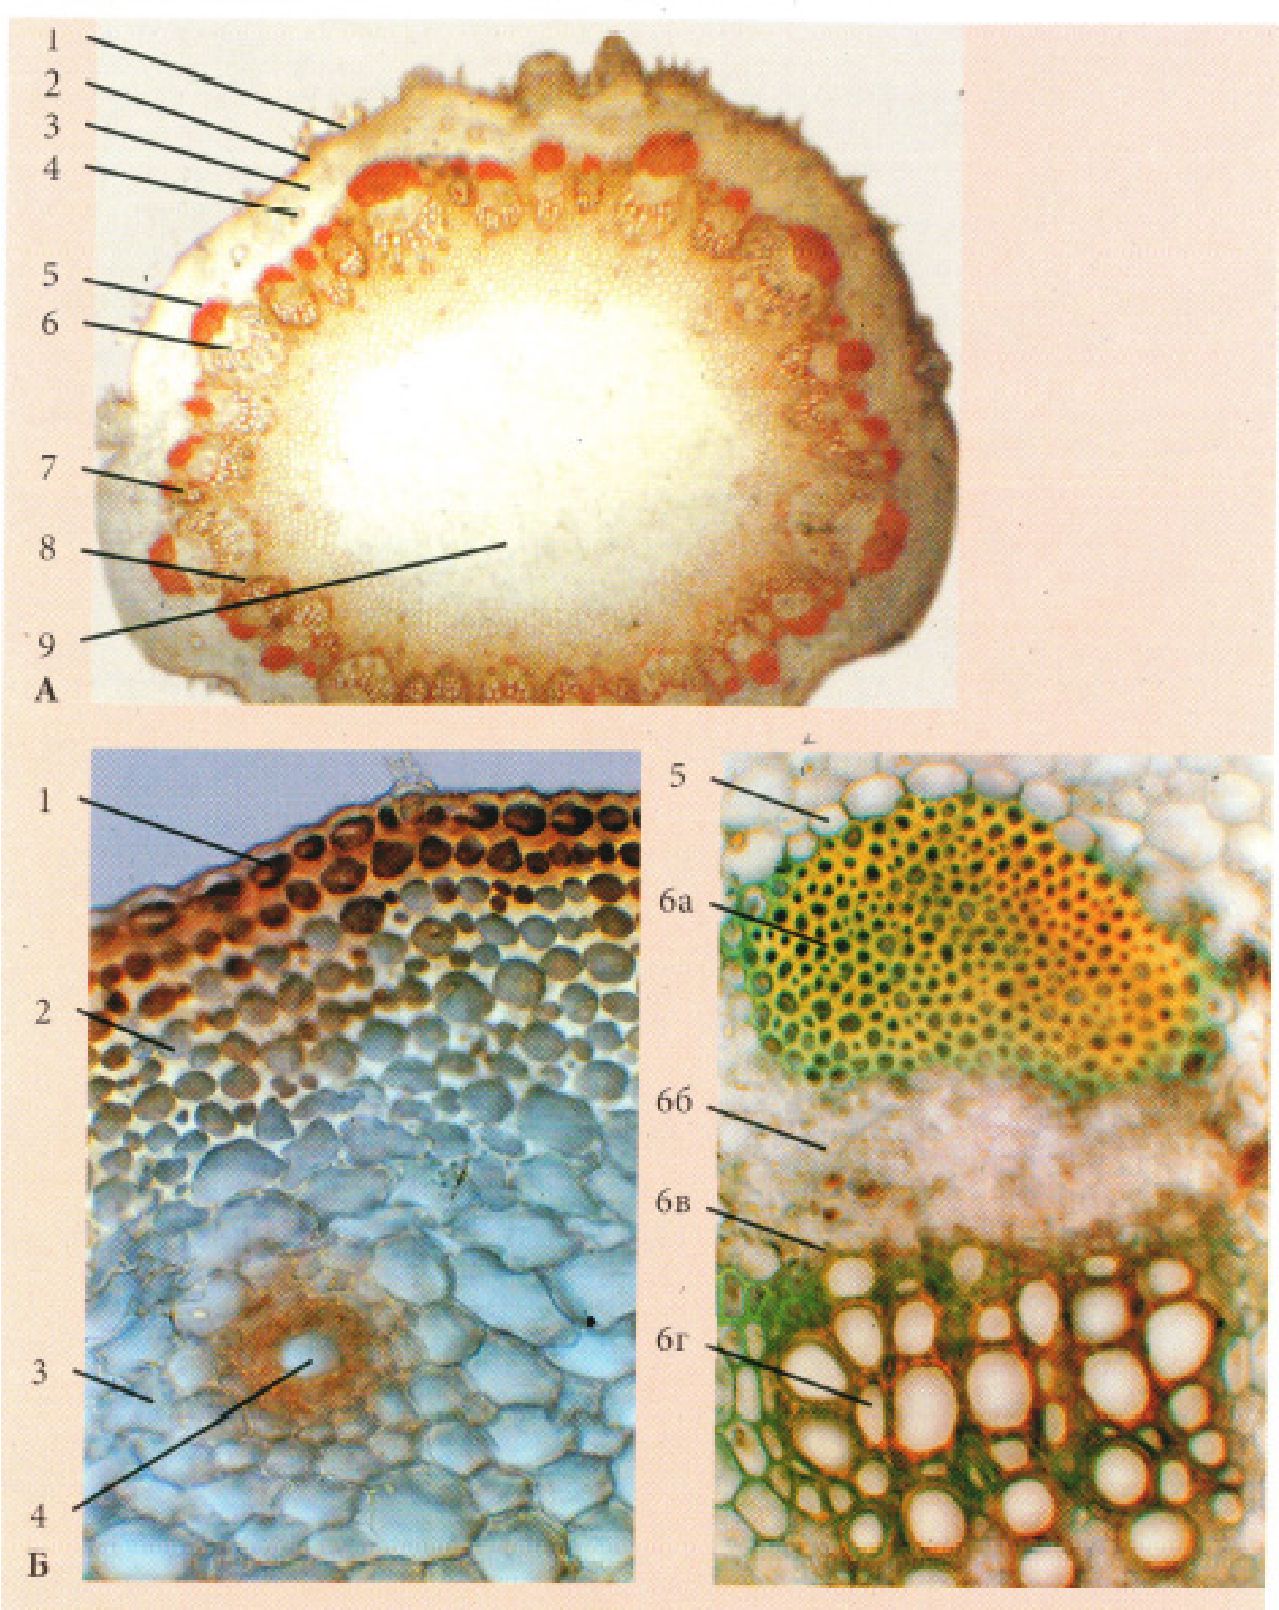
Fig. 23. Stem of a herbaceous dicotyledonous plant of the transitional type
Helianthus annuus L.:
A – low magnification, B – high magnification: 1 – epidermis with trichomes, 2 – collenchyma, 3 – cortical parenchyma, 4 – schizogenous canal, 5 – endodermis, 6 – open collateral bundle (a – sclerenchyma, b – phloem, c – cambium, d – xylem), 7 – accessory bundle, 8 – medullary ray, 9 – pith.
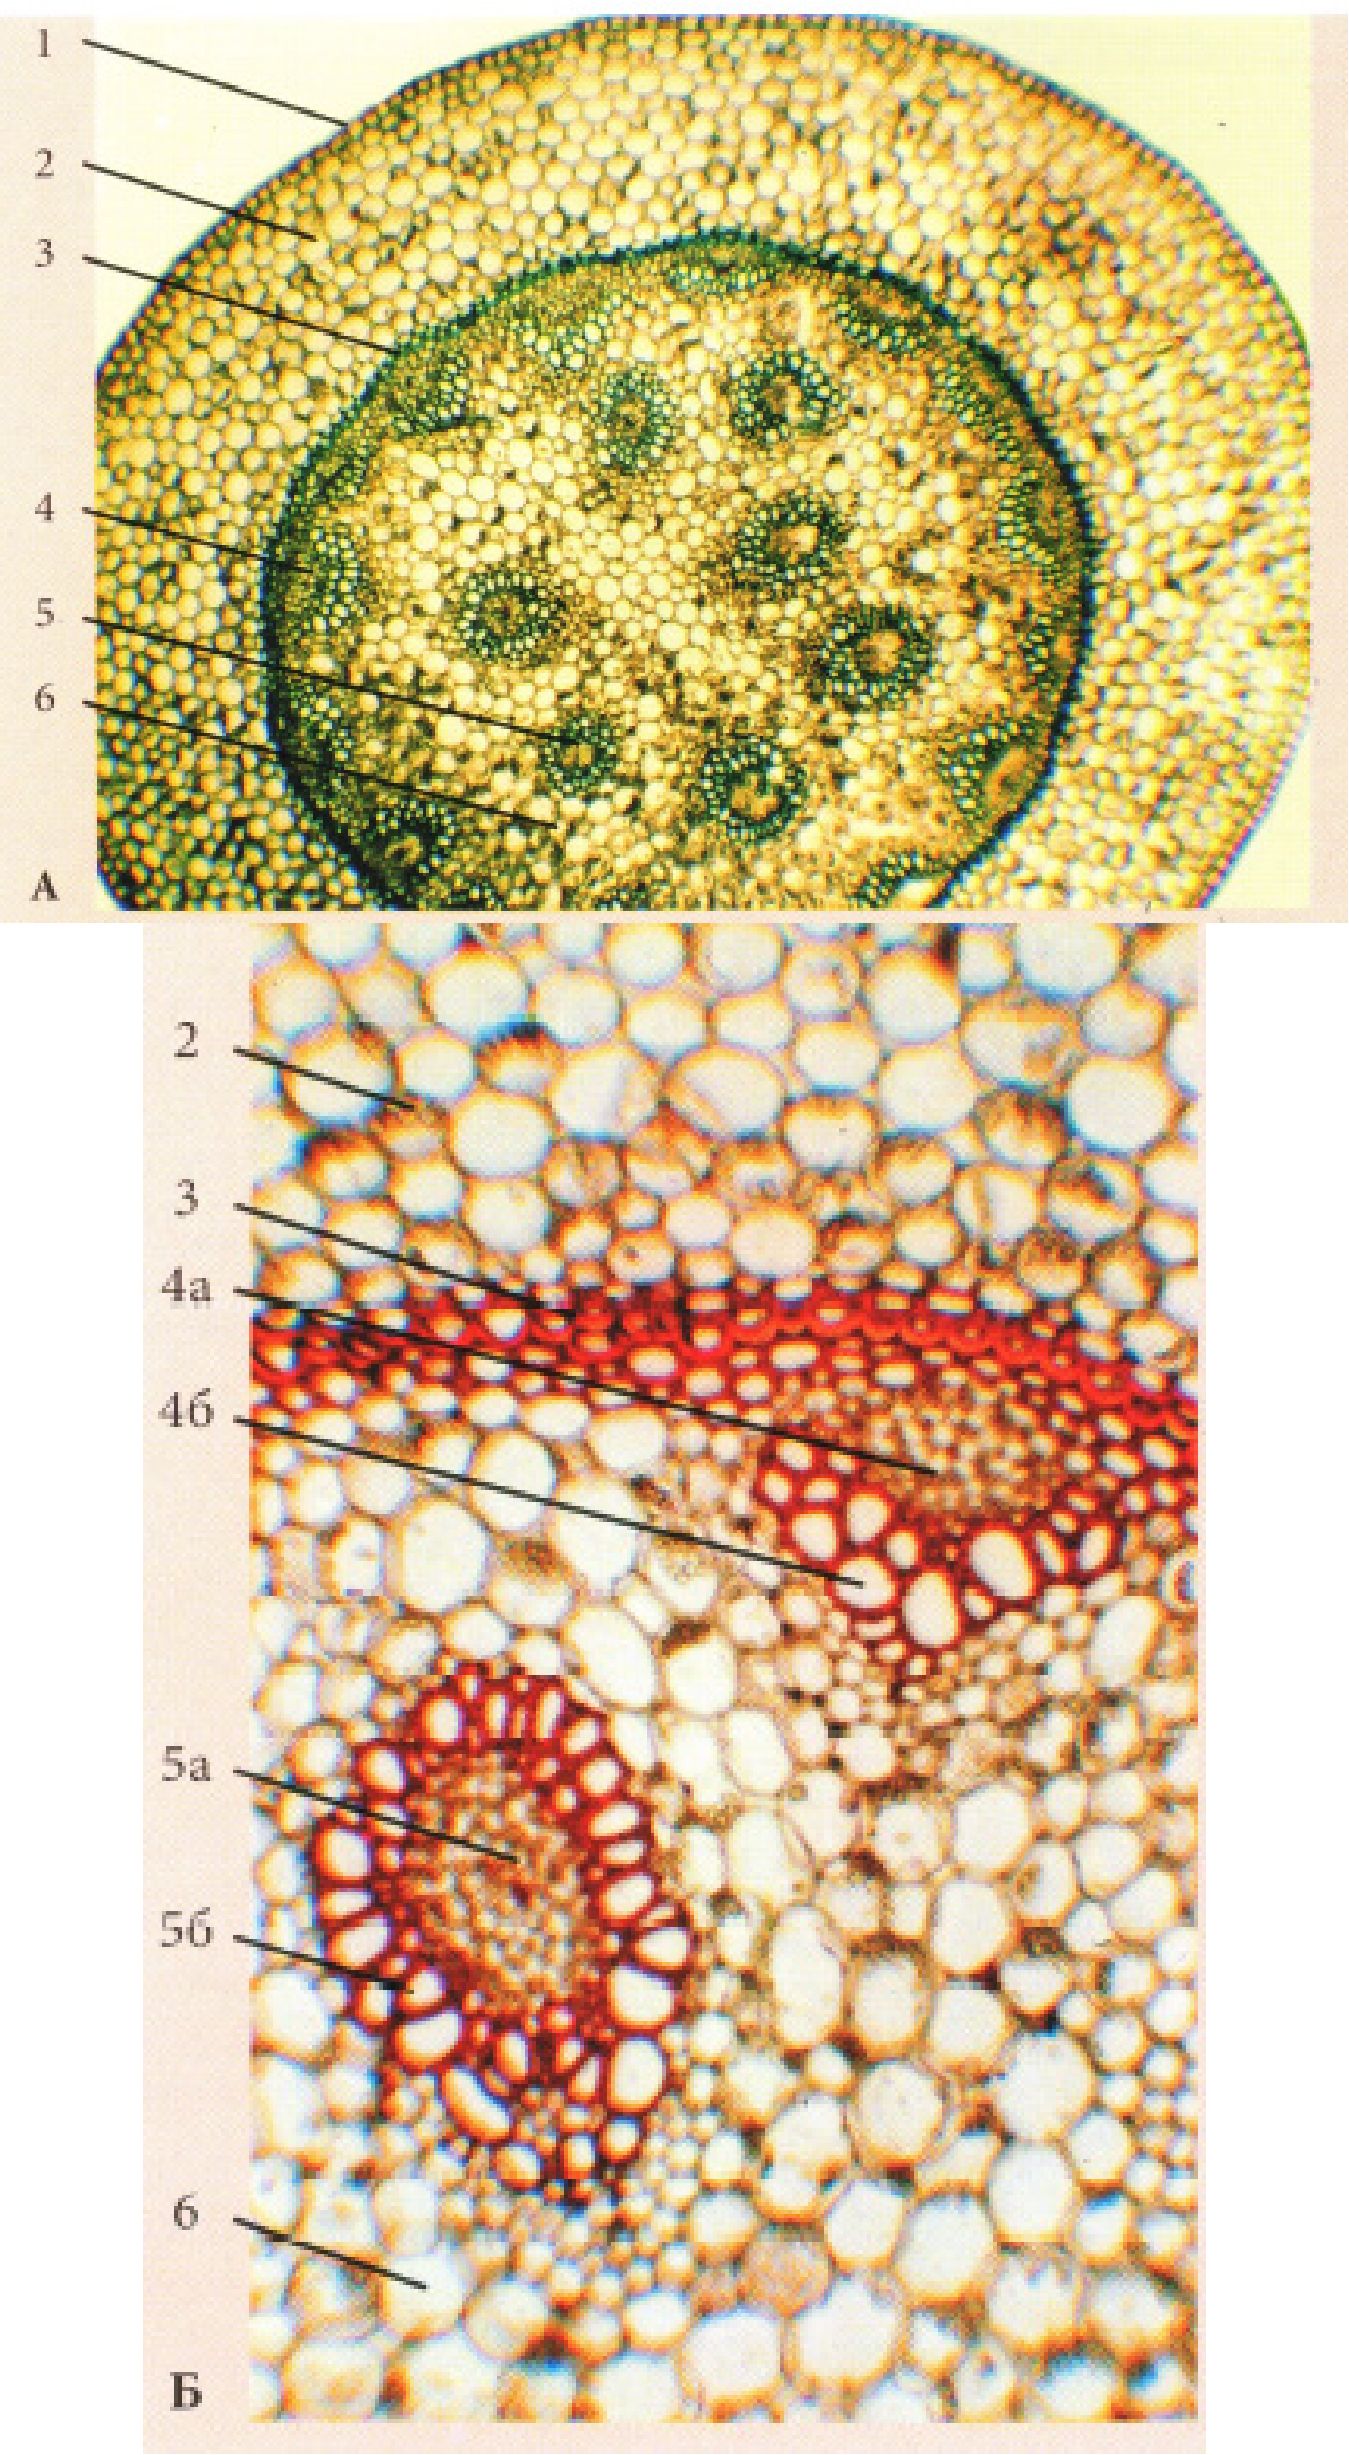
Fig. 24. Rhizome of the dicotyledonous plant Scopolia carniolica Jacq.:
A – low magnification, B – high magnification: 1 – epidermis, 2 – storage parenchyma of the cortex, 3 – endodermis with U-shaped thickenings, 4 – closed collateral bundle, 5 – concentric amphivasal bundle (a – phloem, b – xylem), 6 – storage parenchyma of the stele.
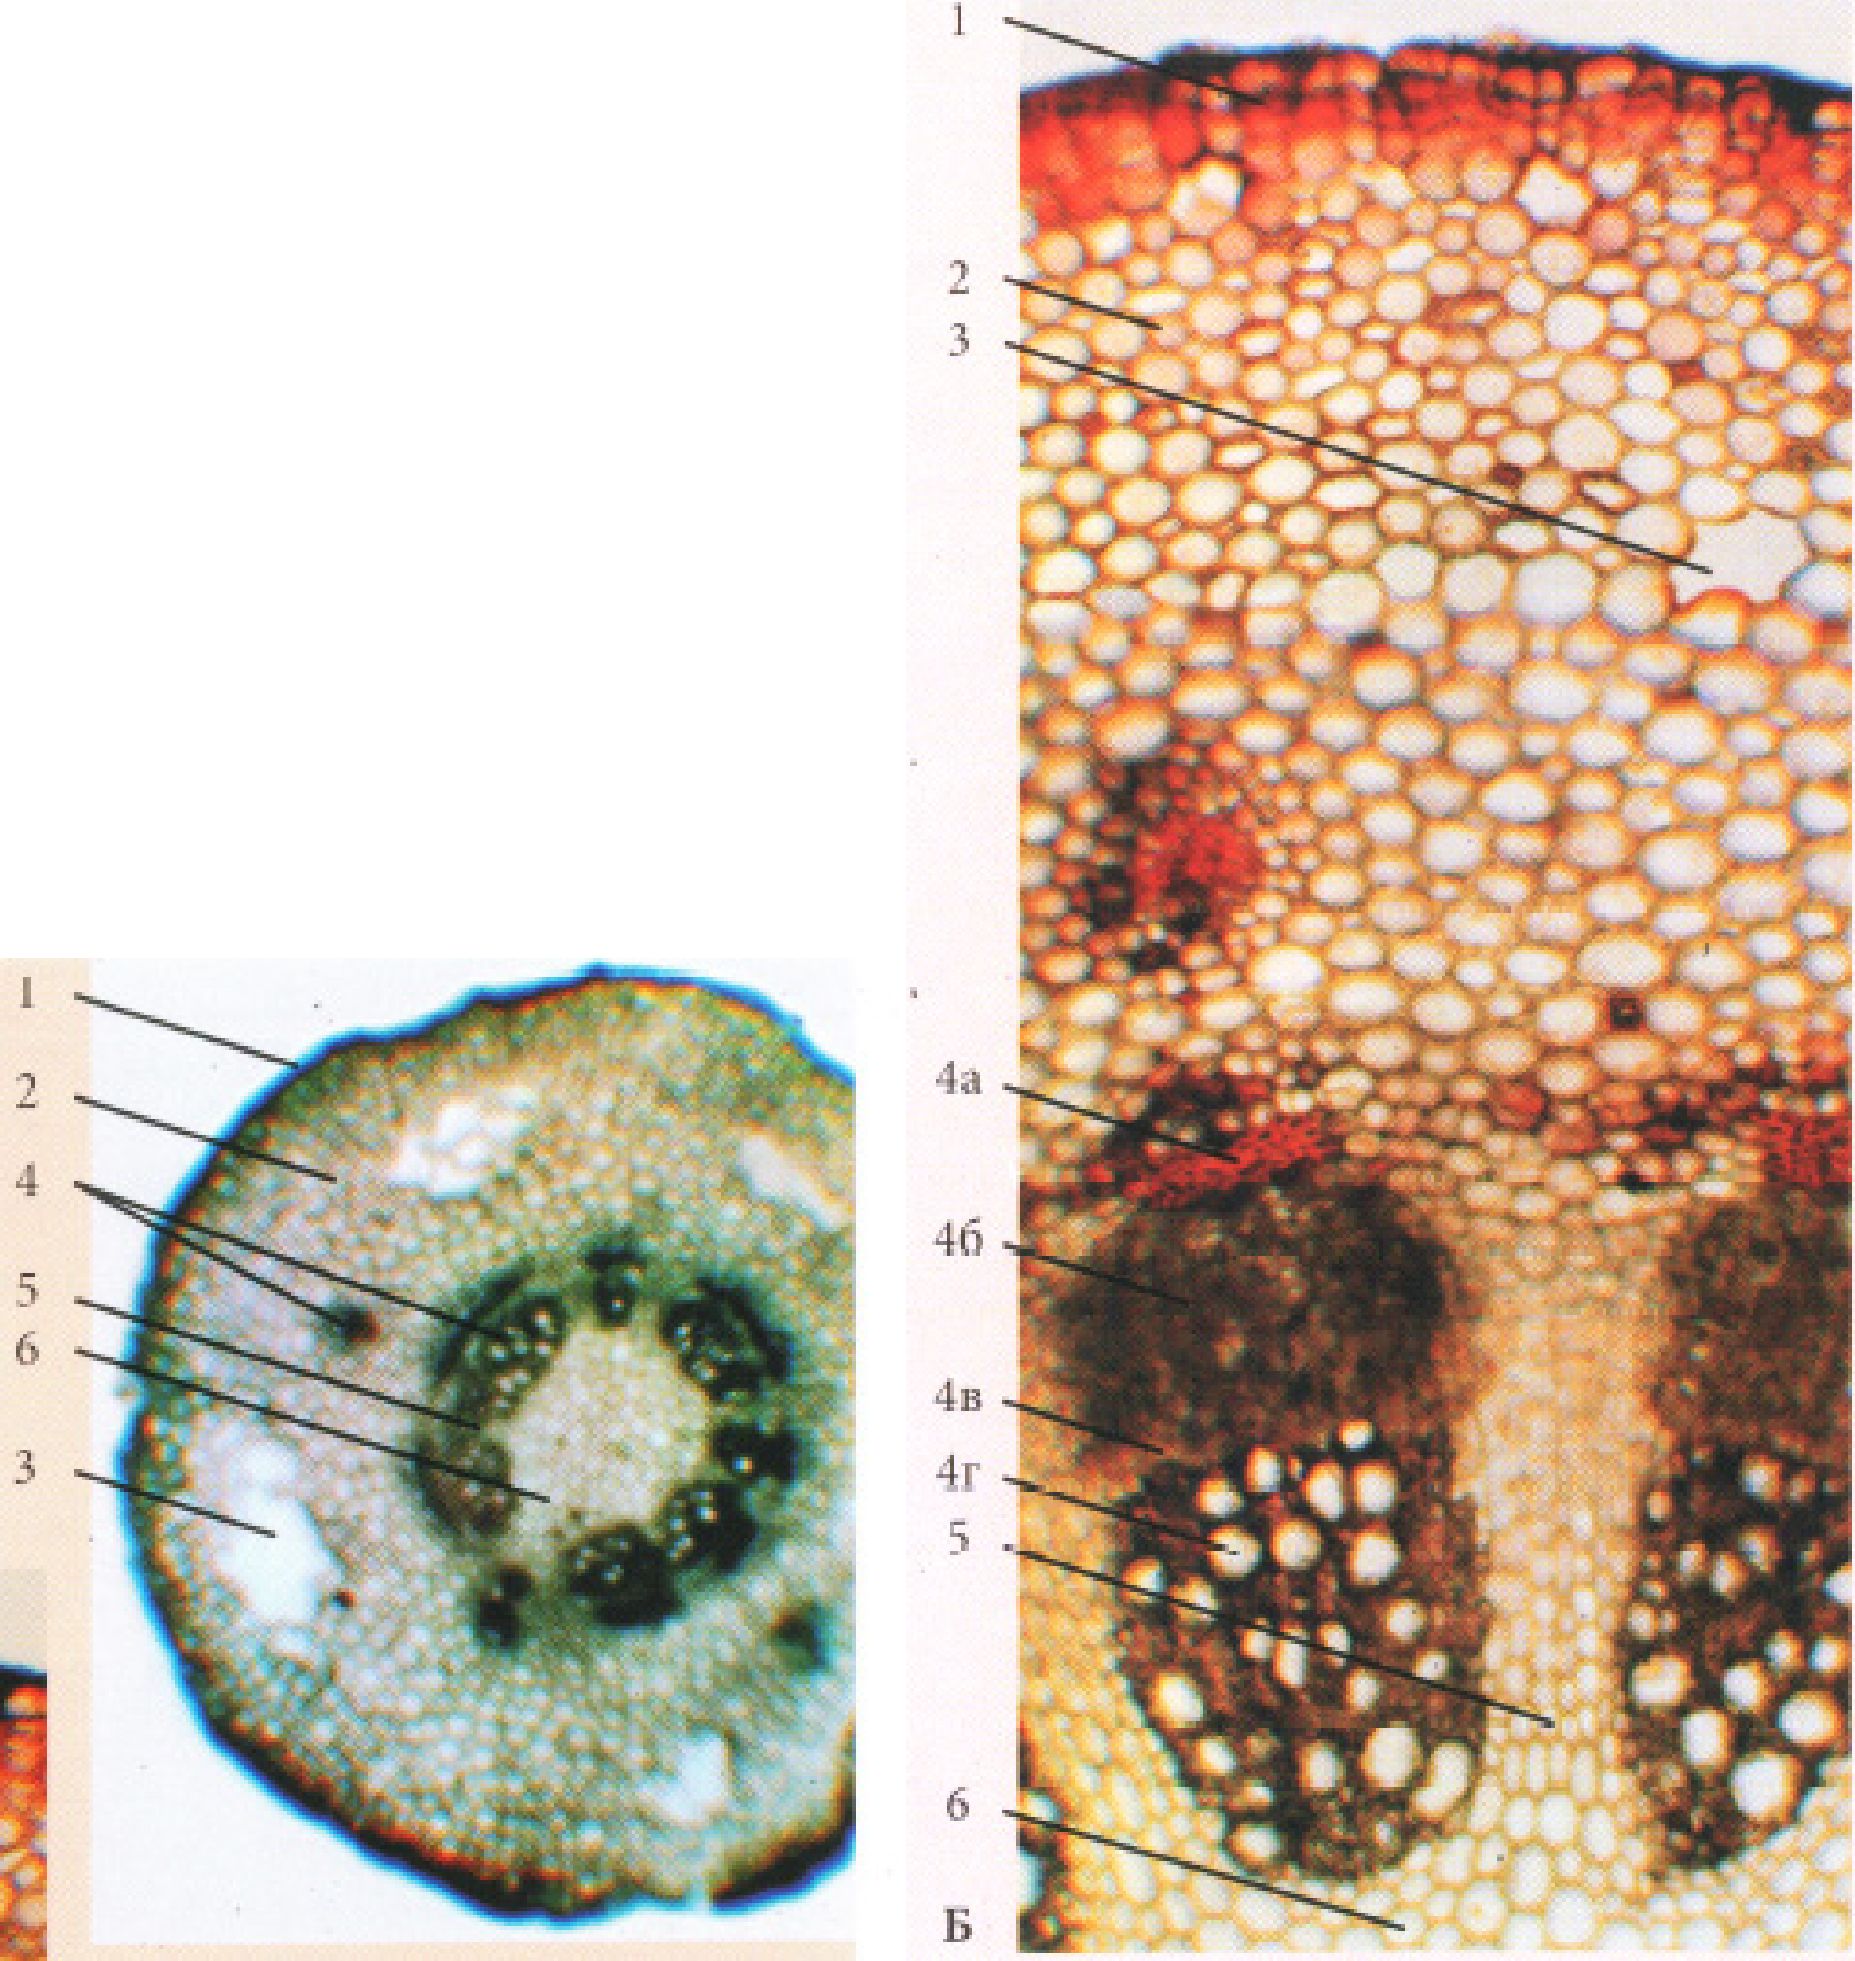
Fig. 25. Rhizome of the dicotyledonous plant of transitional type – Tussilago
farfara L.:
A – low magnification, B – high magnification: 1 – periderm, 2 – storage parenchyma of the primary cortex, 3 – cavity, 4 – vascular bundle (a – sclerenchyma, b – phloem, c – cambium, d – xylem), 5 – medullary ray, 6 – storage parenchyma of the pith.
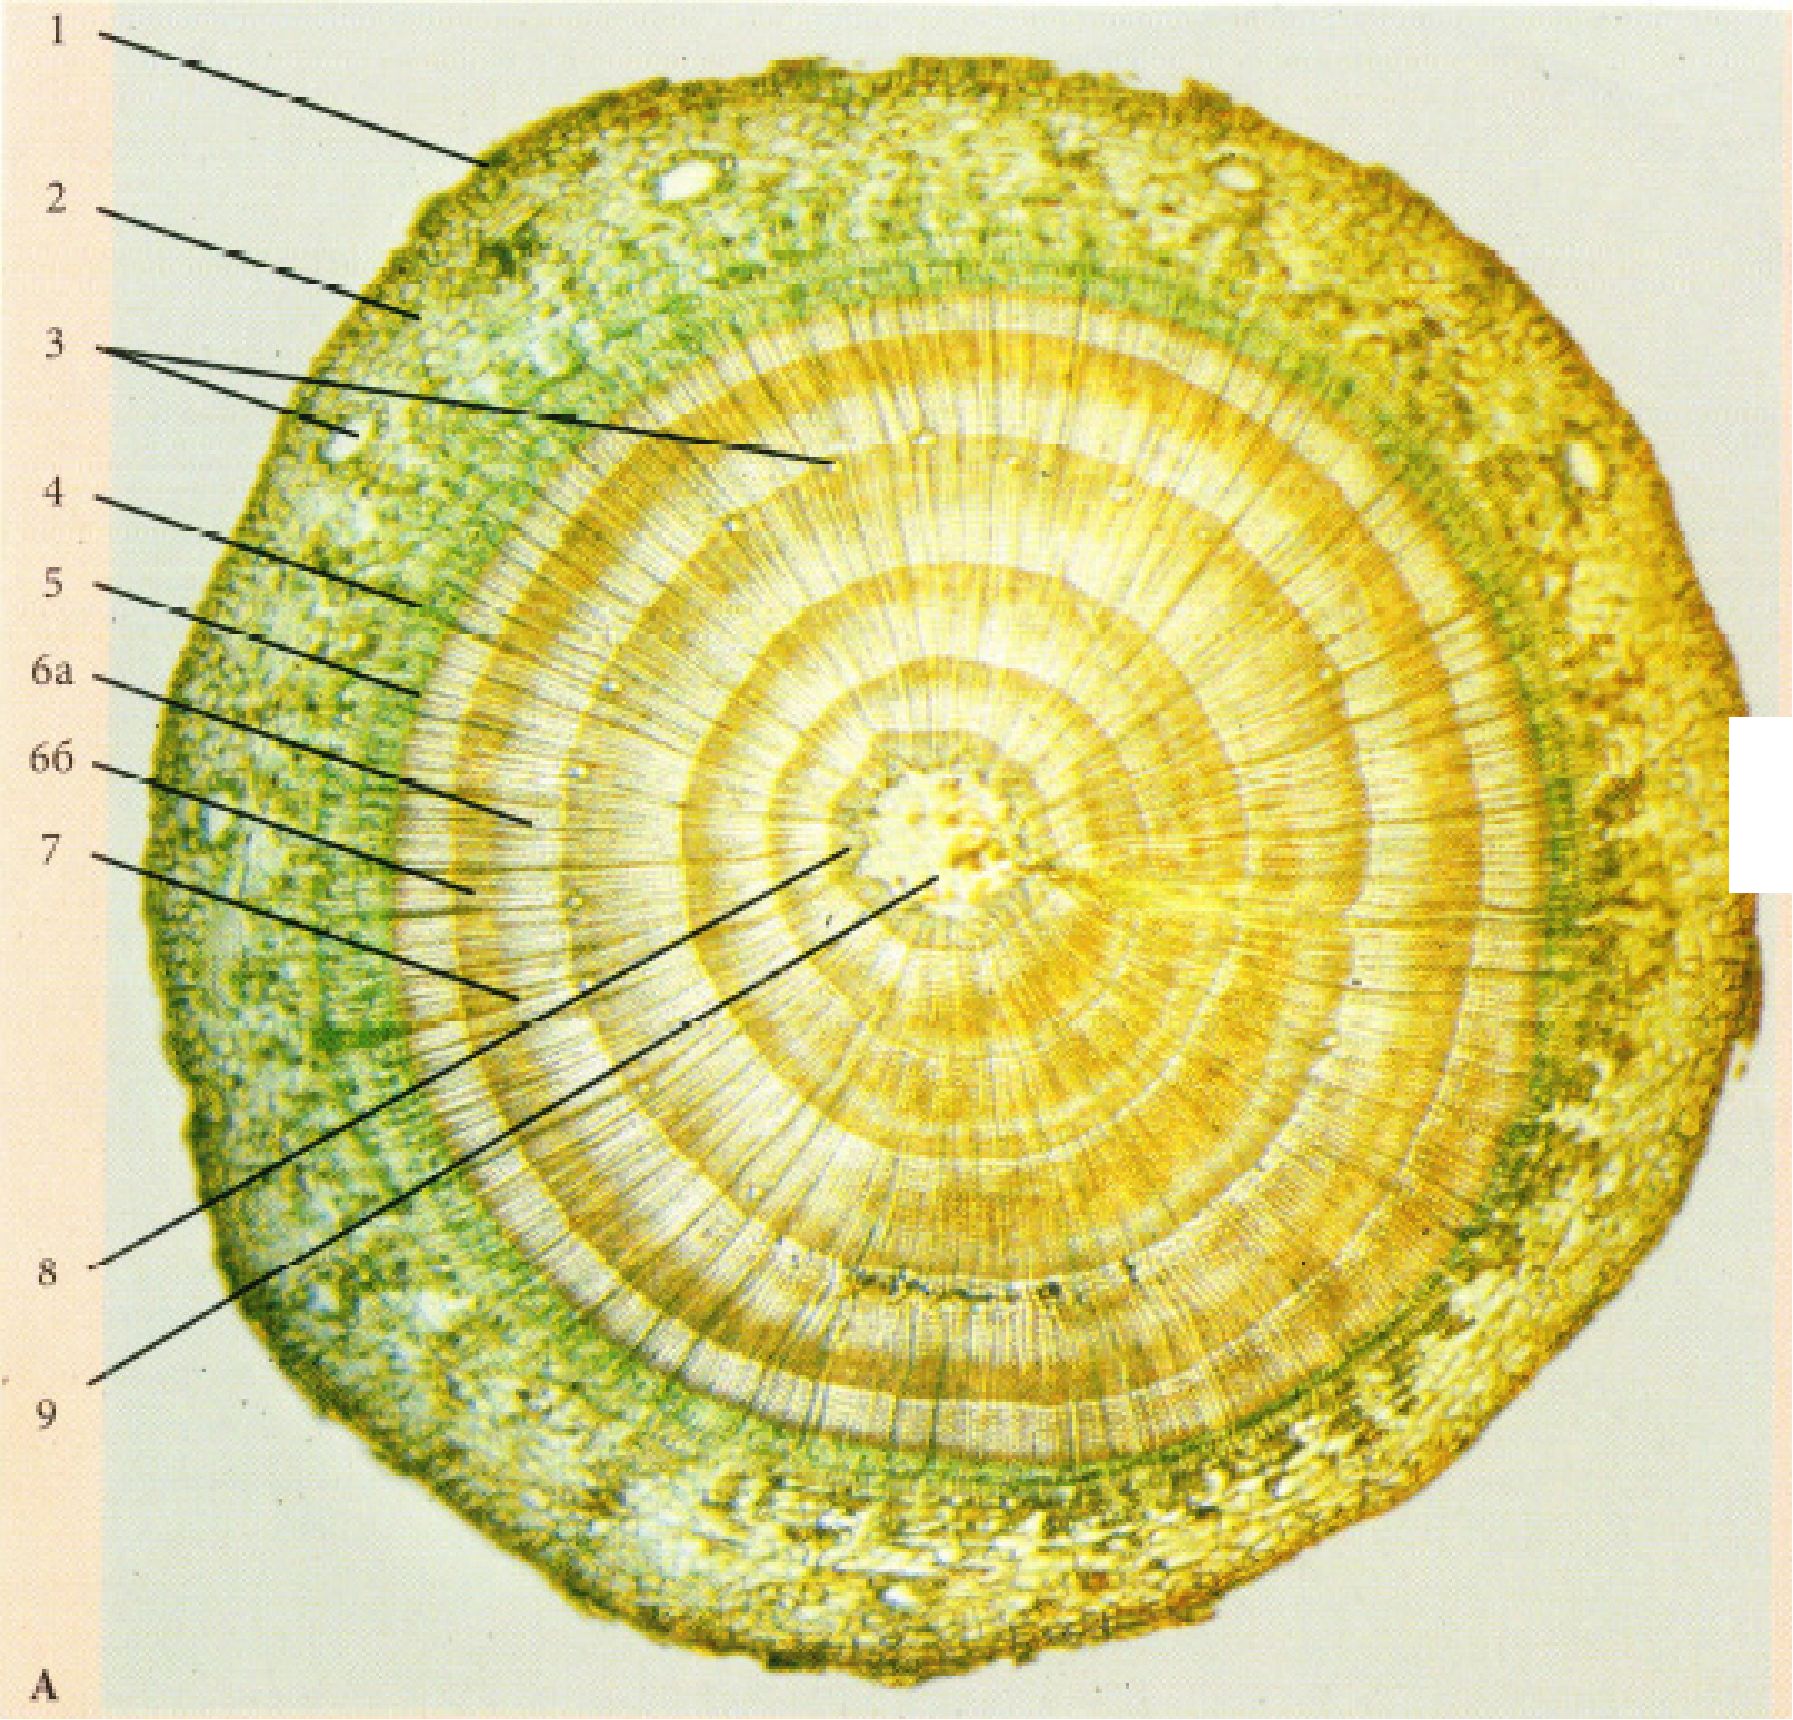
Fig. 26. Stem of the gymnosperm plant – Pinus sylvestris L.:
1 – periderm, 2 – cortical parenchyma, 3 – resin duct, 4 – secondary phloem (bast), 5 – cambium, 6 – secondary xylem (wood) (a – spring tracheids, b – autumn tracheids (a, b – annual ring)), 7 – medullary ray, 8 – primary xylem, 9 – pith.
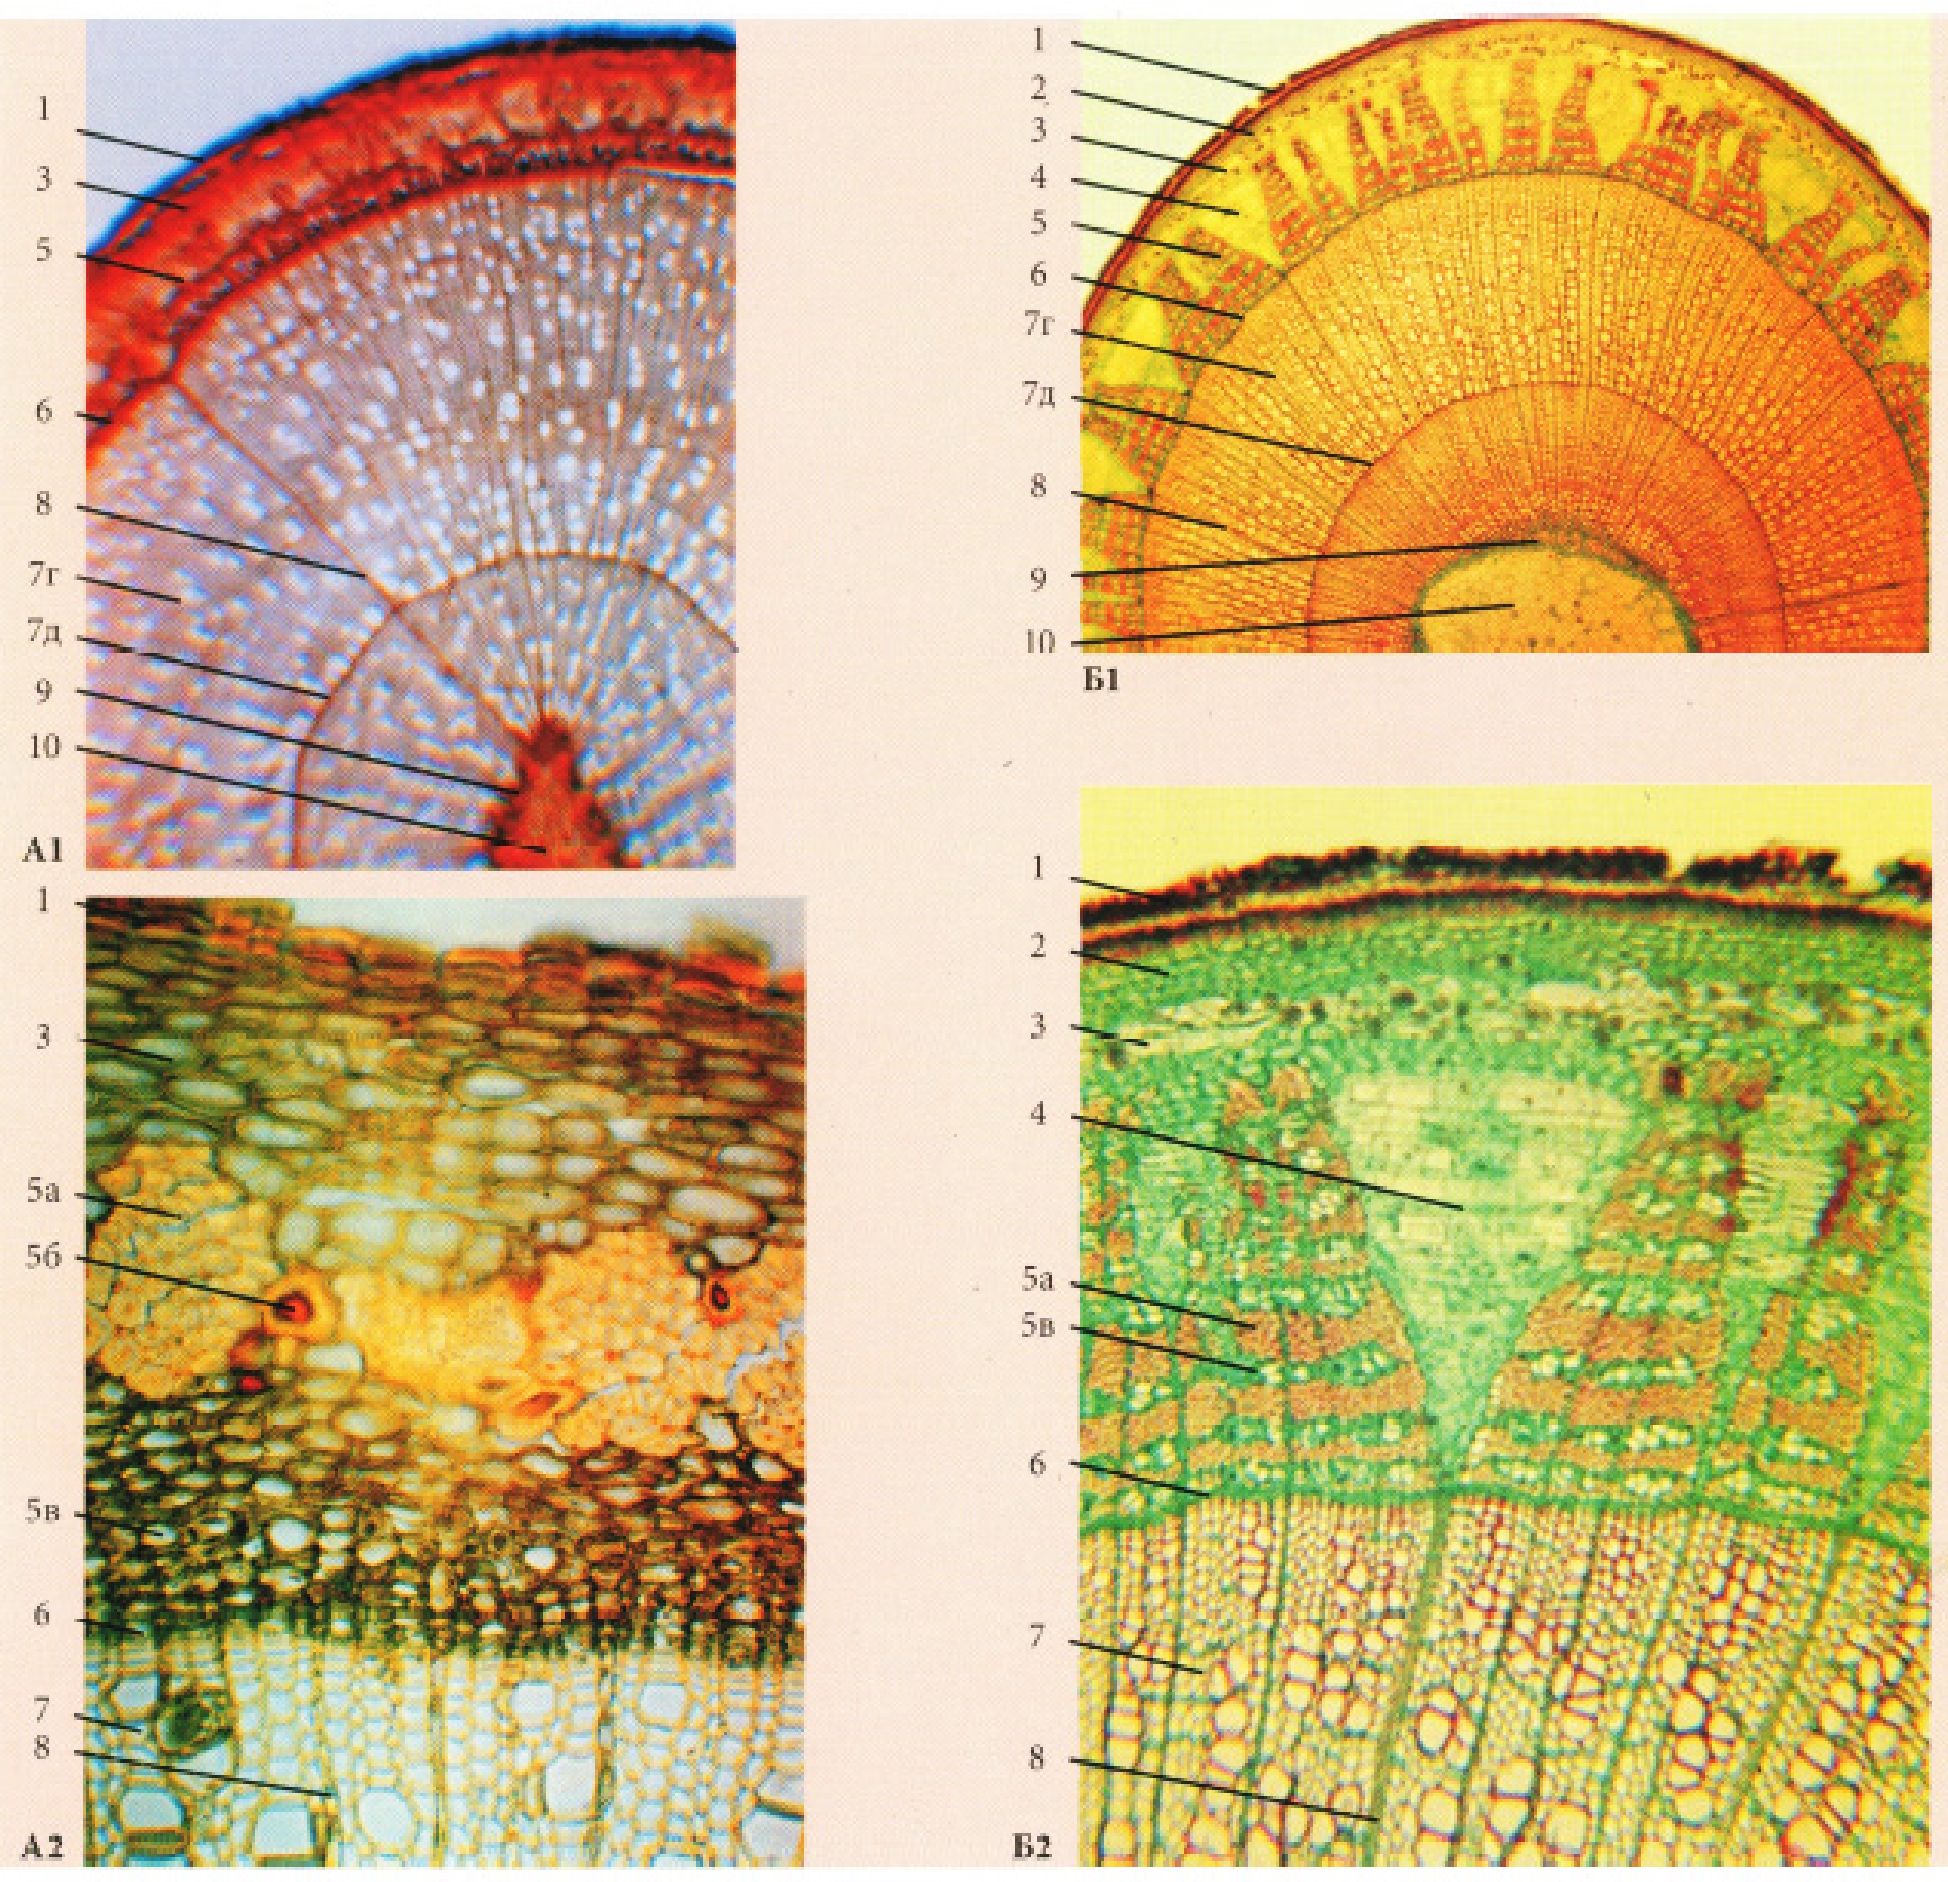
Fig. 27. Stems of woody angiosperms:
A – Betula verrucosa Ehrn.; B – Tilia cordata Mill.: 1 – under low magnification, 2 – under high magnification: 1 – periderm, 2 – collenchyma, 3 – cortical parenchyma with druses, 4 – parenchyma of the medullary ray apex, 5 – secondary phloem (bast) (a – bast fibers, b – sclereids (thick-walled bast), c – sieve tubes with companion cells and bast parenchyma (thin-walled bast)), 6 – cambium, 7 – secondary xylem (wood) (d – spring elements, e – autumn elements (d, e – annual ring)), 8 – medullary ray, 9 – primary xylem, 10 – pith.
Appendix 8
і-о • • • •••
Histochemical Reactions
Detection of Cellulose.
To detect cellulose, two classical reactions are most commonly used: with chlor-zinc-iodine reagent and with iodine in potassium iodide followed by sulfuric acid. The reaction with chlor-zinc-iodine reagent (according to Novopokrovsky).
Chlor-zinc-iodine is prepared by mixing two solutions: I – 20.0 g of dry zinc chloride is dissolved in 8.5 ml of distilled water with heating, and the solution is allowed to cool; II – 1.5 g of crystalline iodine and 3.0 g of potassium iodide are dissolved in 60 ml of cold distilled water. With constant stirring, solution II (approximately 1.5 ml) is added dropwise to solution I until saturation, i.e., until a precipitate appears. The mixture is allowed to settle, the clear supernatant is decanted, and it is stored in a dark glass bottle with a ground-glass stopper. The section is placed in a drop of water, blotted with filter paper, the reagent is added, and it is covered with a coverslip. Chlor-zinc-iodine stains cellulose blue, violet, or blue-violet, while lignified cell walls are stained yellow-brown shades. The coloration may be masked by the presence of lignin, lipid-like substances, pigments, etc., in The Cell wall.
Reaction with Iodine in Potassium Iodide Solution with Sulfuric Acid (Johansen
Method).
Sections, after preliminary immersion in distilled water and blotting with filter paper, are placed in a drop of a 1% solution of iodine in potassium iodide (2.0 g of potassium iodide, 0.2 g of crystalline iodine, 100 ml of distilled water), covered with a coverslip, and kept in the dark for approximately 10 minutes. Then, a drop of 65% sulfuric acid (or a mixture of two parts concentrated sulfuric acid and 1 part water) is introduced under the coverslip. After the solutions mix, microscopic observation is carried out immediately. The cellulosic cell wall turns blue (to violet). The quality of staining may be affected by Other components of the cell wall. The lignified cell wall stains in orange-yellow shades. This reaction requires increased caution, as evaporation of sulfuric acid leads to the degradation of the Optical Properties of the objective lenses.
Detection of Lignified Cell Walls (Lignin).
The most characteristic reactions for lignin include the phloroglucinol and permanganate tests, as well as frequent treatments with aniline sulfate and safranin.
Phloroglucinol Reaction
The section is placed in a drop of distilled water, blotted with filter paper, and kept for 3–4 minutes in 2–3 drops of a 1–5% alcoholic solution of phloroglucinol; then 3–4 drops of 25% sulfuric acid are added, and the section is covered with a coverslip. Alternatively, the section can be treated with a 0.5% solution of
phloroglucinol in a 1:1 mixture of alcohol and distilled water, followed by Treatment with 20% sulfuric acid after 1–2 minutes. Depending on the section thickness and the degree of lignification, lignin-containing cell walls turn cherry-red, purple-red, or exhibit other shades of red. This coloration is unstable and disappears within 5–7 minutes, especially in the Presence of water or upon heating.
Permanganate Reaction
Apply 2–3 drops of a 1% potassium permanganate solution to the sections. After they turn brown, rinse with 10% Hydrochloric acid until the tissues are completely decolorized. Next, rinse the sections with distilled water, remove excess water with filter paper, place them in concentrated ammonia solution, cover with a coverslip, and observe under a microscope. Lignin-containing cell walls briefly stain in tomato-red shades.
Aniline Sulfate Reaction
In a drop of a mixture consisting of 2.0 g aniline sulfate, 4 mL acetic acid, and 194 mL 50% ethanol (or alternatively 1.0 g aniline sulfate, 70 mL distilled water, 30 mL 96% ethanol, and 3 mL concentrated sulfuric acid), lignified cell walls acquire a color ranging from yellowish to lemon-yellow and canary-yellow.
Safranin Reaction
Plant sections are immersed for 30–60 minutes in a 0.5–1.0% dye solution of
safranin in 50% ethanol. Afterward, the sections are rinsed with water, transferred to 96% ethanol to wash out excess stain, and rinsed with acidified ethanol (2 drops of concentrated hydrochloric acid added to 100 mL of 96% ethanol) until the stain is removed from non-lignified tissues. The sections are then transferred to glycerin. Depending on the degree of lignification, cell wall coloration ranges from pink to magenta-red.
Detection of Starch
Starch is best observed in water or highly diluted glycerin.
The classical test is the iodine reaction using Lugol's solution. To prepare it, 2.0 g of potassium iodide is dissolved with heating in 5 mL of distilled water, 1.0 g of crystalline iodine is added, and the volume is brought to 300 mL with water. Reagents must be stored in dark glass containers. Upon treatment with Lugol's solution, starch grains may stain from pale blue and faint violet to intense blue, almost black. Starch grains in certain cereals stain reddish with brownish to violet shades when treated with iodine-containing reagents, whereas starch paste stains reddish-violet.
Detection of Storage Proteins (Aleurone Grains)
The simplest and most accessible test for aleurone grains is the reaction with Lugol's solution, which stains them yellow. For specimens rich in fatty oils, optimal results are achieved by observing the sections not in water, but in a concentrated sugar syrup or anhydrous glycerin.
Detection of Mucilage
Mucilage readily dissolves in water and washes out of the section. Alcohol, concentrated sugar solutions, and glycerin hinder its swelling. If a section is placed in ethanol, covered with a coverslip, water is then added under the coverslip while drawing off the alcohol from the opposite side with filter paper, mucilage swelling can be directly observed. Cellular mucilage in a drop of freshly prepared black India ink (1:10) appears as glassy, unstained lumps sharply contrasting against a dark gray background; as they dissolve in water, they gradually swell and spread, or thickened mucilaginous walls become visible in the preparation. When sections are placed for 5–10 minutes in a saturated copper sulfate solution, rinsed with water, and transferred to a 50% potassium hydroxide solution, mucilage stains blue (e.g., in Malvaceae) depending on its chemical composition. Pectin mucilage, after prior treatment with a 10% aqueous solution of lead acetate, stains yellow with iodine. Cellulose mucilage stains faintly blue with iodine, and turns bright red when treated with Congo red in an alkaline medium. An alcoholic solution of methylene blue (1:5000) stains mucilage more intensely than surrounding cells.
Detection of Fixed and Essential Oils, Resins, Waxes, Cutinized, and
Suberized Cell Walls
To detect general Lipids, including fats, the reaction with the fat-soluble dye Sudan III is most commonly used. To prepare it, 0.1 g of the dye is dissolved in 20 mL of 96% ethanol, or 0.01 g in 10 mL of a 1:1 mixture of 96% ethanol and glycerin. The solution is stored in a dark glass bottle and filtered after a week. Sections are placed in the dye solution for 10 minutes and mounted in glycerin after staining. Fats, oils, waxes, and free Fatty acids stain pink, orange, and orange-red with Sudan III. Sudan Black B stains fats dark blue. To distinguish fats from essential oils, sections are placed in a drop of a 1:1 mixture of 50% aqueous potassium hydroxide and concentrated ammonia, covered with a coverslip, and the edges sealed with sealant. After a few days, needle-like soap crystals—readily visible under a polarizing microscope—precipitate around the periphery of fatty oil droplets. Unlike fatty oils, essential oils are readily soluble in ether, chloroform, ethanol, concentrated acetic acid, chloral hydrate, etc. They dissolve in concentrated sulfuric acid with a yellow or brown coloration. When water-mounted preparations are heated and gently boiled for a few minutes, essential oils evaporate, whereas fatty oils remain intact.
Resins are detected using Tschirch's reaction. Sections are placed in a drop of saturated aqueous copper oxalate and heated on a water bath to 100°C, whereupon molten resin turns emerald-green. Treatment with a saturated solution of Sudan III in 50% alcohol for 10–15 minutes colors resins pink in sections acidified with nitric acid.
Waxes are readily soluble in ether. If a section of the studied epidermis is placed on a microscope slide, covered with a coverslip, and the ether is allowed to evaporate, various wax crystals will remain on the glass. Waxes are insoluble in cold water, but melt and coalesce into droplets upon boiling.
Suberized and cutinized cell walls, much like fats, stain with Sudan III. Upon treatment with chlor-zinc-iodine reagent, they turn yellow to brown.
Detection of Crystalline Inclusions
Calcium oxalate crystals (druses, raphides, solitary crystals, etc.) gradually dissolve in concentrated hydrochloric and nitric acids without releasing carbon dioxide bubbles or forming a precipitate. In concentrated sulfuric acid, the crystals dissolve, but gypsum crystals form in their place; they are insoluble in acetic acid. Calcium carbonate crystals (cystoliths) dissolve in concentrated hydrochloric and nitric acids with the release of carbon dioxide bubbles. Calcium orthophosphate precipitates as crystals upon exposure to a 2% sulfuric acid solution. When sections are kept in ethyl alcohol for an extended period, colorless or pale yellow spherocrystals precipitate. They dissolve slowly in water and ammonia, and readily in hydrochloric, sulfuric, and nitric acids. Silicon dioxide, which impregnates the cell walls of horsetails and grasses or forms "silica bodies," appears as a siliceous Skeleton upon incineration and calcining of plant material on mica. When phenol crystals are added to dry plant material and subsequently melted over a burner, all tissues become transparent, while the siliceous skeleton or silica inclusions acquire a pinkish-green luster.
Last update: 07/08/2026
Editorial and Educational Adaptation: This material has been compiled based on the primary/original source text. The project team performed an editorial review, corrected technical inaccuracies, structured sections, and adapted the content for an educational format.
What was processed:
- elimination of formatting defects (OCR errors, structural breaks, corrupted characters);
- editorial organization of content;
- standardization of terminology in accordance with academic sources;
- verification of factual statements against the original source text.
All mentions of the author, publication year, and origin of the primary text have been preserved in accordance with the source.