Antibiotics (Properties, Application, Interactions) - M.P. Cherenko 1999
Desmurgy
Desmursia (from Greek desmos — ligament, ergon — action), or the science of bandages, is an independent branch of general surgery.
A bandage is an essential tool for covering a wound or damaged body area to prevent or treat wound infection, apply a certain degree of pressure to a specific area for hemostatic or other purposes, and ensure its immobilization.
In a narrow sense, a bandage is understood as a means to secure or retain dressing material on a wound. The process of applying it to a wound is called bandaging. However, quite often the dressing material itself serves as the bandage, fulfilling a specific function. In this case, the terms "bandage" and "dressing" have the same meaning.
The Classification of bandages involves categorizing them by material, functional purpose, and the stage of medical care delivery. The functional purpose generally determines the choice of a specific material, while the stage of medical care (first aid, pre-hospital, and hospital levels) determines the type of dressing supplies.
Depending on the type of material, bandages are divided into two major groups: soft bandages and hard (or hardening) bandages. Soft bandages include gauze, roller bandages, fabric, gauze-collodion, adhesive plaster, and film-forming aerosol bandages.
Hard bandages include splint (rigid) bandages made of various Materials (wood, metal, plastic) as well as bandages made of plaster of Paris, starch, and modern polymer materials (fiberglass, resins) that harden during application.
Functional bandages are applied for a specific purpose. These include protective, supporting, compressive, hemostatic, occlusive, immobilizing, corrective, and traction bandages.
Protective bandages are used to cover wound surfaces, surgical incisions, and other surface INJURIES OF THE body. They are in direct contact with the wound. Gauze or fabric bandages, adhesive tape, and film-forming aerosols are used for such dressings.
The purpose of supporting (securing) bandages is to fix the dressing material in the area of application. Adhesive tape, adhesive substances, and elastic tubular bandages are most commonly used for this purpose.
Compressive bandages must maintain uniform additional pressure on a specific area of the body. They can be applied to areas where there is no threat to respiratory Functions (e.g., the neck) or Blood supply (e.g., the axilla). These bandages are applied using adhesive plaster (e.g., for umbilical hernias in infants), elastic bandages (for joints, extremities), and ointment preparations (zinc-gelatin unna boot for lower extremity venous diseases).
Hemostatic bandages are designed to stop bleeding from a wound (primarily capillary, or arterial and venous at the pre-hospital stage). This goal is achieved by using special hemostatic materials (hemostatic sponge, gauze, fibrin-forming plates such as TachoComb) or by applying elastic pressure to the bleeding site or vascular trunks (such as the temporal artery).
Occlusive (hermetic) dressings are used at the pre-hospital stage for penetrating wounds (mainly of the chest, to prevent pneumothorax). For this purpose, either standard individual dressing packets (IDP) or any airtight material is used.
Corrective bandages are designed to exert pressure on a specific part of the body in order to change its position or shape. They are predominantly made of hardening substances (e.g., corrective plaster casts for Scoliosis, enamel-lacquer boots for Clubfoot, Pavlik harness made of leather).
Traction bandages combine the function of immobilization with continuous traction in a specific direction. They are used at the hospital stage in an inpatient Setting. These are predominantly complex structures made of metal, wood, and wire. They include compression-distraction apparatuses (Ilizarov apparatus, etc.).
Multifunctional bandages combine several features: they secure the dressing, cover the wound, stop bleeding, and immobilize the injured area, among others.
Modern medical technology makes it possible to widely vary different functions using a single bandage.
Desmurgia utilizes A wide variety of materials—both traditional, time-tested classics (gauze, cotton wool, plaster of Paris, starch) and cutting-edge innovations (film-forming aerosols, fast-hardening fiberglass, etc.).
General Requirements for materials used for soft bandages that come into direct contact with the Skin or wound surface include: high capillarity, hygroscopicity, elasticity, sufficient strength, biological inertness (areactivity), non-irritating properties to the skin, ability to retain their properties after sterilization, and economic feasibility with low cost.
Cotton products—specifically gauze and absorbent cotton—have become the most widely used.
All types of materials used for bandaging can be categorized as follows: fabrics, bandages, fibrous materials; plastic (film-forming) materials; materials for hard bandages (wooden, metal, wire splints); and hardening materials such as plaster of Paris, starch, fiberglass, etc.
Fabrics primarily include absorbent gauze (tela hydrophilia). This is a cotton fabric or one blended with viscose threads. Gauze is cut into pieces of various sizes, from which Sponges are made by tucking the edges inward (their standard size is 4x4 or 8x8 cm), as well as gauze strips (10x90, 10x50 cm) and tampons.
Gauze can be impregnated with various substances—anti-inflammatory, antiseptic, or hemostatic agents.
In addition to gauze, unbleached calico is used, predominantly in the form of triangular bandages (80x80x113 cm), sheets, and separate strips. These are applied when a tight bandage is required, or a simple and convenient one at the pre-hospital stage (triangular bandages, improvised slings, etc.).
Stiffened fabric is used for so-called starch bandages.
Linen fabric, which is denser than cotton, also withstands repeated sterilization much better and is therefore most frequently used for surgical linens.
A special type of dressing fabric is tylexol. It is a cotton fabric with exceptionally high drainage properties, which is why it is used for treating Burns.
Bandages (fasciae) are the most common material for soft dressings. They consist of a strip of gauze of varying width (5–15 cm) and length (2–3 m) rolled into a tight cylinder. Bandages can be sterile or non-sterile. They allow for applying dressings of various shapes to any part of the body.
Class="center">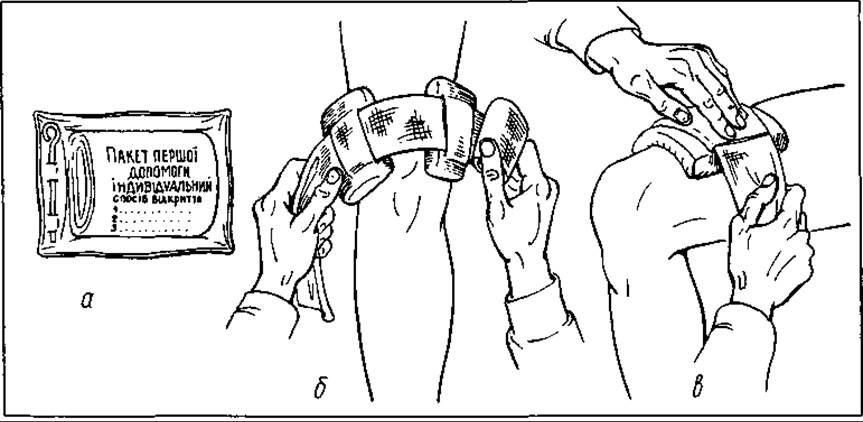
Fig. 141. Application of a dressing package (a) to through (b) and blind (c) wounds
Bandages retain hygroscopicity, air permeability, and plasticity, and do not irritate the skin.
Ready-made special bandages (adhesive zinc-gelatin, starched, plaster) are produced on The basis of standard gauze bandages.
Elastic bandages are made of cotton fabric interwoven with rubber threads, which increases their elasticity. Some companies manufacture elastic bandages with an adhesive layer on one side to facilitate dressing formation (monolast, haftelast for bandage fixation; furelast, porelast, porodress, popelast as elastic bandages).
A special dressing form based on a bandage, gauze, and cotton wool is the individual dressing package (Fig. 141). They are convenient to use, sterile, and combine both wound-covering and fixing materials.
Tubular bandages look like a seamless tube made of hydrophilic mesh material, the elasticity of which is achieved through a special type of weaving. They have significant advantages over gauze bandages due to their versatility and ease of application. They come in various diameters (1–10 cm) and lengths.
Fibrous materials are most commonly used as an adjunct to other dressing materials. They appear as pads that enhance hygroscopicity and capillarity, protect sensitive skin areas from compression, and retain heat. Such materials include bleached (hygroscopic) and unbleached (non-hygroscopic, gray) cotton wool, as well as Cellulose wadding (Lignin) used in the form of wipes. They are characterized by high hygroscopicity and capillarity, but are fragile and non-elastic.
Plastic film materials have become widespread in recent decades. This is a liquid that, after being applied to the skin surface via aerosols (or smearing), polymerizes to form a thin transparent film. The main requirements for these products are that they must be stable, non-irritating, non-allergenic, non-toxic, and not interfere with skin Respiration and wound healing processes. These requirements are met by aerosols based on acrylic and methacrylic acids. Examples include lifusol (Russia), plastubol (Hungary), akutol (Czech Republic), nobecutan (Sweden), liquidoplast (Germany), and others.
Film-forming aerosol dressings are widely used for clean, dry wounds showing no signs of suppuration or wound discharge.
Adhesive compositions (kleol and collodion) are used to glue the edges of gauze dressings to the skin.
Adhesive plaster is a type of dressing material consisting of a fabric backing and a thin layer of adhesive substance. The backing must be sufficiently dense, and the adhesive layer must not dry out or irritate the skin. Certain substances are sometimes added to it. Adhesive plaster is used to fix other dressing materials to a wound, approximate wound edges, and support a fresh scar after early suture removal (on the 2nd–3rd day post-operation). It is less commonly used as an immobilizing material or for taping (supporting ligaments and joints, particularly after injuries to the tendon-ligament apparatus of the limbs).
Given the predominantly immobilizing function of rigid dressings, the material used for them must be durable, lightweight, user-friendly, Water-resistant, and non-irritating to the skin.
Pre-hospital immobilization is performed using splint dressings.
They are made of wood, plywood (Dieterichs splint for leg fractures; Yelansky splint for cervical spine fractures; CITO transport splints), wire (multifunctional Kramer splints in the form of long ladders), metal (standard splints), and plastic (pneumatic and splint boards of various SHAPES AND SIZES). Preference is given to multifunctional and wire splints.
The requirements for long-term immobilization dressing materials, used primarily at the hospital stage, are even more stringent. In addition to the properties mentioned above, these materials must also be pliable and fast-setting.
Plaster of Paris is the most popular among them. Plaster bandages are safe for health, biologically inert, pliable—allowing the dressing to easily adapt to any part of the body—and simple to use.
The disadvantages of plaster casts include slow drying time (36–60 hours), low strength (especially after re-wetting), incomplete radiolucency, etc.
Plaster of Paris is used in the form of plaster bandages, where plaster powder (CaSО4) is impregnated into a gauze strip.
An alternative to plaster casts has emerged in the form of fiberglass and resin dressings, manufactured as rolled, hermetically sealed strips. They set within 10–30 minutes.
Thermoplastic materials (orthoplast, hexelite) have also been synthesized, which can be molded when heated to 72–75 °C. They can be reused multiple times. The disadvantages of these materials include The Need for protective gloves (for the physician's hands) and high cost. However, their lightness, durability, and water-resistance make them indispensable for treating elderly and senile patients.
APPLICATION OF DRESSINGS
The application of dressings is a complex and responsible Procedure. R. Vreden noted that every medical professional must know how to properly apply a bandage, and every surgeon must be a master of this craft. An improperly applied dressing can lead to serious complications and have the same consequences,
just as a poorly performed surgery is. Therefore, certain requirements apply to the bandage itself as well as the rules governing its application process.
Thus, any bandage is designed: a) to perform its function to the maximum extent possible; b) to maintain physiological conditions for the function of a particular organ and the entire Organism;
c) to be neither too loose (not sliding) nor too tight (except for special bandages), without impairing BLOOD AND Lymph Circulation; d) to be comfortable for the patient, without distressing their psyche; e) to be aesthetically acceptable.
Rules for bandage application:
1) the organ to which the bandage is applied should be at the chest level of the person performing the dressing, and the injured body part must be as accessible as possible for the procedure;
2) at the moment of application, the organ must be in the exact position it will maintain after dressing, throughout Treatment or transportation. This position must be functional (for the shoulder joint — abducted arm position; for the elbow — forearm flexed at a 90° angle; for the hand — the "holding a ball" position; for the hip joint — straightened thigh; for the knee — lower leg in a slightly flexed position (10°), etc.);
3) the patient's Muscles (especially of the extremities) must be as relaxed as possible. To achieve this, the injured limb should be supported or auxiliary rests, rolls, etc., should be used.
Requirements for the person applying the bandage:
1) they should stand or sit facing the patient to observe their facial expression (reaction to the bandage) and monitor pain responses during the dressing;
2) the posture of the person applying the bandage must be as comfortable as possible;
3) during application, secondary complications in the traumatized organ must be prevented—such as bone fragment displacement, damage or compression of vascular and nerve bundles by fragments, bandage slippage, additional microbial contamination of the wound, etc.;
4) the size of the dressing material must correspond to the size of the organ to which it is applied;
5) dressing should begin from the narrower, peripheral edge toward the wider, proximal one (this ensures the bandage holds better);
6) the bandage starts with several circular turns of the roller bandage.
The most common soft bandages in surgery are protective and fixing ones.
Protective bandages are designed to prevent primary (in surgical wounds) or secondary (in accidental open injuries) contamination of damaged body areas.
The type of protective bandage depends on The Nature and extent of the injury, application conditions, and the duration the bandage remains on the body.
The simplest are adhesive bandages for small scratches, minor cut, puncture, and contused wounds. For this purpose, special medical adhesives (BF-6, adhesive-88, their mixtures with antiseptics, Novikov's liquid, etc.) are used. They are applied directly to the damaged areas of the skin. The adhesive sets within 3—5 min, forming a protective film that reliably shields the wound from infection, lasts for about 3—4 days, is waterproof, does not restrict movement, and promotes epithelialization.
This group also includes dressings using film-forming aerosols ("Lifuzol," "Plastubol," "Acutol," "Nobecutan," etc.). They are convenient, multifunctional (combining protective and therapeutic properties), can be applied to any skin area, and allow monitoring of the healing process. However, their common drawback is the impossibility of use on moist surfaces in cases of purulent, exudative processes, or bleeding wounds. In the absence of these complications, the skin is disinfected and degreased before applying adhesive protective substances, and the wound is treated with antiseptics. The aerosol is applied in 2—3 layers with an interval of 15—30 s.
The film persists for 6—8 days. If necessary, the film layer is removed using ether or alcohol. In some patients, adhesive dressings may irritate the skin, occasionally causing allergic reactions.
A special form of protective dressing for undamaged skin prior to surgery is OPAL-CITO films, which are applied to antiseptic-treated skin either the day before surgery or immediately before it begins.
Adhesive plaster dressings are used for small, fresh wounds. They allow wound edges to be approximated and compressed, but using them without a gauze or other absorbent backing is undesirable: the adhesive tape seals the entire wound, preventing exudate drainage and obstructing wound "respiration." Therefore, bactericidal plasters with a gauze backing impregnated with antiseptics have become more widespread.
If it is necessary to protect a suppurating or bleeding wound, gauze-adhesive or gauze-bandage dressings are used.
Gauze-adhesive dressings consist of several layers of gauze or other absorbent sterile material (with or without antiseptics) and are applied to the wound using kleol or collodion, adhered to healthy skin areas around the perimeter. The dressings can be secured with a few strips of adhesive plaster.
Hemostatic bandages are best secured by bandaging.
In addition to standard bandaging, triangular and sling bandages are also used.
The purpose of a retention bandage is to secure dressing materials (therapeutic or protective) over a wound or injured area of the body.
Reliable securing of the material on a specific body part is achieved by using gauze-adhesive or gauze-plaster bandages, as discussed above.
Triangular, sling, and T-bandages are reliable, convenient, and easy to apply, particularly in a hospital setting.
A triangular bandage is applied using a piece of fabric shaped as a triangle (standard size 80x80x113 cm) or a square folded diagonally. It can be applied to virtually any part of the body, which is why it is used not only in the pre-hospital setting but also in clinical practice, as well as for temporary limb immobilization.

Fig. 142. Applying a bandage to the hand
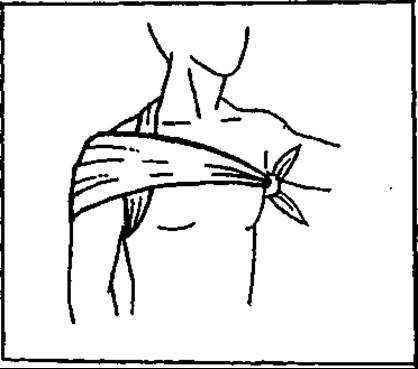
Fig. 143. Applying a bandage to the shoulder
The advantages of triangular bandages include their cost-effectiveness and safety regarding the compression of Blood Vessels, nerves, and other Tissues—the so-called tourniquet effect.
A triangular bandage features an apex, a base, and 2 ends. Rolling the bandage from the apex into a strip 5–6 cm wide creates the material needed for so-called cravat bandages.
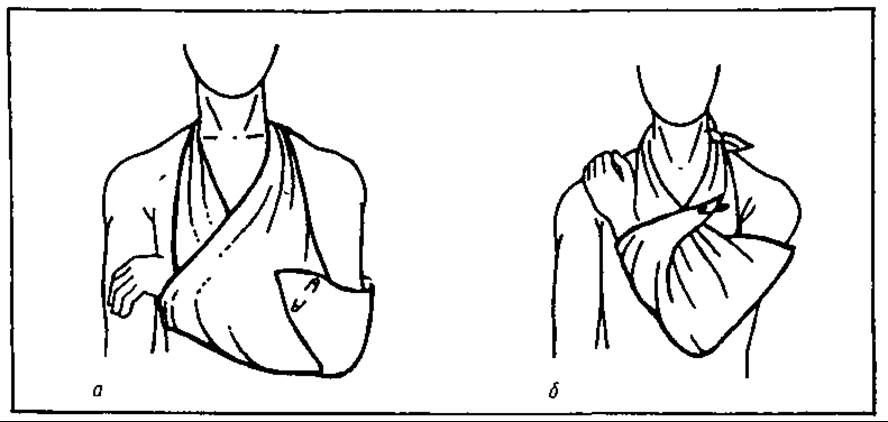
Fig. 144. Applying a bandage to the upper extremity: a — supporting; b — securing

Fig. 145. Applying a bandage to the FOOT
The general rule for applying triangular bandages is that the Base of the bandage is placed over the injured area or dressing material, its apex covers the remaining part requiring a bandage, and the ends are secured by crossing and tying them (on the side opposite to the wound).
The application diagrams for various types of triangular bandages are shown in Fig. 142–146.
Sling bandages are among the simplest types. They are made from a long strip of gauze, bandage material, or fabric, with both ends slit lengthwise to an equal distance. The middle (uncut) section of the bandage is placed over the affected area to secure the dressing, while the ends are crossed on the opposite side of the body segment and tied in pairs (Fig. 147). Such bandages are used to secure dressing materials on protruding PARTS OF THE body (such as the Nose or chin).
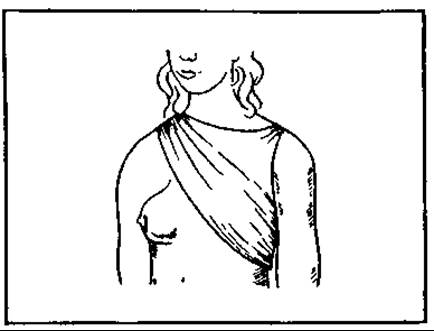
Fig. 146. Applying a supportive bandage to the mammary gland
T-bandages are made from 2 intersecting strips of bandage or fabric running perpendicularly to each other. Most commonly, a T-bandage is applied to the Perineum.

Fig. 147. Applying a sling bandage to the chin (a) and nose (b)
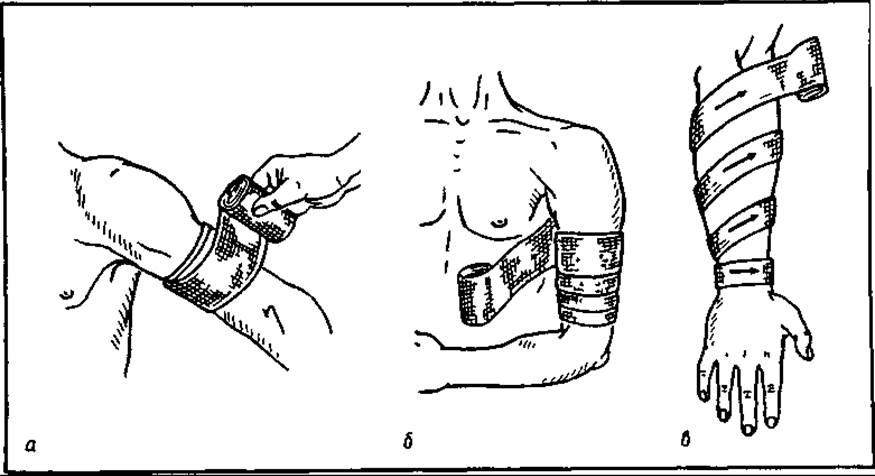
Fig. 148. Applying circular (a), spiral (b), and creeping (c) roller bandages
Among soft retaining bandages, roller bandages are the most commonly used. They are versatile, reliable, durable, and elastic, allowing for the required pressure to be applied to a specific area of the body.
However, one should not overlook the drawbacks of roller bandages.
First, there is the tourniquet effect in the bandage application zone, which creates unfavorable conditions for blood and Lymph Circulation and sometimes leads to nerve damage. Second, there is the economic inefficiency of using such a large quantity of gauze required for roller bandages. Therefore, The Use of elastic tubular net bandages, gauze-adhesive bandages, and adhesive sprays is a promising alternative.
Nevertheless, every medical professional must know the General Principles and techniques of applying roller bandages, as elements of bandaging are involved in the majority of Procedures in desmurgy.
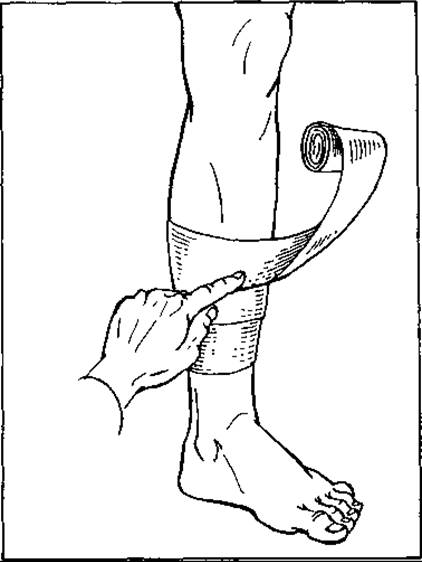
Fig. 149. Reversing the bandage for its snug fit to the leg surface when bandaging non-cylindrical segments
A bandage is a tightly rolled strip of gauze, 2–3 m long and 5–20 cm wide. The rolled part of the bandage is called the HEAD, and the free end is called the tail (or start). To apply a roller bandage, the head is held in the right hand (for right-handed persons) and the start in the left. The bandage should not be unrolled widely; instead, it should simply glide over The surface of the body part while remaining rolled. Depending on the pattern—the course of the bandage turns—roller bandages can be circular, spiral, creeping (serpentine), spica, turtle, or figure-of-eight. Any roller bandage begins and ends with circular turns that anchor it. The initial turns secure the bandage to the body part, and only in the case of a pure circular bandage are all turns placed at the same level so that each subsequent turn completely covers the previous one (Fig. 148, a). All other bandages are applied starting with 2–3 transverse turns, after which the course changes depending on the type of bandage: in a spiral bandage, each subsequent turn overlaps the previous one by two-thirds or a half, less frequently by one-third (Fig. 148, b). In spica and turtle bandages, the turns of the same direction are also applied similarly to the spiral bandage, with each subsequent turn overlapping the previous one by half or two-thirds; in a creeping bandage, the edge of each subsequent turn does not Touch the previous one (Fig. 148, c).
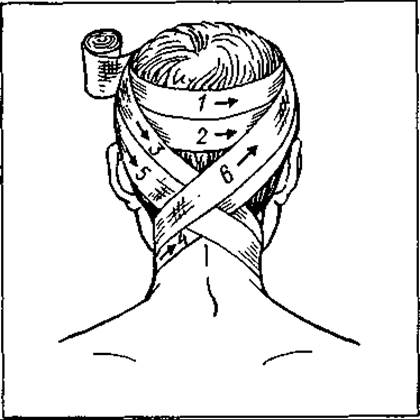
Fig. 150. Applying a figure-of-eight (cross-shaped) bandage to the posterior surface of the neck
These are the general rules for applying roller bandages.
Circular bandages are applied to small wound surfaces, mainly on the upper or lower extremities in segments that resemble a cylinder in shape (distal parts, forearms and legs, fingers, forehead, and rarely others).
Spiral bandages are most frequently used for injuries to the extremities, chest, and torso.
Creeping bandages are used to cover large wound surfaces on extremities to secure dressing material, after which a spiral bandage is applied.
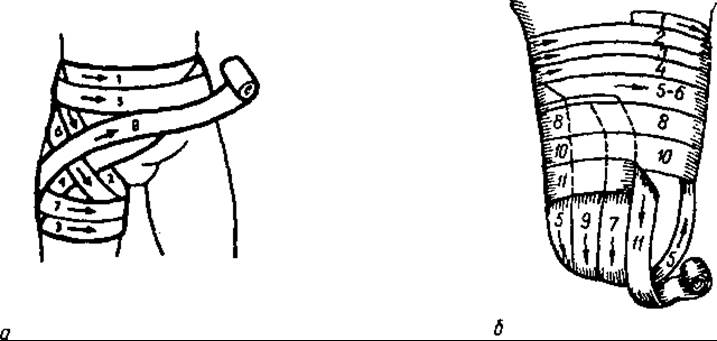
Fig. 151. Applying a spica bandage to the inguinal region (a) and a recurrent bandage to an amputation stump of the arm (b)
On the extremities, the turns are directed from bottom to top, i.e., in the direction of blood and lymph flow. The upper edge of every 3rd or 4th turn lifts away from the skin surface and does not lie flat against it; therefore, at this point, the bandage must be reversed (folded over) by 180° (Fig. 149).
The application of a roller bandage is also completed with circular turns (one or two). It is secured either by splitting the distal end of the bandage into strips, crossing them, and tying them over the bandage on the opposite side, or by stitching the end of the bandage in place or fastening it with a safety pin.
The course and turns of the bandage should have a uniform tension, or the initial turns should be the tightest with subsequent ones slightly looser, rather than the other way around. The bandage is secured by folding the starting end of the bandage after the first turn under the second turn (perpendicularly to the course of the latter) or by gluing THE START OF the bandage to the skin with collodion.
During application, one must continuously monitor the patient's facial expression as well as the color of the distal segment of the extremity to prevent organ compression and circulatory impairment.
The figure-of-eight (or cross-shaped) bandage is widely used when a wound is localized in the head, neck, chest, foot, popliteal fossa, hand, etc. In shape, it resembles the figure "8". Here, the bandage turns are repeated several times with crossovers along a single line, predominantly over the affected area. If the crossover occurs at the exact same spot, the bandage is called a cross-shaped (cruciate) bandage (Fig. 150). It is secured with several circular turns of the bandage. If the crossovers of the bandage turns are aligned along a single line and progressively advance with each turn upward or downward, overlapping two-thirds of the previous one, such a bandage is called a spica bandage (Fig. 151, a). It is most frequently applied to joints.
A variant of the figure-of-eight bandage is the turtle bandage, which is used primarily for bandaging the knee and elbow joints.
Recurrent bandages are used for bandaging amputation stumps on the lower and upper extremities (Fig. 151, b), as well as the foot and hand; they must be secured with collodion or initiated with a spica bandage over the joint. Without this, such bandages quickly loosen and slip off.
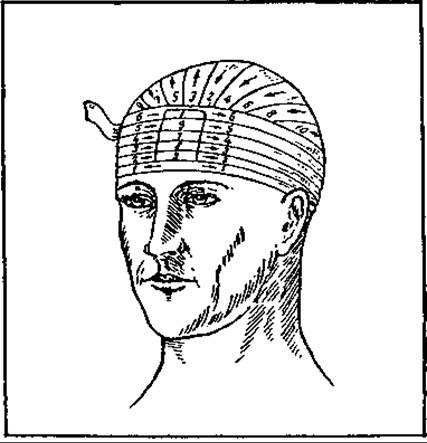
Fig. 152. Hippocrates' cap bandage

Fig. 153. Application of the cap bandage (a, b)
Almost all bandages applied to various parts of the body are combined, meaning they consist of circular (or spiral) turns mixed with figure-of-eight turns, which effectively secure the dressing material.
Before applying a bandage, one must select a bandage of optimal width and length: for the fingers and hand — 3–5 cm wide and 0.5–1 m long; for the upper limbs — 5–7 cm wide and 1–2 m long; for the lower limbs — 7–10 cm wide and 2–3 m long; for the torso — 10–15 cm wide and 3–5 m long.
Head and Neck bandages. The "Hippocratic cap" bandage, which covers the scalp, is primarily of historical significance because it is poorly fixed and easily slips off (Fig. 152). Therefore, in practice, the "cap" and "bridle" bandages are preferred.
The "cap" bandage (Fig. 153) is applied as follows. A piece of bandage approximately 1 m long is placed symmetrically over the crown of the head, with its ends hanging loosely on both sides of the head. At the level of the eyebrows and the occipital protuberance, the first circular turn is applied underneath the hanging ends. At each subsequent turn, a loop is made around the free end, after which the bandage is led across the back of the head to the other side, where another loop is made around the free end, and the bandage is brought across the forehead to the opposite side. Each successive turn is gradually shifted toward the crown until the bandage covers the entire scalp surface. The free ends are tied under the chin.
The "bridle" bandage (Fig. 154), in addition to the scalp, also covers the lateral surfaces of the face, chin, temples, and forehead. It begins with 2–3 circular turns across the forehead and occiput, then descends above the ear, passes to the rear, right, and front surfaces of the neck, and is then guided vertically upward along the left cheek in front of the ear. The required number of vertical turns is made, covering the crown and occiput; then the bandage is again passed behind the ear to the occipital region and neck, and horizontal turns are made for fixation.
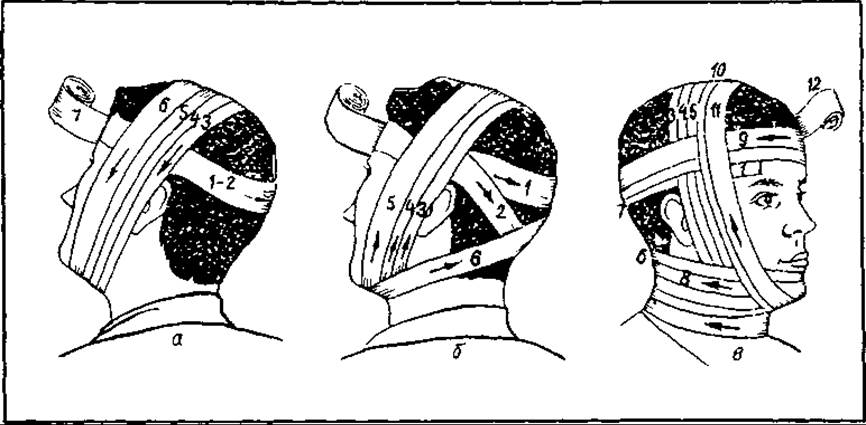
Fig. 154. Application of the bridle bandage to the temporoparietal region (a), temporoparieto-occipital region (b), and the chin (c)
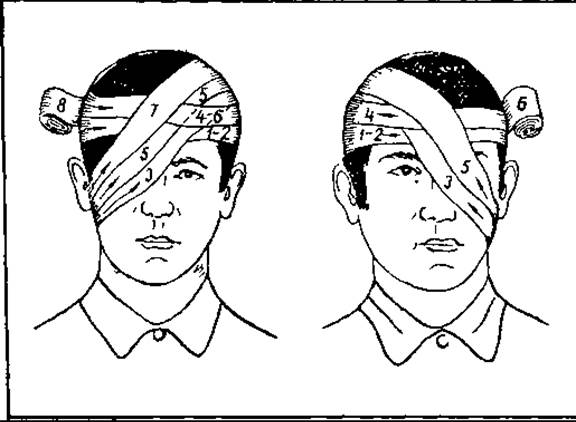
Fig. 155. Application of a single-eye bandage
A nodular (compressive) bandage is used to stop bleeding from the temporal artery. It is applied using a double-headed bandage. Bandaging begins at the temple of the uninjured side in a horizontal plane. A crossover is made at the site of the injury (a cotton-gauze pad is placed under the bandage to increase pressure on the wound), and the bandage is then directed perpendicularly to the first turn (in the frontal plane). Passing both heads again through the healthy temple to the affected one, a crossover is made there, and the bandage is continued in a horizontal plane.
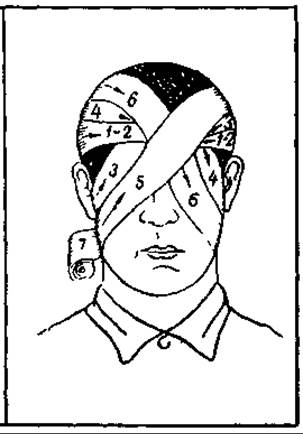
Fig. 156. Application of a binocular (both eyes) bandage
Bandage for the eye (Fig. 155). When bandaging the right eye, the bandage is held in the right hand; conversely, when dressing the left eye, the head of the bandage is transferred to the left hand and the bandage is led from right to left. The first turn applied is circular around the head. Subsequent turns pass above the ear on the healthy side and below the ear on the injured side.
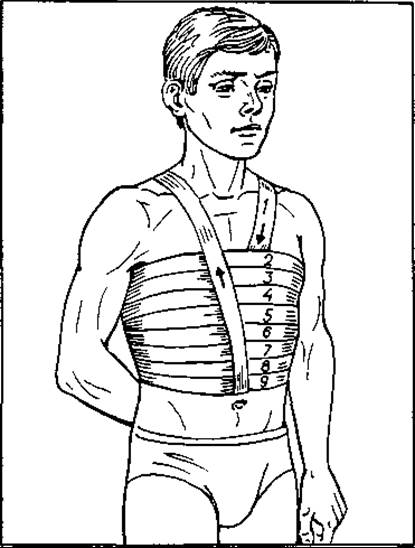
Fig. 157. Application of an ascending spiral bandage with shoulder strap loops onto the chest region
The bandage for both eyes (Fig. 156) begins in the same way as the single-eye bandage. Then it passes over the occipital protuberance to the other side beneath the ear, after which it is led upward, covering the second eye. The turns cross over the bridge of the nose. The bandage is finished with a circular turn around the head. The ears are left uncovered.
Bandages for one or both ears are performed in the same way as bandages for one or both eyes, but they cover the auricle on the affected side while leaving the eye open. A "bridle" bandage can also be used to cover the auricle.
The bandage for the nose and chin is applied in much the same way.
A neck bandage must be applied very carefully to avoid causing asphyxia. In addition, due to the wide range of neck movements in this area, it is difficult to secure the dressing material.
Therefore, combined bandages are used, pairing a spiral bandage (for the neck) with a figure-of-eight bandage across the occiput and chest, or reinforcing it with oblique turns over the head.
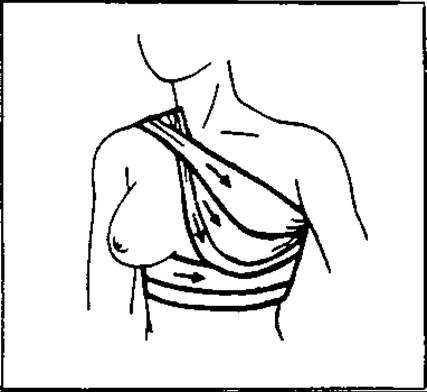
Fig. 158. Application of a supporting roller bandage to the mammary gland
In cases of purulent wounds of the neck, if an adhesive dressing cannot be used, the bandage is secured at the sides with mastisol to prevent the dressing material from sliding.
Chest bandages. Wide bandages are used. A specific feature of bandages applied to this body region is their tendency to slip easily, as well as the potential to restrict respiratory excursions, which is highly undesirable in elderly individuals.
For the upper half of the chest, figure-of-eight bandages with the crossover on the back or in the sternal region are predominantly applied, depending on the wound Location. They are complemented by circular turns around the chest.
An ascending spiral bandage can be recommended for bandaging the lower half of the chest. For better fixation, before applying this bandage, two strips of the bandage are thrown over the deltoid muscles on both sides, Crossing Over the back (Fig. 157).
Breast-supporting and compressing bandages (Fig. 158). The first turn is made around the chest under the breasts in the direction from the healthy side to the affected one; then the bandage is led across the back to the shoulder of the healthy side, looped obliquely, and brought down to cover the breast, starting from the lower areas. Subsequent turns cover it completely.
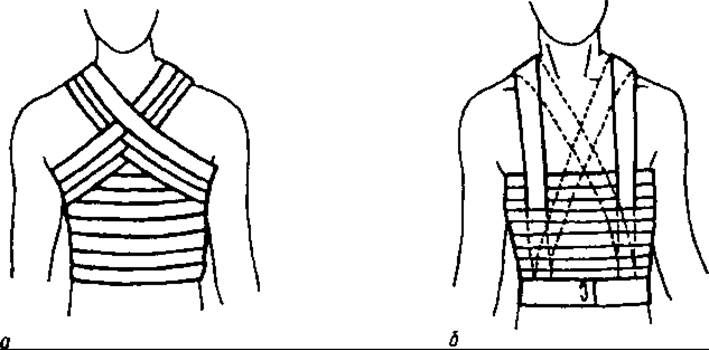
Fig. 159. Application of a bandage to the abdomen: a — across the chest; b — with armholes
To apply a bandage to both breasts, after the turn covering one breast, the bandage is not led to the opposite shoulder, but is wrapped around the torso, covering the second breast, and brought to the opposite shoulder across the front.
Bandages for the abdomen, pelvic region, and perineum. The abdominal bandage is applied in the classical manner. This is a spiral bandage (Fig. 159) that can be secured either with figure-of-eight turns over the shoulders or, like the spiral chest bandage, with two shoulder straps positioned before the bandaging begins.
The perineal bandage is applied using the spica bandage principle (Fig. 160). It is formed by figure-of-eight turns made around the hip joints so that the bandage crossover is formed on the perineum without covering the anus and external genitalia. The bandage is led from the anterosuperior iliac spine to the perineum, passes to the opposite thigh, goes around it posteriorly, returns to the perineum, moves to the posterior surface of the thigh, wraps around it, and rises obliquely in front to the anterosuperior iliac spine of the opposite side.
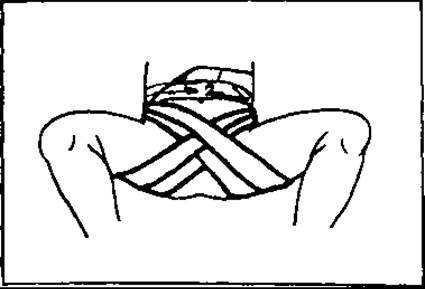
Fig. 160. Application of a spica bandage to the perineum
The spica bandage for the inguinal region is used to cover both this region and the perineum. The application of the bandage begins with circular turns around the abdomen at the waist level. Next, the bandage is led along the anterior abdominal wall obliquely downward into the inguinal region, wraps around the thigh from the opposite side posteriorly, and returns along the anterior abdominal wall to the starting point. Then the bandage is wrapped around the torso posteriorly and along the anterior surface of the pelvis, descending obliquely into the inguinal region. The previous turn is repeated symmetrically. The bandage is finished with a circular turn at the waist.
Bandages for the upper extremities and shoulder girdle. Finger bandages can be recurrent, spiral, or spica types. For this purpose, bandages 3–5 cm wide are used.
A recurrent bandage is used when it is necessary to completely cover the end of the distal phalanx. Bandaging begins from the palmar surface, leading the bandage along the finger from the proximal phalanx to the nail, looping around the tip of the finger, transferring the bandage to the dorsal surface, leading it to the proximal phalanx where the bandage is folded and brought by a creeping turn to the end of the finger, and from there in the reverse direction by spiral turns to the proximal phalanx, where the bandage is secured.
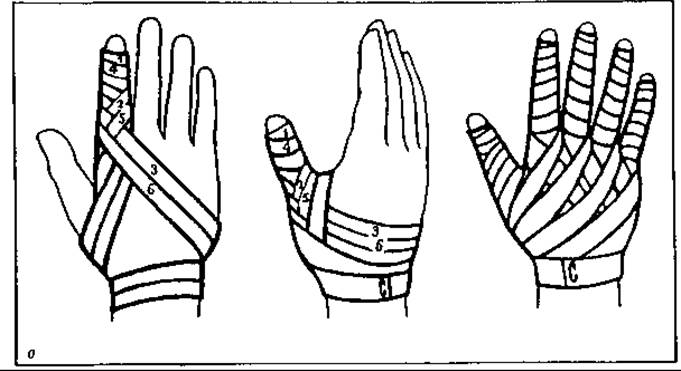
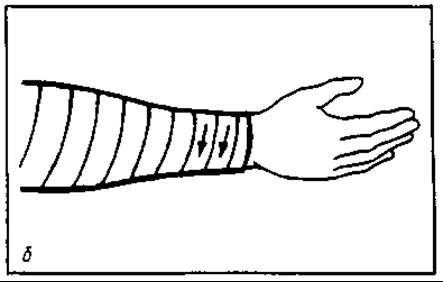
Fig. 161. Application of a bandage to the fingers, hand (a), and forearm (b)
The spiral bandage begins with fixation by circular turns in the wrist area. After that, the bandage is led along the dorsal surface of the hand to the nail phalanx of the finger, and from there by spiral turns to the proximal phalanx, and again across the back of the hand returning to the wrist, where the bandage is fixed. The spica bandage is most convenient for covering the metacarpophalangeal joints, primarily the thumb. It usually begins with fixation at the wrist, then the bandage is led obliquely along the dorsal surface of the hand to the thumb, and after a few figure-of-eight turns with a return to the wrist, the bandage is fixed there (Fig. 161, a).
The spiral bandage for all fingers of the hand (gauntlet bandage) is applied when it is necessary to bandage all fingers in turn, for example, in burns or skin diseases. It is performed with a narrow bandage, starting with the thumb on the right hand or the little finger on the left. The bandage is applied in the same way as a spiral bandage for a single finger, gradually moving from one finger to another through securing turns at the wrist. Such a bandage can also be applied partially—without bandaging all fingers.
The hand can also be bandaged with a spica and a recurrent bandage.
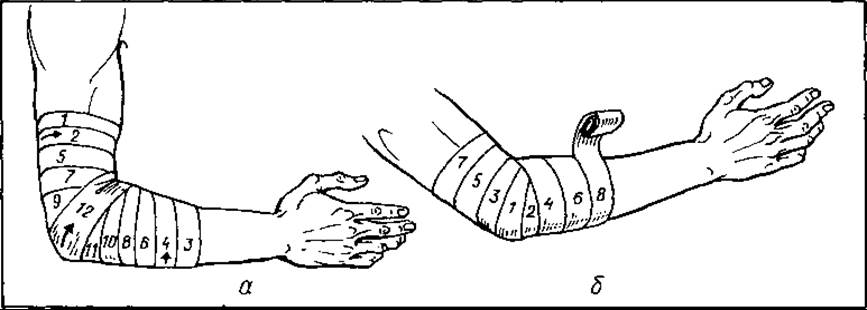
Fig. 162. Application of a turtle (recurrent) bandage to the elbow joint: a — convergent; b — divergent
The spica bandage covers the dorsal and palmar surfaces of the hand, excluding the fingers. It starts with fixing turns at the wrist, then obliquely crosses the dorsal surface of the HAND FROM THE radial side to the ulnar side and passes to the palm, returning to the base of the index finger, and from there again along the dorsal surface of the hand to the radiocarpal joint. It is better to perform this bandage as a descending one, first covering the distal part of the hand and then the proximal part.
The forearm is bandaged using the technique of a simple spiral bandage (Fig. 161, b) or with reversals. Both bandages are best performed as ascending, starting from the radiocarpal joint.
The elbow joint region is bandaged using a turtle bandage — either convergent or divergent. It is applied in the physiological (mid-position) of the joint. In the first case, the first fixing turn is made under the elbow joint, then through the cubital fossa the bandage is transferred to the upper arm above the joint and wrapped around it posteriorly. Gradually, with figure-of-eight turns converging toward the olecranon, the entire joint is covered, and the last fixing turn is made in the middle of it (Fig. 162, a). In the case of a divergent bandage (Fig. 162, b), the first turn is applied above the olecranon, and then the figure-of-eight turns diverge from the center, gradually covering the entire joint. The crossover is made on the anterior surface of the limb.
To cover the shoulder joint and armpit region, a shoulder spica bandage is used (Fig. 163).
The ascending spica bandage begins with a fixing turn on the upper arm near the armpit. Then the bandage is passed under the armpit to the outer side of the shoulder joint, looped around it, and goes to the back toward the armpit of the opposite side, and then along the anterior surface of the chest to the front of the affected shoulder, around it to the armpit. A figure-of-eight turn is formed with the crossover on the anterior surface of the shoulder.
The descending spike (spica) bandage begins with a circular anchoring turn around the chest at the armpit level. The bandage is then brought from the healthy side's armpit obliquely across the chest to the anterior surface of the shoulder joint, looped around it, and passed forward and upward under the armpit to the back, and then through the armpit of the healthy side. This forms figure-eight turns running from the shoulder girdle down onto the arm, intersecting on the front of the shoulder. The bandage is completed with a securing turn in the upper third of the arm.
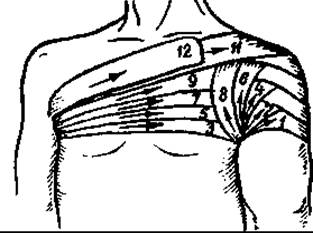
Fig. 163. Applying an ascending spike bandage to the shoulder joint
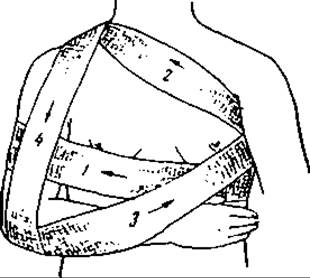
Fig. 164. Application of the Desault bandage
The Desault bandage is rather complex. It is used to immobilize the upper limb against the trunk and support it, primarily in cases of clavicle or humerus fractures. It is usually applied during first aid. Before bandaging, a cotton-gauze pad is placed in the armpit to prevent Displacement of the clavicle or humeral fragments. The arm is pressed against the chest and flexed at the elbow at a 90° angle. The first circular turn is made from the back, under the healthy armpit, across the chest, wrapping around the injured arm and pressing it against the chest wall. Next, the bandage runs across the back, returns to the armpit of the healthy side, emerges from under it, and goes obliquely across the chest to the upper part of the shoulder. From there, it descends along the posterior surface of the shoulder to form a sling supporting the forearm, and rises along the anterior surface to the shoulder girdle of the injured arm. Similar turns are repeated to gradually form the bandage. The healthy arm remains free in the process (Fig. 164).
The Velpeau bandage differs very little from the previous one. A pad is placed in the armpit. The injured arm is positioned so that the palm rests on the opposite, healthy shoulder. The first turn is circular around the chest; the second presses the injured arm against the chest wall. The bandage is then passed under the healthy arm to the back, obliquely toward the opposite (injured) shoulder, looped over the top of it, and led down the anterior surface to the elbow of the injured arm, encircling it just above the elbow crease, and passed under the armpit of the healthy arm. The tip of the elbow remains free (Fig. 165). Due to the somewhat unphysiological position of the arm, this type of bandage is applied for no longer than a week.
Bandages for the legs. The spike bandage for the big toe of the foot has certain specific features. It begins with an anchoring turn above the anklebones (malleoli). The bandage then passes under the medial malleolus to the dorsum of the foot, running obliquely almost to the base of the little toe, where it loops around the outer edge of the foot and runs along the sole to the base of the big toe. Next, following a circular turn around the toe, the bandage is routed similarly in the reverse direction (Fig. 166, a).
The spike bandage for the foot can be of the ascending or descending type. In either case, it starts with a circular turn above the anklebones. Then the bandage is led from the inner side of the foot to the outer side, turned onto the sole, and brought out again from the other side onto the dorsum of the foot, where it runs obliquely to the fixation point above the anklebones (Fig. 166, b).
In addition, the foot and toes can be bandaged using a recurrent bandage.
The heel region is bandaged using the turtle bandage technique. A turtle bandage holds better on the foot when it starts with a circular turn over the heel, with subsequent turns moving away from the apex of the heel toward the lower leg and the foot.

Fig. 165. Application of the Velpeau bandage
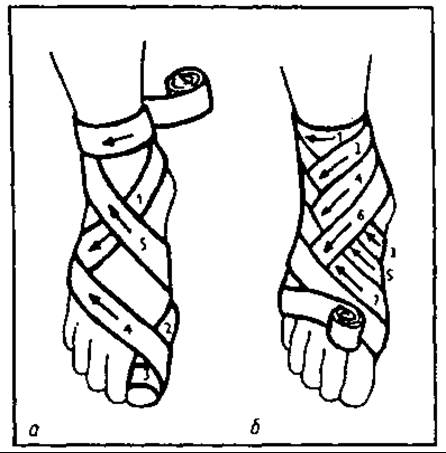
Fig. 166. Application of the spike bandage to the first toe (a) and to the foot (b)
Conversely, the turtle bandage on the knee should be applied so that the final turn covers the Patella.
The bandage on the lower leg is performed as a simple spiral or a spiral with reversals (breaks). Bandaging begins from the bottom up.
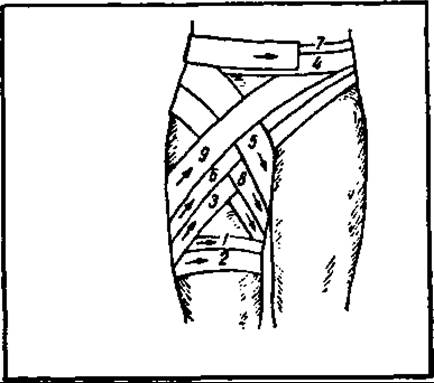
Fig. 167. Application of the ascending (spike) bandage to the hip joint
Bandages on the thigh are applied similarly, but due to the conical shape of this limb segment, it is sometimes necessary to reinforce the upper part of the bandage with spike turns to keep it secure, much like when applying a hip joint bandage.
The hip spica (spike bandage on the hip joint) can be performed in descending and ascending variants. The ascending bandage is applied more frequently (Fig. 167). It begins with an anchoring turn around the waist toward the healthy side, transitioning to the lower back. The bandage is then brought forward over the anterior-superior iliac spine on the affected side and lowered to the Medial surface of the thigh, where a circular turn is made. Afterward, the bandage is brought from the front of the thigh to the healthy side, passing anteriorly over the pubic region.
When applying the descending type of bandage, it starts with a circular turn in the upper third of the affected thigh, running from the lateral to the medial side.
A full-leg bandage combines almost all of the aforementioned limb bandage types, starting from the big toe and foot spica up to the hip spica.
Tubular elastic net bandages. Using an elastic tubular cotton net bandage, dressing any part of the body is significantly easier than using a classic gauze bandage. Furthermore, such a bandage saves dressing materials.
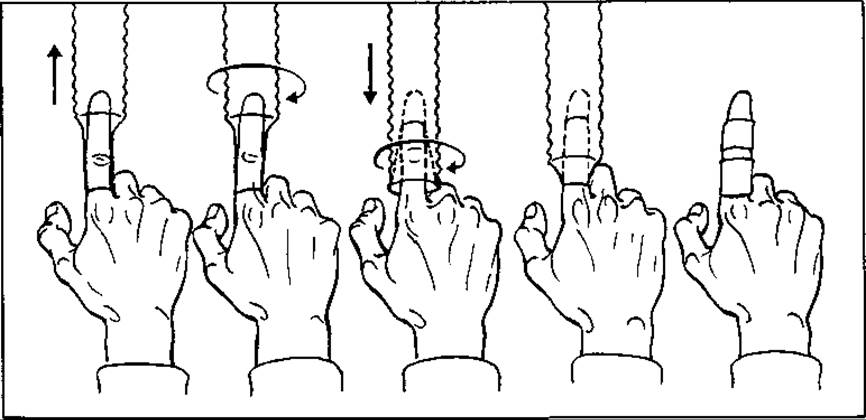
Fig. 168. Applying an elastic tubular bandage to a finger using an applicator
It is very important to properly select the width and length of the bandage (depending on the number of bandage layers in the dressing and the length of the segment being bandaged) as well as the appropriate applicator. When applying a bandage with an applicator, the applicator, with the bandage stretched over it, is placed behind the affected area and then released in the distal direction while simultaneously fixing the section of the bandage sliding off the applicator. After twisting the bandage and applicator 180° outside the bandaged segment, the manipulation is repeated in the reverse direction until the required thickness of the dressing is achieved. Using an applicator prevents trauma to the injured area during bandage tensioning. Additionally, the applicator can be sterilized along with the bandages and used directly in the operating room. The MAIN TYPES OF elastic tubular bandage dressings for the finger, forearm, and lower leg are shown in Figs. 168, 169.
Application of rigid and hard dressings. Transport and therapeutic immobilization dressings. Hard or rigid dressings are made of materials that harden quickly (plaster of Paris, starch, adhesives, celluloid, plastics, etc.). They ensure the immobility of an organ (limbs, spine, pelvis) in a specific position for a defined period. They are used both during first aid provision to an injured (sick) person for temporary immobilization during transportation to a hospital, and for prolonged immobilization during treatment. Rigid dressings used to immobilize an injured organ during first aid provision and transportation to a medical facility are called splints (transport splints), since the main element of such dressings is a splint made of wood, metal, plastic, fabric, etc. Among them, wooden splints are more commonly used for lower limb immobilization (M.M. Dieterichs splint, splint board), head and neck (M.N. Elansky splint), metal splints (Thomas splint) for lower limb immobilization, ladder splints (Cramer splint) for limb immobilization, mesh splints for hand immobilization; and inflatable (pneumatic) splints for limb immobilization (lower leg, forearm, hand). These mentioned splints are manufactured using specific technologies, which is why they are called standard. They are used regardless of the victim's anthropometric parameters. Given this, some splints can be adjusted According to the patient's height. In particular, this is provided for in the wooden Dieterichs splint.
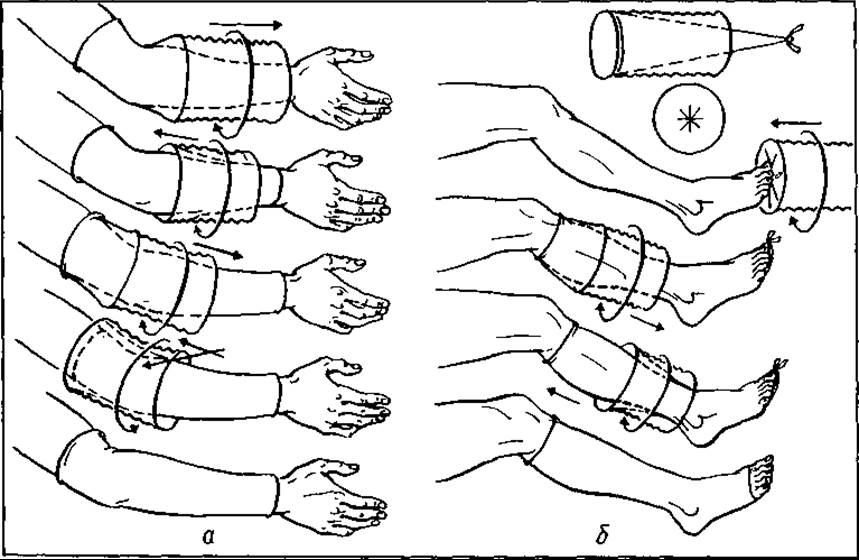
Fig. 169. Application of elastic tubular bandage dressings: a — to the forearm; b — to the lower leg (M. Zeman)
Along with standard splints, improvised ones are used in some cases when providing first aid to victims. They are made from available materials — wooden or plastic plates, boards, sticks, etc. Sometimes, for immobilization purposes, the traumatized limb is bandaged to the healthy one or to the torso.
Application of the Dieterichs splint. The Dieterichs splint (M.M. Dieterichs — professor at the Kiev Medical Institute, born in 1871, died in 1941) belongs to fixation-distraction devices. It allows not only immobilizing the lower limb, but also performing traction and distraction of the peripheral fragment in case of a closed fracture of the Tibia or Femur bones.
The Dieterichs splint (Fig. 170) consists of two telescoping side plates (each consisting of two slats) and a so-called footpiece with metal eyelets. Before application, the splint is adjusted to the victim's height. The medial and lateral plates are set to such a length that their distal ends extend beyond the level of the patient's sole (the foot should be at a right angle) by 10–12 cm. The plate slats are secured at this length. The footpiece slat is bandaged by threading a bandage through its metal eyelets (while cotton padding is applied in the ankle areas). The distal ends of the side plates are passed through the eyelets of the footpiece and connected by the so-called gate. A stick with a cord (tourniquet-tightener) fixed to the footpiece is passed through the opening in the short transverse slat. Cotton-gauze pads or a wad of cotton are placed under bony prominences in the areas of the ankles, knee joint, outside the hip joint, and iliac bone. The side plates are tied together at the thigh level with a belt or bandage passed through the holes in them, and the outer one is additionally tied to the torso at chest level. After this, by turning the tightener stick (Fig. 171), traction of the limb (peripheral fragment) is performed. The limb is tensioned between the splint slats, and the tightener is secured with a chain or bandage to the “gate”. Only after this is the entire splint secured by applying a spiral bandage or several separate circular turns (Fig. 172). The splint is applied over clothing and shoes. In the case of an open fracture or if There is a wound and a tourniquet on the limb, the clothing is cut or removed, and the wound is covered with an aseptic dressing. The tourniquet is not covered with the dressing; it must bear a corresponding mark indicating the time of application. When applying the splint, one must act carefully so as not to displace the fragments of the fractured bone. To do this, significant leg tractions and inducing pain in the patient should be avoided. Before this procedure, the patient receives an analgesic injection.
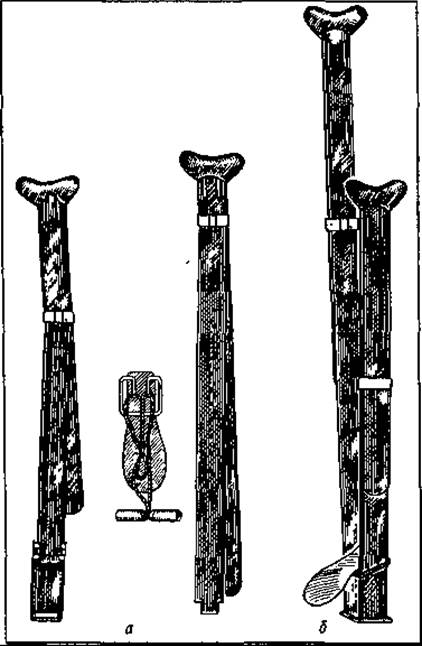
Fig. 170. Dieterichs splint (a, b)
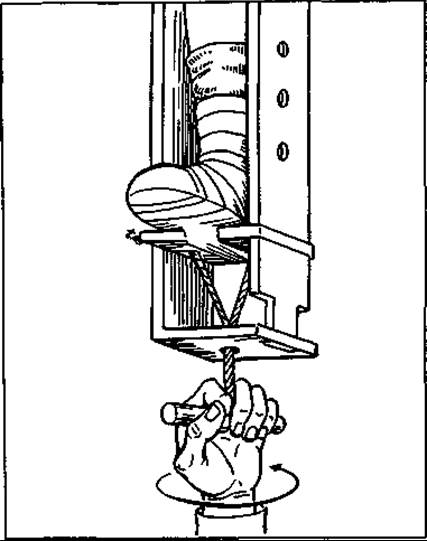
Fig. 171. Traction of the peripheral leg fragment using the Dieterichs splint
Application of the Cramer splint. To immobilize upper limb fractures, in particular of the humerus, the Cramer metal ladder splint (Fig. 173) is used, which has a length of 1 m and a width of up to 15 cm. Before application, this splint is fitted to the patient's healthy arm, marking points on it that correspond to the elbow and shoulder joints and their bends. First, the distance from the elbow to the tips of the middle Phalanges of the fingers is determined. At this distance, a bend is made on the splint at an angle of 70–90°. The second bend of the splint is made at the level of the healthy shoulder joint at an angle of 110–120°. Subsequent shaping of the splint is performed by the physician on themselves (Fig. 174, d, b): applying the splint, already bent at two points, to their own arm, they grasp the splint with both hands and continue bending it both transversely and partially around its long axis (i.e., slightly twisting it); the rounded end of the splint must fit against the shoulder girdle opposite to the affected one, and the distal (rectangular) end of the splint must be positioned horizontally — the injured limb will rest on this plane of the splint with its volar side. During the shaping of the splint, the physician must also ensure conditions for downward traction of the shoulder. For this purpose, a downward bend — a recess for the elbow joint — is formed in the forearm part of the splint, into which the shoulder drops due to gravity (the mass of the arm).
After shaping, the splint is covered with an even layer of cotton wool on the side facing the body (arm), wrapped with spiral turns of a bandage, applied to the injured limb, and after placing a cotton-gauze pad in the armpit and a small wad of cotton in the palm, it is bandaged from the hand to the healthy part of the shoulder girdle. The splint can also be covered with cotton and a bandage before its shaping and modeling. The ends of the shaped and fixed splint are tied together with pieces of bandage passed in front of and behind the shoulder (see Fig. 174). After this, the forearm with the splint is additionally suspended in a sling. The final positions of the segments of the fixed limb are as follows: the hand in a state of slight dorsiflexion at the wrist joint, fingers semi-flexed (with a piece of cotton in the palm) with the thumb abducted. The limb is flexed at the elbow joint at an angle of 70°, the shoulder is abducted by 15–20° and deflected forward by 10° (the bending angle of the splint over the shoulder joint is 110°).
The Cramer ladder splint can also be used to immobilize lower leg fractures, especially in the lower part of its diaphysis and metaphysis. In this case, 3 splints are applied — two on the sides and one on the back.

Fig. 172. Applied Dieterichs splint
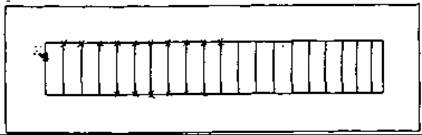
Fig. 173. Cramer splint (metal ladder splint)
In femoral fractures, the thigh can also be immobilized using several interconnected ladder splints attached along the posterior and lateral surfaces of the thigh and lower leg, immobilizing three joints.
Metal mesh splints are used mainly for fractures of the hand bones, and less frequently for the distal forearm bones.
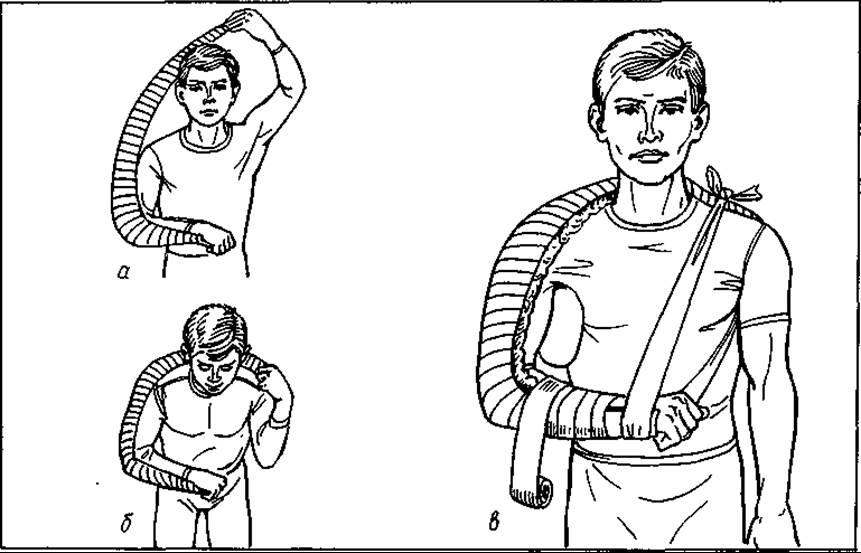
Fig. 174. Stages of applying the Cramer splint for a humeral fracture: a, b — modeling of the splint by the physician on themselves; c — applied splint
In addition to the indicated splints, transport immobilization of patients with spinal fractures, pelvic bone fractures, or multiple fractures utilizes stretchers — metal and vacuum immobilization stretchers.
Patients with pelvic bone fractures should be transported on stretchers equipped with a plywood or board board, with their limbs semi-flexed at the hip joints and a bolster placed under the knees.
Vacuum immobilization stretchers consist of a double-layered cover (bag). Air is evacuated from it to create a negative pressure of up to 500 mmHg, after which the patient is placed onto it. Once the proper position is established, the edges of the cover are laced or tied together. The stretcher-cover rigidifies as its walls come together and the polystyrene foam, which fills two-thirds of its volume, hardens.
Limb immobilization can also be achieved using soft bandages. For instance, in the case of a humeral fracture, the limb can be secured with a triangular bandage. A small gauze roll is placed in the armpit, and the entire limb is bandaged to the torso at chest level.
Plaster casts are applied in a specially equipped room featuring dedicated tables, Supports, and frames (for applying plaster jackets), as well as cabinets and containers for storing plaster of Paris and plaster bandages. It is also stocked with instruments such as specialized shears for removing and cutting casts, bandage scissors and knives, pliers for flanging the edges of casts, and various types of saws for cutting plaster.
The plaster cast was introduced into medical practice in Russia in 1858 by N. Pirogov as a method for treating wounded lower extremities (prior to this, amputation was the standard procedure).
Fig. 175. Types of plaster casts: a — circular, b — splint (longet), c — bridged, d — fenestrated
To apply a plaster cast, either pre-prepared plaster bandages are used or bandages are prepared immediately before application. To make a plaster bandage or gauze strip, it is unrolled on a table to a certain length or across the entire table length. Plaster powder is sprinkled over it and smoothed into a thin layer using the edge of the palm, ensuring the plaster fills all the mesh openings of the gauze. The impregnated bandage is then carefully rolled up again, and a new portion of bandage is unrolled, and so on. Plaster splints are cut from gauze to the required width and length. Rolled plaster bandages are transferred to storage or soaking areas by holding them by the edges to prevent the plaster from spilling out. Before application, the plaster bandages are gently immersed in water until all air bubbles cease to emerge (indicating that the plaster is thoroughly saturated with water). They are then removed from the water and gently squeezed to remove excess moisture. After covering bony prominences on the body part to be cast and placing the injured organ on a support or other device, application of the wet plaster bandage begins. For thin splint-circular casts, 3–4 layers are sufficient; for thick ones, 6–8 layers are used.
After applying the bandage, molding begins by pressing the layers of the bandage against the surface with the palm(s). The contours of the cast must be shaped to match the Anatomy of the immobilized body part. If certain areas lack sufficient plaster, a thin layer of powder is often added immediately and smoothed over the surface of the cast.
Special attention must be paid to the edges: they should be made smooth and slightly flared outward to prevent them from digging into the body, and care must be taken to ensure no bits of plaster fall beneath the cast. The fingers and toes are typically left exposed to allow for monitoring of tissue Blood Circulation beneath the cast. Compression of soft tissues, particularly blood vessels, is indicated by cyanosis of the digits and edema. Once the cast is formed, the date of application is marked on its surface. Plaster hardens within 10–15 minutes, though the cast dries completely only after 24–48 hours or more.
The Anatomical Structure (limb, spinal Column, pelvis) receiving a plaster or other setting cast must be positioned to restore its natural anatomical form (configuration) and function. In most cases, this corresponds to a state of maximal Muscle relaxation (the neutral physiological position), although due to the specific nature of a fracture, the initial stage of immobilization (prior to fracture consolidation) often requires departing from this rule.
Plaster casts can be of various designs: circular solid, circular fenestrated, circular bridged, splint (longet), splint-circular, bed-cast, body jacket, etc.
Although solid circular casts provide more secure immobilization, they are now used much less frequently than splint and splint-circular casts due to the risk of localized tissue compression, the need to remove the cast to correct deficiencies, and the inability to apply other local therapeutic procedures. While providing the necessary level of immobilization, splint and splint-circular casts allow for position adjustments without destruction (replacement), permit other therapeutic procedures (such as physiotherapy) on the exposed areas of the organ, and facilitate wound monitoring.
To provide greater strength and immobilization capacity, a splint is frequently combined with a circular bandage (splint-circular cast). Splint and splint-circular casts are significantly lighter, more cost-effective, and can be adjusted without being destroyed. When organ immobilization must be combined with Other forms of local treatment, alternative types of plaster casts are employed, including circular fenestrated, circular bridged, and removable collar-type casts (Fig. 175).
There are two main Methods for applying plaster casts: padded and unpadded. Previously, almost all casts were applied over a layer of cotton padding covering the entire surface of the body part. However, such casts failed to meet expectations. The padding frequently compromised fixation and caused uneven pressure on the tissues. Furthermore, due to the absorption of body moisture, the cotton often led to skin maceration.
Subsequent experience demonstrated that unpadded casts, applied directly to the skin except over bony prominences (such as malleoli), are far more rational. Such casts fit snugly against the body and provide excellent immobilization. Additionally, plaster absorbs wound exudate, thus acting to a certain degree as an antiseptic.
Therapeutic plaster casts are applied for both traumatic and pathological fractures, as well as for orthopedic conditions and deformities.
Simple closed fractures that can be manually reduced, as well as fractures treated with open osteosynthesis during the fixation phase of the reduced fragments, are managed with plaster casts. However, when traditional skeletal traction or distraction-compression devices (such as those of Ilizarov, Tkachenko, Gudushauri, Sivash, or Kalnberz) are required to restore fragment alignment (reduction and fixation), plaster casts are frequently utilized during the initial consolidation phase involving soft callus.
Last update: 08/08/2026
Editorial and Educational Adaptation: This material has been compiled based on the primary/original source text. The project team performed an editorial review, corrected technical inaccuracies, structured sections, and adapted the content for an educational format.
What was processed:
- elimination of formatting defects (OCR errors, structural breaks, corrupted characters);
- editorial organization of content;
- standardization of terminology in accordance with academic sources;
- verification of factual statements against the original source text.
All mentions of the author, publication year, and origin of the primary text have been preserved in accordance with the source.