Practical Guide to Zoology: A Study Aid - T. A. Dauda 2014
Basic methods and techniques for working with zoological specimens
To study small objects (such as unicellular organisms that, with rare exceptions, can only be seen with magnification), as well as to examine the Fine Structure of Tissues and Organs in Multicellular animals, optical instruments are employed: magnifying glasses (handheld, dissecting, and binocular) and microscopes.
Design of Handheld and Dissecting Magnifiers
Practical Classes make use of a handheld magnifier and a more sophisticated dissecting, or stand, magnifier. Both are designed for examining objects that do not require high magnification: preliminary slide preparation, viewing whole mounts, and the dissection or examination of small animals, etc.
A handheld magnifier consists of a lens encased in a frame with an attached handle. Since using a handheld magnifier keeps one hand constantly occupied, it is preferable to use a stand or dissecting magnifier (see Fig. 1).
Examine the PARTS OF THE stand magnifier: the base (stand) to which a stationary Glass stage is fixed, equipped with clips (clamps) for securing the slide; a movable mirror near the horseshoe-shaped base; a rod in the vertical Column that moves up and down along a rack using a rack-and-pinion screw (cremaillère); and, at the top of the rod, a ring holder for interchangeable eyepieces. Turning the rack-and-pinion screw moves the rod and focuses the image for a clear view of the object. Looking through the eyepiece yields an enlarged, upright image of the object.
Class="center">
Fig. 1 Stand magnifier:
1 — eyepiece; 2 — eyepiece holder; 3 — clip; 4 — Diaphragm; 5 — stage; 6 — illuminating mirror; 7 — rack-and-pinion screw; 8 — base FOOT; 9 — vertical column; 10 — rod; 11 — gear rack; 12 — mirror holder.
The stand magnifier provides low magnification, most commonly utilizing 10× or 20× eyepieces. The mirror helps collect light rays from a source, illuminating the specimen on the stage with transmitted light.
To observe a specimen in transmitted light, adjust the mirror so that the light beam passes through the aperture in the stage, illuminating the object from below. Alternatively, reflected light falling onto the specimen from above (such as from a window or lamp) can be used. For observation in reflected light, turn the frosted side of the mirror toward the stage so the object is illuminated exclusively by top lighting. The intensity of illumination can be adjusted using the diaphragm. For finer dissection and study of small animals, a binocular magnifier is used.
Guidelines for Using the Stand Magnifier
Position the magnifier with the column facing toward you and prepare your slides for examination. A small piece of filter paper, a human Hair, or cotton fibers previously teased apart with forceps can serve as a suitable object. The specimen should not exceed the size of a coverslip. Place the object on a clean, dry glass slide and add a small drop of distilled Water using a pipette.
Cover the object with a coverslip.
Hold the coverslip between the thumb and index finger of your right hand, touching only its edges. Bring one of the free edges of the coverslip into contact with the glass slide, then gently lower it to cover the water drop and the specimen. This often traps air bubbles. Pay attention to them and learn to identify them in the prepared slides.
Place the slide on the stage of the magnifying glass, illuminate the field of view, look through the eyepiece with your left eye, and adjust the mirror toward the light source until the field of view is brightly and evenly illuminated. Look through the eyepiece and move the slide until the target object (a hair, cotton fiber, or a piece of filter paper) is found. Secure the slide with the stage clips, and by turning the rack-and-pinion knob and adjusting THE POSITION OF the eyepiece, bring the object into sharp focus.
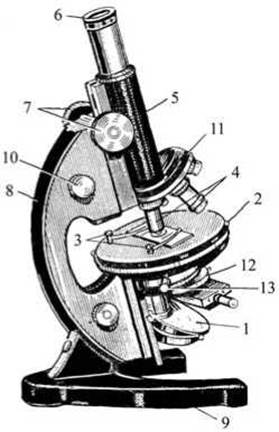
Fig. 2 Microscope:
I — mirror; 2 — stage; 3 — stage clips; 4 — objectives; 5 — body tube; 6 — eyepiece; 7 — rack-and-pinion knob; 8 — limb column; 9 — base; 10 — fine adjustment knob;
II — revolving nosepiece; 12 — condenser and diaphragm; 13 — mechanical stage control knobs.
Microscope Components
A microscope (from Greek μικρος — small, σκοπεω — to look) is an optical instrument used to examine small objects that are difficult to distinguish or invisible to the naked eye.
Familiarize yourself with the microscope components and the operating guidelines (see Fig. 2).
Required Materials and equipment: a microscope; glass slides and coverslips; forceps; a dropping bottle with water; filter paper strips; cotton wool; scissors. Examine the main parts of the microscope. Locate the two optical lens systems: the eyepiece (oriented toward the observer's eye; from Latin oculus — eye) and the objective lens (oriented toward the specimen), screwed into the lower end of the metal tube (the body tube).
The eyepiece is inserted into the upper part of this tube; it can be removed from the tube and replaced with another.
Locate the stage: it is mounted on the limb column, to which the body tube is movably attached. The specimen slide is placed on the stage and secured with stage clips. Raise and lower the body tube by turning the coarse adjustment knob (rack and pinion) to alter the distance between the objective lens and the slide in order to obtain a clear image. Finer focus adjustments are made using the fine adjustment knob. Biological microscopes feature two control knobs on the sides of the stage, known as mechanical stage controls. Turning these knobs allows the stage and the slide to be moved horizontally in either direction without touching the slide by hand. The specimen is illuminated by a beam of light directed through a circular aperture in the stage from an adjustable mirror located beneath the stage. The flat and concave sides of the mirror allow for light intensity adjustment; the diaphragm can also be used for this purpose. Some older models of student microscopes utilize cylinder diaphragms. These diaphragms feature a circular aperture in the center of their upper part, with a diameter of 1, 3, or 6 mm. Changing diaphragms with different aperture sizes makes it possible to regulate the illumination of the specimen.
Research microscopes and modern student microscopes are equipped with an illumination system placed between the mirror and the stage to regulate the specimen lighting. This system consists of a condenser (a group of powerful collecting lenses) and one or two iris diaphragms.
This device allows for exceptionally precise control over the illumination of the specimen. Locate the revolving nosepiece at the lower end of the body tube; three objective lenses of varying magnifications are screwed into its sockets.
The nosepiece makes it easy to switch objective lenses (for instance, replacing a low-power objective with a higher-power one). Magnification can also be changed by swapping eyepieces. The objective must be strictly centered relative to the aperture of the body tube; otherwise, the field of view will be partially obscured. The nosepiece features a special click-stop mechanism that locks the objective precisely into position beneath the body tube as you rotate it. When the objective aligns perfectly with the tube aperture, you will feel and hear a soft click indicating that the nosepiece is locked in place.
Switch objective lenses by rotating the nosepiece and verify precise centering by feeling the click-stop mechanism engage.
The objective lens produces a real image inside the microscope tube, which is then viewed through the eyepiece. The image seen through the eyepiece is magnified and inverted. Note that the magnification of each objective and eyepiece is marked on its mounting (e.g., 7x eyepiece, 40x objective). The total magnification of the microscope is calculated by multiplying the objective magnification by the eyepiece magnification. On eyepieces from manufacturers such as Reichert, Leitz, and Zeiss, magnification values are replaced by Arabic or Roman numerals. The numbers I or 1 denote a low-power eyepiece, II or 2 indicate a higher-power eyepiece, and so on.
To achieve magnifications of 1000x and greater, immersion objectives are used. In this technique, a drop of cedar wood oil—which has the exact same refractive index as glass—is placed between the specimen and the objective lens, and the lower lens of the objective is immersed directly into the oil droplet on the specimen. In biological microscopes produced by domestic manufacturers, immersion objectives are labeled 90x, while foreign models use 1/12, 1/16, or 1/18. Working with immersion objectives requires much brighter illumination of the field of view. When using oil immersion, ensure there are no air bubbles in the oil layer within the field of view, as they can distort the clear image. Bubbles can be removed by gently touching them with a needle or dissecting probe on the coverslip. When working with a microscope, it is essential to know the exact magnification used for viewing a particular specimen and to record it when making drawings.
Rules for Using the Microscope
Handle the microscope with care. When removing it from its case, carrying it, or moving it to a new Location, always hold it by the curved arm (the carrying handle). Place the microscope on your workbench with the arm facing toward you; once positioned, avoid sliding it around. This ensures consistent lighting and protects the microscope from accidental drops, jolts, and damage. Exercise extreme care when handling the objective and eyepiece lenses; they should only be cleaned with a soft linen cloth or chamois leather. Do not attempt to unscrew the eyepieces or objectives, and avoid turning the fine adjustment knob unnecessarily.
To examine a specimen, follow these steps:
1. Place the microscope in front of you on the workbench with the arm facing toward you.
2. Rotate the nosepiece to select the low-power objective (8x), raise the condenser, and open the diaphragm. Ensure the objective clicks securely into position directly beneath the body tube.
3. Look into the eyepiece while adjusting the mirror until the field of view is brightly and evenly illuminated. Excessively bright light can be softened using the diaphragm (overly bright lighting strains the eyes and hinders observation).
4. Place the specimen slide on the stage (with the coverslip facing upward!) so that the object of study is positioned directly beneath the objective.
5. Look from the side and use the coarse adjustment knob to lower the body tube until the distance between the objective and the specimen is about 1/2 cm (be careful not to let the objective Touch the slide, as this can crush the specimen and damage the lens!).
6. Look into the eyepiece and slowly turn the rack-and-pinion knob to raise the tube until a sharp image appears in the field of view.
7. Turn the fine adjustment knob slightly to achieve sharper focus.
8. For prolonged observation, secure the slide to the stage using the stage clips and examine the specimen by slowly moving it with the mechanical stage controls. At the same time, gently rock the fine adjustment knob back and forth to inspect the entire depth of the specimen.
9. Switch from low to high magnification. First, use the stage controls to center the specific detail you wish to examine under high power. Remember that if the feature is not centered in the field of view, changing the objective may cause it to move completely out of view.
Rotate the nosepiece to click the high-power objective (40x) into place. Since high-power objectives are longer, slightly raise the body tube first. Then, viewing the microscope from the side, carefully lower the tube until the objective nearly touches the coverslip, taking care not to crush the specimen or damage the lens. Finally, look through the eyepiece and very slowly raise the tube until the outlines of the object come into view. Use the fine adjustment knob, turning it gently left and right, to fine-tune the focus.
10. Train yourself to look into the microscope with your left eye while keeping your right eye open; this allows you to view the specimen and sketch it simultaneously.
Examining Living Specimens Under the Microscope
Whenever possible, study living biological material when using a microscope. Investigating Protozoa, rotifers, and lower crustaceans in vivo is a core methodology. Small organisms are examined whole, while larger ones allow for The Study of isolated organs.
For microscopic examination, specimens should ideally be kept in their natural aquatic medium, which is usually fresh or saltwater. For parasites, use the Contents of the specific organ (such as the intestine) where they reside. For isolated organs and parasites, physiological saline solution (0.6% NaCl for invertebrates) or Ringer's solution is used. Ringer's solution has the following composition: distilled H2O — 100 cm3, NaCl — 0.85 g, KCl — 0.025 g, CaCl2 — 0.03 g. Calcium chloride must be added last; otherwise, a precipitate will form.
A major challenge when studying many living organisms in vivo is their mobility. Various techniques are used to overcome this hurdle. The most common method is gently compressing the specimen between a coverslip and glass slide by drawing off excess liquid with filter paper. Alternatively, you can place a tiny strand of absorbent cotton into the drop of fluid containing the specimen on the slide, tease it apart into fine fibers using dissecting needles, and then apply the coverslip.
To slow down the movement of infusoria and other small aquatic animals, you can use anesthetics, applying gentle heat or various chemical agents such as weak solutions (10–15%) of alcohol, MgSO4, and others. Determine the required anesthetic concentration experimentally for each case, and draw the solution under the coverslip using filter paper.
To avoid crushing small, delicate specimens with a cover slip, small wax feet are made. To do this, the corners of the cover slip are gently scraped across pre-softened wax. The thickness of the feet is determined by the size of the specimen being studied.
Studying Fixed Mounts
In most cases, the study of zoological specimens involves fixed and stained slides. Fixing fluids contain potent agents that act on living Cytoplasm and penetrate the specimen's tissues fairly quickly. Common components of fixatives include solutions of corrosive sublimate, picric acid, chromic acid, or osmium tetroxide, as well as acetic acid and certain salts. Due to the toxicity of fixatives, strict adherence to all established safety regulations is a mandatory prerequisite when working with them.
Fixation protocols, the composition of commonly used fixatives, and the duration of the fixation process itself are thoroughly and accessibly outlined in the Practical Guide to Invertebrate Zoology by A. V. Ivanov, Y. I. Polyansky, and A. A. Strelkov (see References). This study guide also provides recommendations for preparing and staining whole mounts.
Animal Dissection and Sketching of Specimens
The best method for studying animal organisms is the investigation of living specimens, particularly observing the animal's Morphology and vital Functions in its natural environment. However, it is not always feasible to study an animal in the wild. The structure of individual body parts, organs, and systems must often be studied using dissection and preparation techniques.
The necessary equipment includes: dissecting boards (for larger animals); dissecting trays (for small animals); scalpels; forceps; scissors; dissecting needles; pins; hand lenses and dissecting microscopes; and a compound microscope (depending on the topic of the practical session).
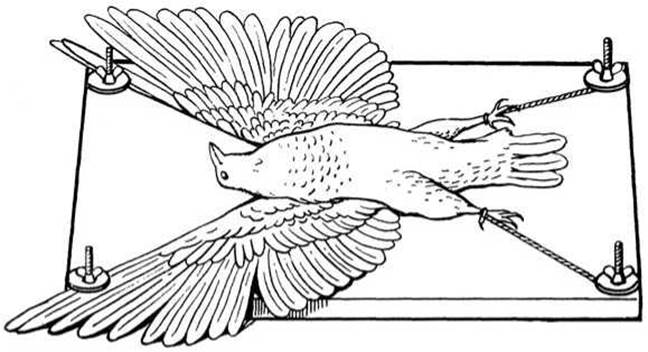
Fig. 3 Dissecting board with a pigeon prepared for dissection
Rules for Animal Dissection
1. Invertebrates are dissected from the dorsal side, whereas vertebrates are dissected from the ventral side.
2. Large vertebrates (e.g., pigeon, rabbit, rat) are dissected on a special dissecting board (Fig. 3); invertebrates and small vertebrates are dissected in a dissecting tray with a wax-poured bottom.
3. Dissection in a dissecting tray is performed under water, unless otherwise specified.
4. The animal being dissected is securely pinned to the wax bottom of the tray by inserting the pins at an angle into the densest parts of the body farthest from the area being prepared. On a dissecting board, animals are tied with twine to hooks located at the corners.
5. Dissecting instruments are used for the Procedure: scalpels, scissors, forceps, and dissecting needles.
6. If the water in the tray becomes cloudy, the dissected specimen should be gently rinsed under a weak stream of water, and the water in the tray must be replaced.
7. The dissected specimen may only be removed after careful examination and sketching have been completed.
8. After dissection, the instruments used must be thoroughly washed and wiped dry, then returned to their designated place as indicated by the instructor. It is strictly prohibited to stick instruments into the wax bottom of the dissecting tray.
Sketching Specimens
Sketching plays a vital role in the study of biological specimens. Drawing is not only an aid to memory, but also a method for gaining a deeper understanding of the subject under observation.
Before sketching a specimen (a slide, a dissected animal), one must examine it carefully and only then begin drawing. Drawings must be executed meticulously—never with a colored or ink pencil, and certainly not with ink, but exclusively with a soft, well-sharpened drawing pencil. The drawings should be clear and large-scale. It is recommended to use a special album with drawing paper. Sketches must be accompanied by labels explaining the structural details of the specimen, along with indications of:
1) the source of the sketch (whole mount, microscope slide, live specimen, chart, diagram);
2) the taxonomic position (phylum, class, common and Latin names) of the animal being studied.
Labels must be written in ink.
The structures of small animals, or the organs and tissues of large animals, should be sketched exactly as they appear under a microscope or magnifying glass (under no circumstances should one copy a textbook chart or illustration). In some cases, only the external Morphology of the animal needs to be rendered (e.g., mite, scorpion, spider). When performing a dissection, all internal Organ Systems (digestive, nervous, excretory, etc.) must be sketched. It is recommended to color them using colored pencils: for example, Arteries in red, Veins in blue, respiratory organs in violet or pink, the Digestive System in brown, the excretory system in green, the Reproductive System in orange, and The Nervous system in yellow.
Last update: 13/08/2026
Editorial and Educational Adaptation: This material has been compiled based on the primary/original source text. The project team performed an editorial review, corrected technical inaccuracies, structured sections, and adapted the content for an educational format.
What was processed:
- elimination of formatting defects (OCR errors, structural breaks, corrupted characters);
- editorial organization of content;
- standardization of terminology in accordance with academic sources;
- verification of factual statements against the original source text.
All mentions of the author, publication year, and origin of the primary text have been preserved in accordance with the source.