Amino Acids, Peptides and Proteins - Dévényi T., Gergely J. 1976
Methods of Immunochemical Analysis
Protein Analysis by Gel Diffusion Methods
Ouchterlony Double Gel Diffusion Method
Principle of the method. Antigen and immune serum solutions diffuse toward each other in a flat layer of Agar gel. A precipitate forms where the antigen and antibody meet.
Scope of application. The method allows for the direct comparison of different Proteins (Antigens) or specific immune sera. It is used to detect specific proteins in protein mixtures, and to determine antigenic identity, similarity, or differences between proteins.
EQUIPMENT AND Reagents FOR THE ASSAY
1. Petri dishes.
2. Metal cubes with 10 mm edges.
3. A set of punches for cutting wells in agar gel.
PROCEDURE
1. Agar purification and gel preparation (see p. 127).
2. Preparation of the agar plate. Typically, the reaction is performed in a flat layer of agar gel solidified at the bottom of a Petri dish. First, the inner surface of the Petri dish is coated with an agar film. To do this, it is filled with 0.1% molten agar, which is then immediately poured out, and the dishes are transferred to a desiccator to dry completely. Alternatively, the bottom of the Petri dish can be coated with a 1 mm thick layer of 1% molten agar. Merthiolate should be added to the agar as a preservative.
Pour 1% molten agar in saline containing 0.1% merthiolate into the prepared Petri dishes to form a 3–4 mm thick layer. Wells are then cut in the prepared agar gel layer to load the test samples.
3. Well preparation. Wells in the agar gel layer for loading the test samples can be made in two ways:
a) Place three metal cubes with 10 mm edges into a Petri dish coated internally with an agar film, spacing them 1 cm apart, as shown in Fig. 23. Then, pour molten agar into the dish to form a 3–6 mm thick layer and place it in a refrigerator. After the agar solidifies and the metal cubes are removed, wells precisely matching the shape and size of the cubes remain in the agar gel layer.
b) To prepare cylindrical wells, use special punches or Glass tubes of appropriate diameter. Gently pressing down, insert them vertically into the agar gel at the desired positions, taking care not to damage the surrounding gel. After cutting the outlines of the wells, remove the punches or glass tubes, and extract the cut agar plugs by aspirating them under a weak vacuum using a large-bore needle.
4. Sample loading and evaluation of the precipitation reaction. Load the test material (antigen solutions, immune sera) into the prepared wells in the agar plate.
Class="center">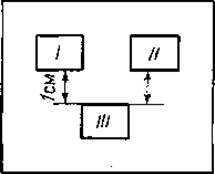
Fig. 23. Layout of test samples in the agar gel for the Ouchterlony double immunodiffusion assay [17] (see text for details).
If two protein solutions or two protein mixtures need to be compared, they are loaded into the two upper wells (I and II in Fig. 23), and the specific immune serum is loaded into the lower well (III).
After loading the samples into the agar, sufficient humidity must be maintained in the dish to prevent it from drying out. The easiest way to achieve this is by placing a piece of moistened filter paper on the inside of the Petri dish lid.
The agar dishes can be left at room Temperature or kept in a refrigerator. They should be examined daily to monitor the appearance of precipitation lines. Depending on the experimental conditions, the observation period may be limited to 24 hours or extend to several days or even weeks.
NOTES
1. The loaded samples diffuse uniformly in all directions through the gel, and a precipitation line forms in the regions between the wells where the optimal ratio of antigen and antibody concentrations is reached.
2. Evaluation of results:
a) A slight curvature of the precipitation line between the wells is observed if the immune serum filling one well contains Antibodies (anti-A) to the antigen (A) filling one of the other two wells (Fig. 24,1).
b) The precipitation lines merge continuously if the two upper wells contain identical protein antigens (A) and the antiserum diffusing from the lower well contains specific (anti-A) antibodies. This pattern demonstrates antigenic identity (Fig. 24,2).
c) Partial fusion of the precipitation lines (spur formation) occurs when the samples filling the two upper wells consist of two antigenic components, one of which is shared (Axy and Ay), and the immune serum contains antibodies specific to both antigenic components (anti-Ax and anti-Ay). This pattern indicates antigenic similarity (Fig. 24,3). The shape and length of the spur formed at the site of partial fusion depend on the degree of antigenic similarity between the test samples. If the antigens are closely related, i.e., they share many identical determinants, a short spur close to the merging lines is formed. If the compared antigens share few identical determinant groups, a long spur branching sharply from the merging precipitation lines is formed.
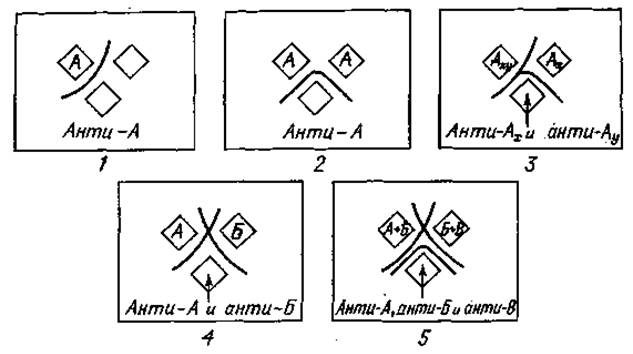
Fig. 24. Evaluation of the results of two-dimensional double immunodiffusion in gel (for details, see text).
d) Precipitin lines intersect if both upper wells are filled with solutions of different antigens (antigens A and B), while the third well contains antiserum containing antibodies to both antigens (anti-A and anti-B). This represents a pattern of non-identity (Fig. 24, 4).
e) If the upper wells contain two different mixtures of antigens (A + B and B + C), and the antiserum filling the third well contains antibodies to each antigenic component of these mixtures (anti-A, anti-B, and anti-C), several precipitin lines are formed; in this case, patterns of both identity and non-identity can be observed (Fig. 24, 5).
f) The patterns described in notes a–e hold true only for balanced systems with approximately equal antigen concentrations in different wells. With significant differences in these concentrations, i.e., in unbalanced systems, asymmetric fusion of precipitin lines occurs; the precipitate forms further from the well containing the more concentrated antigen solution and closer to the well filled with the less concentrated antigen solution. If the differences in antigen concentrations are too large, double precipitin lines or false spurs may form altogether. Unlike true spurs, which indicate partial antigenic similarity, false spurs do not become more pronounced during incubation; instead, they gradually lose clarity and eventually disappear.

Fig. 25. Well arrangement patterns in agar gel.
3. The number of precipitin lines appearing in the agar when using this method corresponds to the minimum number of individual antigen-antibody systems participating in the reaction.
4. The position and curvature of the precipitin lines also depend on the molecular weights of the reacting proteins. If the Molecular Weight of the antigen is lower than that of the antibodies, the precipitin line curves toward the well filled with the antiserum. Conversely, if the molecular weight of the antigen is higher than that of the antibodies, the precipitin line shifts and curves toward the well filled with the antigen.
5. When working with low-concentration antigen solutions, a single Filling of the well may sometimes be insufficient for a precipitin line to appear; however, the antigen solution should only be refilled after the well is completely empty. It should be kept in mind that refilling can cause The formation of double precipitin lines.
6. Depending on the number of samples analyzed, the number and arrangement pattern of the wells in the agar plate may vary. Figure 25 shows several commonly used well patterns. Wells in the agar gel can be made as described above (p. 131) or using a special device.
7. Preliminary Analysis of the test samples can be easily and quickly performed in an agar layer on a glass plate by arranging the wells 3–5 mm apart in two parallel rows. Due to the short distance between the wells filled with antigen and antiserum, precipitin lines should appear very rapidly. Similarly, preliminary titration of antigen or antiserum solutions can be performed by filling rows of wells with reagents at appropriate dilutions.
Another method consists in cutting a 1 mm wide strip in the agar layer on the plate at a distance of 3–5 mm from a row of wells; the antiserum is introduced into the resulting trough, and the antigen solution is placed in the wells.
8. The reaction results can be recorded by photographing either the native preparation or the stained precipitin lines.
A. Direct photographic printing from the agar plate. After the precipitin lines have formed, The surface of the agar gel is washed with distilled Water, and the plate is placed in a photographic enlarger like a negative plate. The subsequent steps are exactly the same as in conventional photographic printing. Using the enlarger lens, the precipitin lines are focused onto photosensitive paper. It is recommended to print on high-contrast photographic paper and use a high-contrast developer.
B. Staining of precipitin lines. Staining the agar plates not only makes the precipitin lines more visible but also increases the accuracy of the analysis by supplementing it with specific color reactions. In addition, special staining Methods allow for a more detailed study of proteins and Lipoproteins.
a) Preparation of the agar plate for staining. After the precipitin lines have formed, proteins that did not participate in the precipitation reaction are eluted from the agar gel. For this purpose, the agar plate is covered with a 0.9% NaCl solution, and elution is carried out for 48 hours, changing the eluting fluid 2–3 times a day.
After elution, the agar gel is covered with a sheet of filter paper of appropriate size, moistened with distilled water, and dried in an incubator at 37°C. Once the agar plate is completely dry, the covering filter paper is peeled off after being moistened with a few drops of distilled water, and the dry agar film is then stained in the same Petri dish in which the reaction was performed.
b) Protein Staining with Amido Black. Staining solution: 0.1 g of Amido Black 10B is dissolved in 100 ml of an acetic acid–methanol mixture (1:9).
Washing solution: acetic acid–methanol mixture (1:9).
Before staining, 10% acetic acid is poured onto the dried agar plate and left for 10 min. The acetic acid is then drained, and the preparation is covered with the Amido Black solution for 60 min. Afterward, the dye is drained, and the excess is removed with the washing solution, changing the solution every 15 min until it remains colorless.
c) Protein staining with Acid Fuchsin. Staining solution: 2.0 g of Acid Fuchsin is dissolved in 500 ml of methanol, then 400 ml of distilled water and 100 ml of acetic acid are added.
Differentiating solution: 500 ml of methanol is mixed with 400 ml of distilled water and 100 ml of acetic acid.
Washing solution: 10% acetic acid.
Before staining, the agar plates are treated with 10% acetic acid for 10 min.
After 30 min of staining, the staining solution is discarded and the agar plate is covered with the differentiating solution. The specimen is then treated with the washing solution, changing it every 15 min until dye elution ceases.
d) Protein staining with azocarmine. Staining solution: 0.5% solution of azocarmine in a methanol–acetic acid mixture (9 : 1).
Washing solution: methanol–acetic acid mixture (9 : 1).
Staining time: 60 min. During washing, the washing solution should be changed every 15 min.
e) Protein staining with Ponceau S. Staining solution: 0.15% solution of Ponceau S in 3% trichloroacetic acid.
Washing solution: 5% acetic acid solution.
Staining time: 60 min. During washing, the washing solution should be changed every 15 min.
f) Lipoprotein staining with Sudan Black. Stock dye solution: 500 mg of Sudan Black B is dissolved in 500 ml of methanol. Before use, the stock dye solution should be kept in a dark place for at least a week.
Staining solution: 100 ml of the stock dye solution is mixed with 180 ml of methanol and 120 ml of distilled water. Before staining, the solution is filtered through a paper filter. After 60 min of staining, the samples are washed with tap water.
g) Lipoprotein staining with Oil Red. Staining solution: 0.5% solution of Oil Red in 50% ethanol.
Washing solution: 50% ethanol.
Staining time: 2 h. The washing solution should be changed every 15 min.
Last update: 06/08/2026
Editorial and Educational Adaptation: This material has been compiled based on the primary/original source text. The project team performed an editorial review, corrected technical inaccuracies, structured sections, and adapted the content for an educational format.
What was processed:
- elimination of formatting defects (OCR errors, structural breaks, corrupted characters);
- editorial organization of content;
- standardization of terminology in accordance with academic sources;
- verification of factual statements against the original source text.
All mentions of the author, publication year, and origin of the primary text have been preserved in accordance with the source.